|
xTuple ERP Reference Guide |
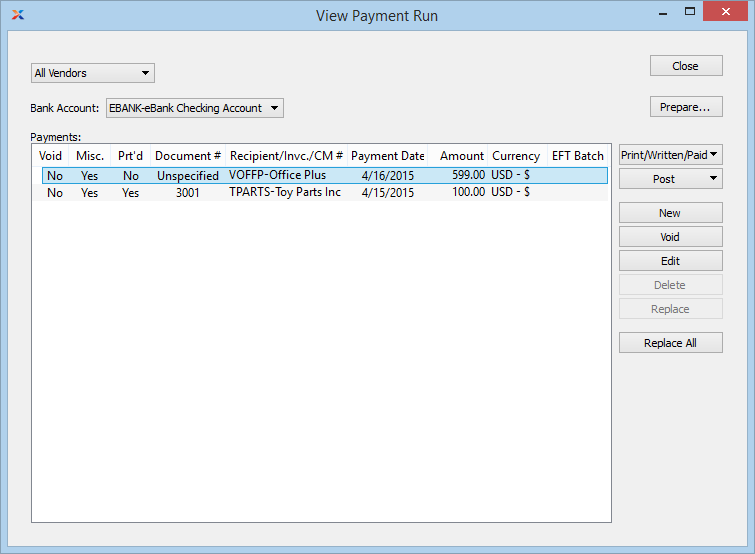
To view a detailed list of payments prepared to be run, go to . The following screen will appear:

When viewing the detailed list of payments prepared to be run, you are presented with the following options:
Select all or specific vendors whose payments you would like to view.
Specify the bank account whose payment run you want to view.
Display lists details for payments included in the payment run. This display is a nested list, with a plus (+) sign located to the far left of the display next to each payment. By clicking your mouse on a plus sign, you reveal lower levels of information related to the payment.
The following buttons are unique to this screen:
Select to prepare a payment run. For more information on preparing payment runs, see Section 1.4.3, “ Prepare Payment Run”.
Select from one of the following options. If a selected payment has already been written and/or paid, you will have the ability to mark the payment as such on the Print Payment screen. The options presented here will be limited if the specified bank account does not require payments to be printed. Also, if the bank account is configured to use electronic funds transfer (EFT), you will be presented with the option to create an EFT file on the Print Payment screen.
Highlight a payment in the list and then select this button to either print the payment or mark it as having been already printed/paid.
Select to print the payment run, using the specified bank account. For more information on printing payment runs, see Section 1.6.3, “ Print Payment Run”.
Prints a copy of the pending payment run for review.
If payments being printed contain reference lines which spill over and exceed one standard page, then consider using the report definition CheckMultiPage.xml. This payment form is designed to support multiple pages for one payment number.
Select from the following context-sensitive posting options:
Highlight a payment in the list of payments and then select this button to post the payment. If the specified bank account requires printing, the payment must be printed or marked as already printed/paid before it can be posted. If printing is not required, the payment may be posted immediately. See the Printed column in the display to determine a payment's printed status.
Select to post all payments available for posting.
Highlight a payment in the list of payments and then select this button to void the payment. Voided payments may not be printed or posted. When a payment is voided, the payable amount will be reopened on the Select Payments screen. In other words, if a payment for $100.00 is voided, that amount will once again be made available for payment on the Select Payments screen. The reopened amount will again be associated with the referring payable document (i.e., voucher or debit memo).
Highlight a miscellaneous payment and then select this button to edit the payment. Only unprinted miscellaneous payments may be edited.
Only unprinted miscellaneous payments may be edited. Regular payments may not be edited.
Highlight a voided payment in the list of payments and then select this button to delete the payment. Only voided payments may be deleted.
Highlight a voided payment in the list of payments and then select this button to replace the payment. Payments must be voided before they can be replaced. When a voided payment is replaced, the payable amount displayed on the Select Payments screen will be removed. In other words, if a voided payment for $500.00 is replaced, that amount will no longer be available for payment on the Select Payments screen.
Select this button to replace all payments shown in the list of payments. Payments must be voided before they can be replaced.