|
xTuple ERP Reference Guide |
The 1099 information features are designed to help you organize and manage your 1099 vendors, as well as your accounts used for 1099 reporting. The following terms are used:
1099 forms are U.S. Federal tax documents with payment information for independent contractors, government payments, interest payments, etc.
1099-MISC forms are related but are used to report on miscellaneous income that 1099 forms do not usually cover.
1096 forms are used to total up all the 1099's and 1099-MISC forms in your database.
In xTuple ERP, 1099 form information is determined based on the combination of vendors marked as 1099 recipients and general ledger (GL) accounts marked to be included in 1099 amounts. For more information about working with 1099's in xTuple, please see the following article: https://www.xtuple.org/docs/1099-information-package.
The reports provided to support this feature were formatted to match preprinted forms available at Staples.
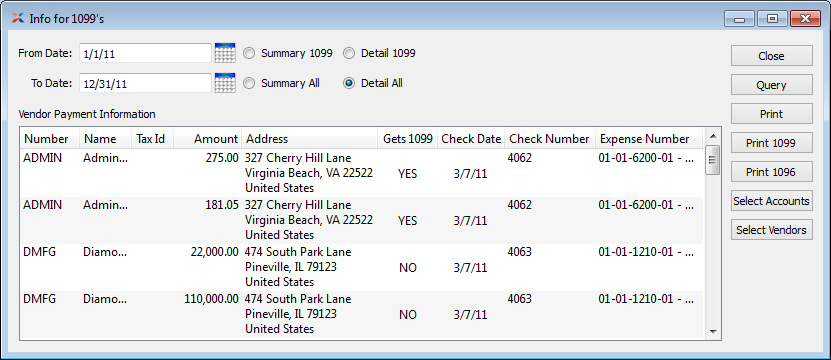
To view and manage your 1099 information, go to . The following screen will appear:

When viewing and managing 1099 information, you are presented with the following options:
Specify the starting date for the date range you want to include 1099 information for.
Specify the ending date for the date range you want to include 1099 information for.
Select to display summary payment information for all your 1099 vendors.
Select to display summary information about all vendor payments during the specified date range, regardless of vendors' 1099 status.
Select to display detailed payment information for all your 1099 vendors.
Select to display detailed information about all vendor payments during the specified date range, regardless of vendors' 1099 status.
The following buttons are unique to this screen:
Select to print a summary 1099 report for all your 1099 vendors. This button is only available when using the Summary 1099 option.
Select to print a summary 1096 report for all your 1099 vendors. This button is only available when using the Summary 1099 option.
Select to open a list of accounts which you can manually designate as being used for 1099 reporting.
Highlight a vendor in the list and then select this button to update the vendor's 1099 status. Using this button is equivalent to turning / the Receives a 1099 flag on the vendor record.
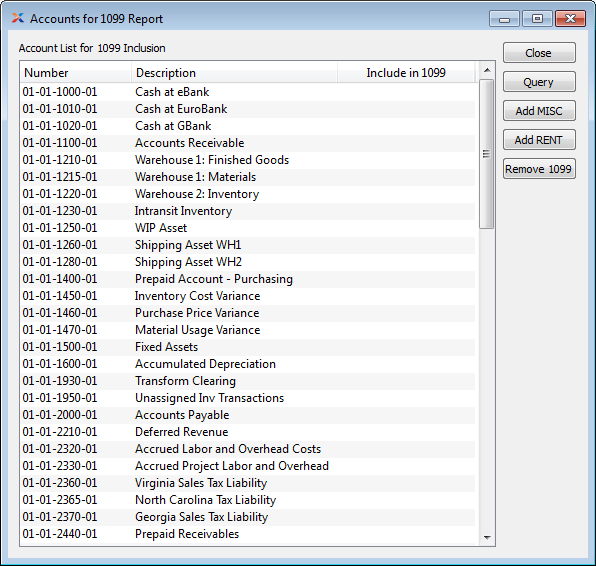
To select the accounts you want to include in your 1099 reporting, choose the button. The following screen will appear:

The Accounts for 1099 screen displays your chart of accounts and allows you to indicate which accounts you want to include for 1099 reporting.
The following buttons are unique to this screen:
Highlight an account and then select this button to add the account as a miscellaneous account for 1099 reporting purposes.
Highlight an account and then select this button to add the account as a rent account for 1099 reporting purposes.
Highlight an account and then select this button to detach the account from 1099 reporting.