
|
xTuple ERP Reference Guide |
|
|
xTuple ERP Reference Guide |
| 2.1. New Simple Sales Order | ||
|---|---|---|
 | 2. Sales Order |  |
To support environments where you don't need complex sales orders (e.g., counter sales, retail, etc.), xTuple offers a simple sales order. As its name implies, the simple sales order provides an easy-to-use interface for quickly processing simple sales orders. The screen provides an alternative to the regular Sales Order Entry screen and may be used in conjunction with it. Because the simple sales order is optional, it must be specifically enabled in the module configuration before it can be used.
To create a new simple sales order, go to . The following screen will appear:

When creating a new simple sales order, you are presented with the following options:
Next available sales order number will automatically display, unless your system requires you to enter sales order numbers manually. Default values and input parameters for sales order numbers are configurable it the menu.
Enter a customer purchase order number, as needed.
Specify the supplied from site for the order. By default, the logged in user's preferred site will be used.
Specify the tax zone for the order. If the default customer (or other specified customer) does not have a default ship-to address and associated tax zone, then the tax zone for the site will be used.
Specify the customer associated with the sales order. By default, the cash-paying customer defined in your module configuration will be displayed here. However, you may easily select a different, pre-existing customer—or enter a new customer record—during order entry.
If the specified customer has exceeded their credit limit, the screen will revert to using the default cash-paying customer.
Enter the number of the preferred ship-to address. Customers may maintain multiple ship-to addresses.
Enter the item number of the item you want to sell. The item list will contain sold items available for sale to the specified customer. The list of available items may vary from customer to customer, depending on how pricing schedules are implemented at your site.
Enter the quantity of the specified item being ordered. By default, the quantity entered will be "1." However, you may manually override the default quantity.
The following buttons are unique to this screen:
Select to save the order and save it for processing later. You may be prompted to print a sales order acknowledgement form if your module is configured to do so.
Select to enter a new simple sales order.
To process payment for the order, select the tab. The following screen will appear:
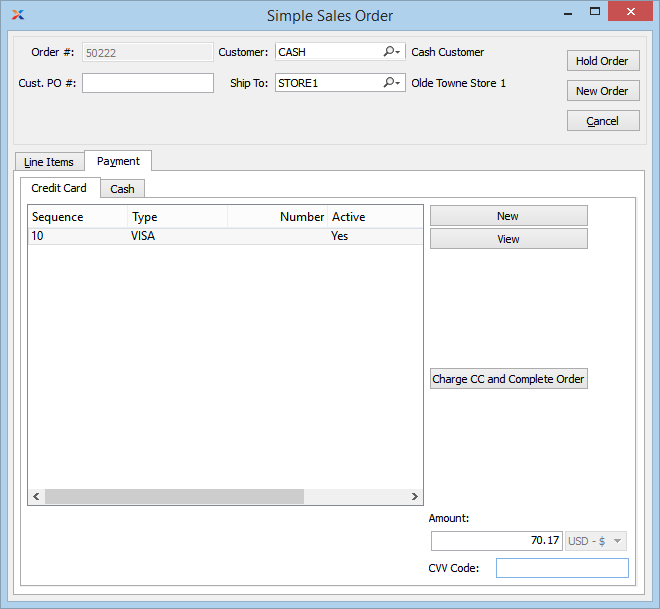
When processing a credit card payment for the order, you are presented with the following options:
List will display credit cards already on file for the customer, if any. Highlight the credit card you want to use for the transaction prior to selecting the button. If none exist, you can create a new credit card record by selecting the button.
The order total will be displayed here.
Enter the card verification value (CVV) code found on the back of the specified credit card. This may be an optional feature at your site. Contact your systems administrator for details.
The following buttons are unique to this screen:
Select to create a new credit card record for the customer.
Highlight a credit card record on file and then select this button to view the credit card information.
Select to charge the highlighted credit card and complete the order. You may be prompted to print a shipping packing list and/or an invoice if your module is configured to do so.
To process a cash payment for the order, select the tab. The following screen will appear:
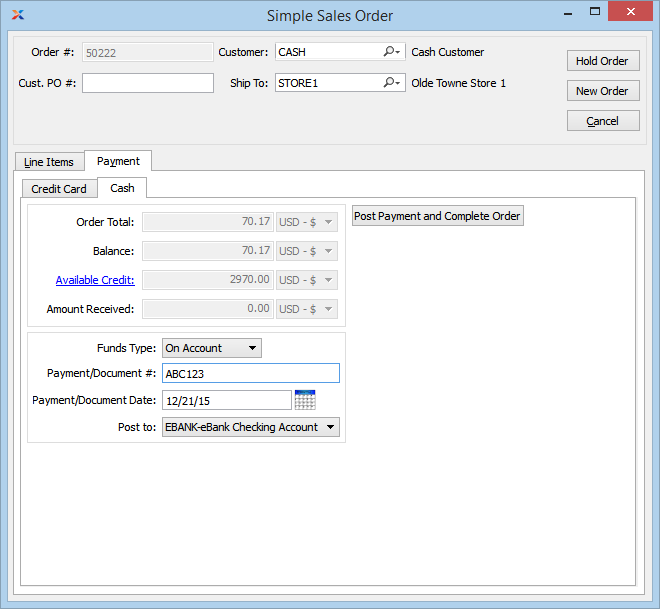
When processing a cash receipt for the order, you are presented with the following options:
Displays the total for the order.
Displays the balance due for the order.
Displays the value of the customer's outstanding credits, if any.
Enter the amount of cash being received against the order. If the customer's credit status is good and the funds type is set to On Account, this field will be disabled.
Specify the type of funds being used for the cash receipt. Choose from the following types: on account, cash, check, certified check, wire transfer, and other.
The On Account funds type will only be shown if the specified customer has not exceeded their credit limit. If they have, the type will be hidden and the default cash-paying customer will be used instead.
Use this field to enter the customer's payment number, transaction number, credit card number, or any other document number you wish to associate with the cash receipt.
Use this field to specify the date on the payment you received. This is the document date used when running the receivables aging report.
Select the bank account you want to post the cash receipt to. The asset account used for the selected bank account is specified on the Bank Account master.
The following button is unique to this screen:
Select to post the cash receipt and complete the order. You may be prompted to print a shipping packing list and/or an invoice if your module is configured to do so.
| |  | |
| 2. Sales Order |  | 2.2. New Sales Order |