
|
xTuple ERP Reference Guide |
|
|
xTuple ERP Reference Guide |
| 13.2.8. EDI Profiles | ||
|---|---|---|
 | 13.2. Master Information |  |
The electronic data interchange (EDI) system supports the export of documents and files using either of the following two delivery methods:
FTP
EDI profiles are the master records which describe what information to send and how to send that information to EDI recipients—whether those recipients are customers, suppliers, or intermediaries such as VANs (value-added networks). When creating an EDI profile, you specify delivery method, recipient details (or how to retrieve these from the database), and output format. The following output formats are available:
xTuple report (.PDF)
Comma delimited (.CSV)
Tab delimited (.TSV)
HTML
XML
Using different combinations of delivery methods, output formats, and database queries, you have the flexibility to create a wide range of unique EDI profiles.
The EDI system exports files using the xTuple Connect batch manager. The batch manager must be installed and running at your site for EDI exports to be successful.
To access the master list of EDI Profiles, go to . The following screen will appear:
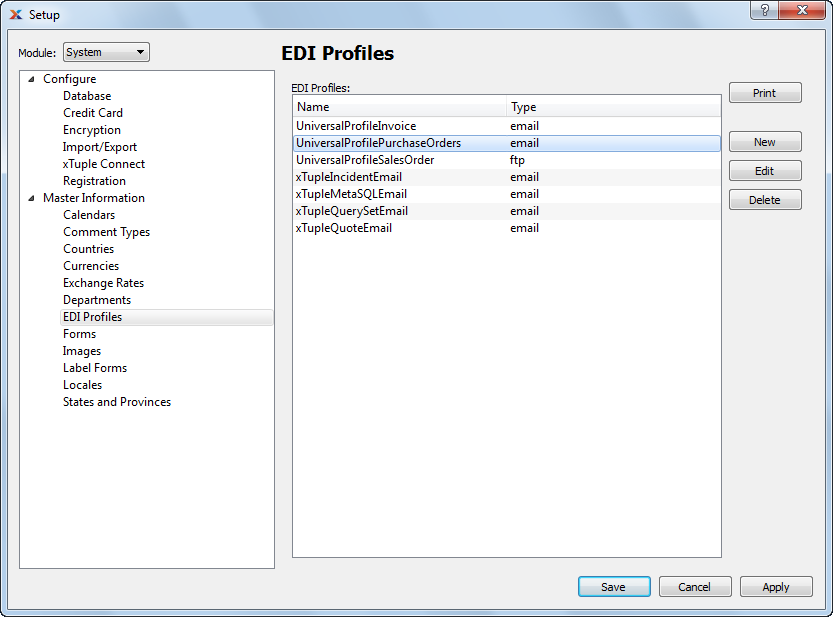
The EDI Profiles screen displays information on all existing EDI profiles.
To create a new EDI profile, select the button. For this example, we have chosen the email delivery method, as shown in the following screenshot:
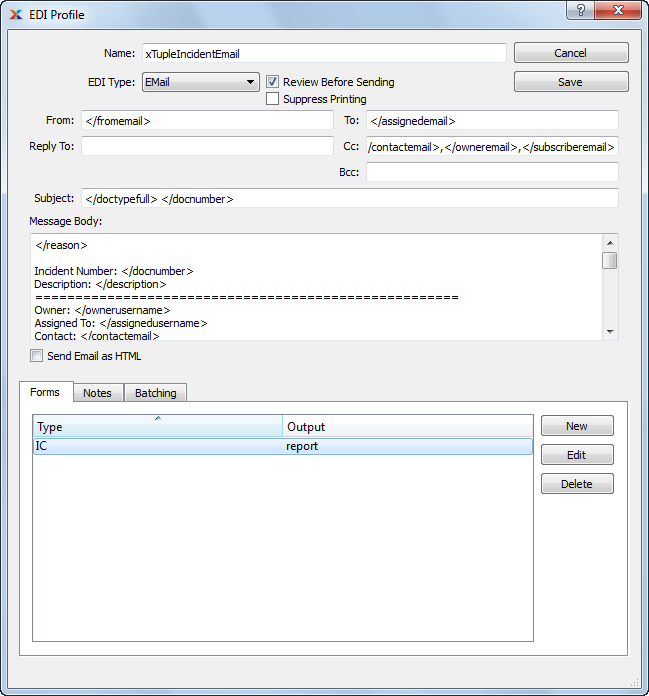
Create new EDI Profile for email delivery
The screen options will vary depending on which EDI delivery method you select—email or FTP.
When creating an EDI profile using the email delivery type, you are presented with the following options:
Enter a brief name to identify the EDI profile. This is the name which will appear when the profile is cross-referenced throughout the application—in the Customer master, for example.
For this example, we have selected the delivery method. Selecting the option indicates that recipients will receive EDI documents via electronic mail. Most documents will be attached to the email after the message body.
Select if you want to review outgoing emails before they are sent. When selected, users will be presented with an editable view of the outgoing email. During the review step, you will have the option to either continue (i.e., send) or cancel the email. Edits made to the view of the email will be received by the recipient but will not be saved to the database. To make permanent changes, you must cancel the email, make edits/changes in the xTuple client, then send again. If this option is not selected, emails will be sent automatically without review.
Select to suppress the operating system print dialog when printing documents for customers/vendors linked to the EDI profile. Users will still be presented with an xTuple print dialog. However, the operating system's print dialog will be suppressed, effectively preventing the actual printing of the document. If not selected, documents may be printed.
This is the email address of the person sending the email. It can be set to a particular person's email address or to a generic address (e.g. sales@xtuple.com). If it is left blank on this screen, the batch manager will fill in the email address of the user running the application when an EDI message gets prepared.
This is the reply-to address that will be set on the outgoing email message. This controls the email address used when someone replies to an email sent by xTuple ERP. If the From address is left blank or is set to the application user's email address, it's a good idea to set the Reply To address to a generic address. This is especially useful if there is an email address shared by an entire department. If this is left blank, replies will normally be sent to the From address.
Enter the email address to be used as the default recipient address whenever documents are emailed using this profile.
Send documents to multiple recipients by separating email addresses with a comma. Be sure to omit any spaces between addresses when using commas to send copies to multiple recipients.
Enter the email address to be used as the default carbon copy address whenever documents are emailed using this profile.
Enter the email address to which copies of the email will be sent using this profile. BCC differs from CC in that none of the recipients will see the BCC addresses. It is a good idea to set this to an address that will have its inbox archived or to an email address shared by a department. This way there is a history of the transmission or the entire department knows what has happened.
Enter a default email subject line to be used whenever documents are emailed using this profile.
Use this text field to enter the default message that will accompany any documents emailed using this profile.
Select if you want the body of the email to be sent as HTML. If not selected, the email will be sent as plain text.
Displays the EDI form(s) associated with the profile. Forms control which types of document can be sent using this EDI profile—if the EDI profile does not have a form for a document type, that document type cannot be sent using this EDI profile. Forms also control the names and values of replacement tokens (see Section 13.2.8.1.1, “EDI Form”).
This is a scrolling text field with word-wrapping for entering notes related to the profile.
This allows for creating and sending EDI files on a schedule, instead of creating and sending the files individually as the requests come in. Typically EDI requests are immediately processed whenever a user prints a document that should also be sent by EDI. To process all EDI requests for a profile in batches, create a recurring EDIBatch job for that profile using the tab. When the EDIBatch job runs, it creates individual scheduled jobs for each EDI file to be created and sent.
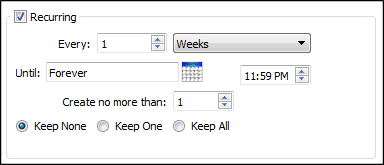
When creating a recurring event, you are presented with the following options:
Check this box if you want the event to repeat itself at regular intervals, using the frequency settings you specify below. Recurring events are generated when you run the Recurring Items utility, which is described in more detail here: Section 9.2, “Create Recurring Items”.
Enter a number and select a unit of time to describe how frequently you want the event to occur. You can choose any regular schedule, ranging from once every 1 minute to once every 99 years.
Enter a date and time at which to start the first event. The default value is the time the screen opened. The From option only appears on some screens.
Enter a date and time after which the event should no longer occur.
Enter the maximum number of future copies of this event you want the system to maintain. Whenever the Create Recurring Items screen is run, it will create up to the number you enter here.
If you delete all copies of a recurring event, the event will stop repeating even if the until date has not yet been reached. xTuple recommends setting this to at least 2 to reduce the likelihood of deleting all copies of the event.
Select to make the next job catch up if work was missed.
Select to create one catch-up job if work was missed.
Select to create any missed jobs.
Whenever an EDIBatch job runs, the xTuple Connect batch manager will use the provided email address properties to send email about the EDIBatch job itself. This email tells the recipients how many RunReport, FTPReport, EmailCSV, FTPCSV, etc. jobs were generated but does not give information about the success or failure of the individual jobs.
This email configuration is stored as part of the EDIBatch job. If you delete all copies of the EDIBatch job, the email configuration information will also be deleted.
Certain special character sequences exist that you can use to build your EDI profile. You can enter these EDI tokens in any of the text input fields on the EDI Profile window (except the Name, of course). You can also define your own tokens by writing database queries (see Section 13.2.8.1.1, “EDI Form”). The system defines the following tokens:
</docid>This is the internal document ID of the document being sent.
</docnumber>This is the document number of the document being sent.
</doctype>This is the internal version of the type of document being sent.
</doctypefull>This is a human readable version of the </doctype>.
The primary key ID for the document, named for the Primary Key field of that document (e.g., </invchead_id>).
Table 9.5. Values of EDI replacement tokens for different document types
| </doctype> | </doctypefull> | document-type-specific token |
|---|---|---|
| AR | A/R Statement | cust_id |
| CM | Credit Memo | cmhead_id or aropen_id, depending on context |
| IC | Incident | incdt_id |
| IN | Invoice | invchead_id |
| PO | Purchase Order | pohead_id |
| QT | Quote | quhead_id |
| SO | Sales Order | cohead_id and sohead_id |
To create a new EDI profile using the FTP delivery method, select the button from the EDI Profiles master list. Once the new Profile screen opens, choose the option. As the following screenshot shows, the screen options change when is selected:
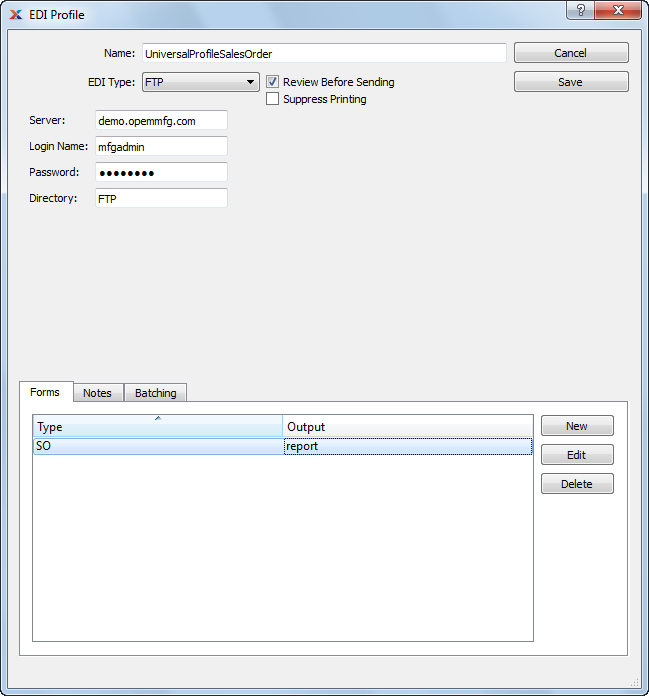
When creating a new EDI profile using the FTP delivery method, you are presented with the following options:
Enter a brief name to identify the EDI profile. This is the name which will appear when the profile is cross-referenced throughout the application—in the Customer master, for example.
For this example, we have selected the delivery method. Selecting the option indicates that recipients will receive EDI documents as files transferred by FTP to the server address specified in the profile.
Enter the host name or IP address of the FTP server where EDI documents should be transferred.
Enter the login name required to access the specified server.
Enter the password required to access the specified server (this value is not encrypted in the database).
Specify the directory location (if any) where EDI documents transferred by FTP should be placed. By default, EDI documents will be placed in the top level directory.
Displays the EDI form(s) associated with the profile.
This is a scrolling text field with word-wrapping for entering notes related to the profile.
EDI forms specify the file format an EDI profile will use. They also define replacement tokens to fill in email or FTP details and to use when running reports or queries. To associate an EDI form with a profile, select the button. For this example, we will choose the format, as shown in the following screenshot:
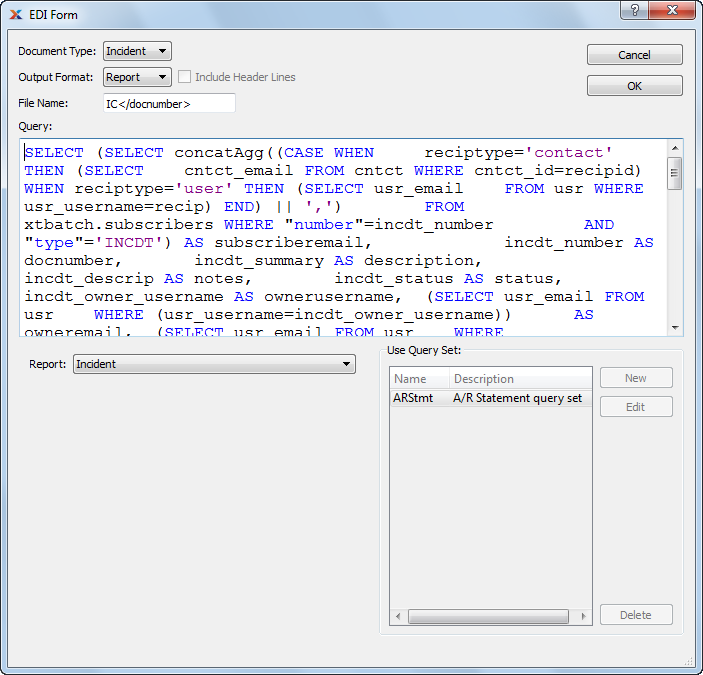
Create new EDI Form using report format
When creating a new EDI form using the format, you are presented with the following options:
Select the type of document the form will be used for. The following document types are supported: A/P memo, A/R memo, A/R statement, sales credit, incident, invoice, MetaSQL statement, packing list, pick list, purchase order, query set, quote, and sales order.
For this example, we have selected the output format. Selecting the option indicates that document information will be written using the report definition specified below. Documents will be forwarded to EDI recipients in .PDF format. The following output formats are supported: report, CSV, HTML, and XML.
When selecting CSV or HTML as the Output Format, check this box to include a line containing column headings.
Enter a standard file name to be used when documents are forwarded to EDI recipients using this EDI form. You may enter tags to generate dynamic file names using information stored in your database. In the example shown, the file name will include the specific invoice number of each invoice being forwarded to EDI recipients, the customer number, and the date the EDI is generated.
This is an optional field to be used if you want to define your own replacement tokens. The example uses a SQL statement to select the customer number for this invoice and the current date as year, month, and date separated by underscores (_). You will note in the WHERE clause that MetaSQL is used to dynamically capture the specific customer number using the system-defined docid token (the "</>" wrapper is replaced by the MetaSQL <? value("") ?>). For more information on writing queries using MetaSQL, please see the Report Writer User Guide.
Tokens defined in this query can also be used on the EDI Profile screen. For example, the query in the example above also retrieves the sales rep's name and email address. The message body on the EDI Profile window could be changed to end with the token "</salesrep_name>" and the From address could be set to </usr_email>. If you do this, invoice emails will always be signed with the name of the sales rep and sent from the sales rep's email address if s/he is also defined as a user and employee.
Specify the report definition you want to associate with the EDI form.
The Use Query Set feature is not used with the report output format.
To create a new EDI form using comma separated value (CSV) format, select the button from the EDI Profiles master list. Once the new Profile screen opens, choose the option. As the following screenshot shows, the screen options change when is selected:
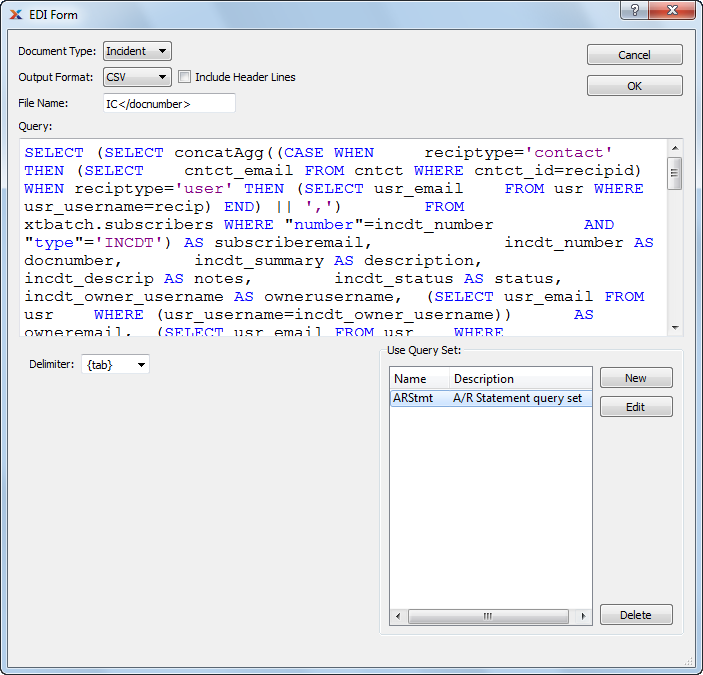
Create new EDI Form using CSV format
When creating a new EDI form using the CSV format, you are presented with the many of the same options as for reports. However, the option is replaced with the following:
Select one of the following delimiter options:
Select to generated comma-delimited CSV files.
Select to generated tab-delimited CSV files.
You may also define your own delimiter. It must be a single, non-space, printing character (e.g. * or : ).
Displays a list of all the query sets currently defined. Select the query set you want to run to generate the CSV data. If there is more than one SQL statement in the query set, each query will be run in the order specified in the query set and the data will be written to the CSV file in the same order.
If the selected output format is XML, you can either accept the default xTuple XML output or transform this with an XSLT stylesheet. If you need to transform the output, create an XSLT stylesheet, register it in the system (see Section 13.1.4, “Import/Export”), and select it from the alternate XML list.
HTML and XML are also supported as an output format. HTML output is much like CSV output, with the data presented as rows and columns in HTML tables instead of separated by line breaks and a single delimiting character. For XML, you will be given the option to send using either xTuple XML or an alternate XML.
To create a new form detail query to be used when generating CSV file output, select the button. The following screen will appear:

Create new EDI Form detail query
When creating a new form detail query, you are presented with the following options:
Enter a name to identify the form detail query. In the example shown, the name indicates the query will return information to be used in the header of the CSV file output.
Select a value between one and 99 using the arrows located to the right of the field. The value entered specifies the order in which a query will be executed.
Choose the type of query. Available options are , and .
Enter a SQL query to identify the information you want to populate your CSV file with. As you can see in the example, the query selects invoice header information from the invchead table. You will note in the WHERE clause that MetaSQL is used to dynamically capture the specific invoice number using the system-defined docid token (the "</>" wrapper is replaced by the MetaSQL <? value("") ?>). You may also use any tokens defined in the EDI form query to build the EDI form detail query. For more information on writing queries using MetaSQL, please see the Report Writer User Guide.
This is a scrolling text field with word-wrapping for entering notes related to the EDI detail query.
| |  | |
| 13.2.7. Departments |  | 13.2.9. Forms |