
|
xTuple ERP Reference Guide |
|
|
xTuple ERP Reference Guide |
| 6.4. View Financial Report | ||
|---|---|---|
 | 6. Financial Statements |  |
Once a financial report has been created using the financial report layout tools, you may then generate it using time-phased information. To view a financial report, go to . The following screen will appear:
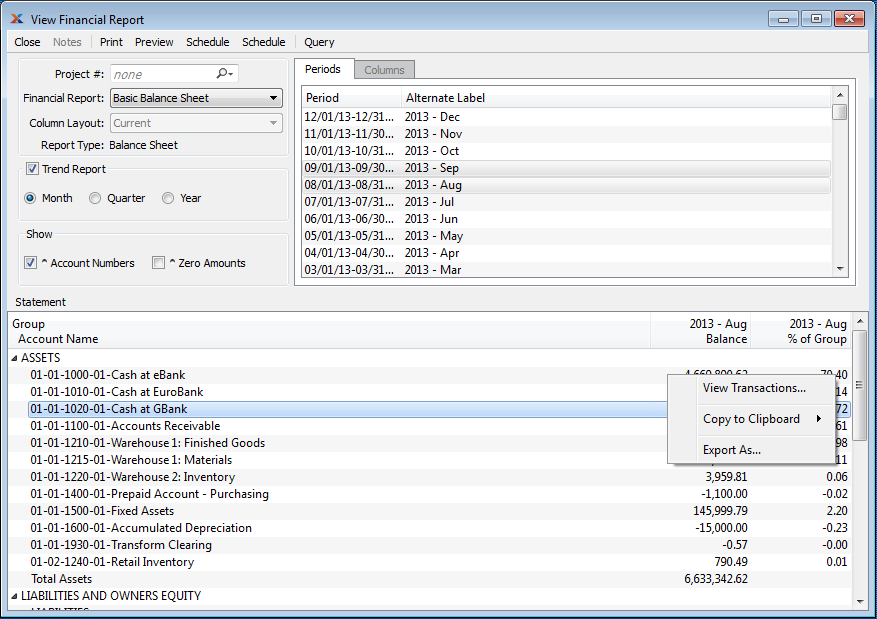
When viewing a financial report, you are presented with the following options:
If you have the xTuple Project Accounting package installed, enter a project number to display financial reports by project.
Specify the financial report you want to generate. The list will include both system-defined financial reports (e.g., basic income statement and basic balance sheet) and also any other reports you may have created.
Select the column layout you want the financial report to use. This feature may not be used in conjunction with the Trend Report option. When defining a financial report using one of the standard report types (i.e., balance sheet, income statement, or cash flow), you must define a column layout to specify the time buckets financial information will be sorted into. A standard financial report may have any number of column layouts defined for it. Each layout will be linked to either a pre-defined report definition or a custom report definition you create yourself. This option will be disabled for ad hoc reports, which do not use column layouts.
Displays the report type for the financial report you select: balance sheet, income statement, cash flow, or ad hoc.
The options available on the screen will vary, depending on the report type selected. For example, column layouts are not available for ad hoc reports.
Specify the accounting period(s) whose details you want to display. For financial reports created using one of the standard report types (i.e., balance sheet, income statement, or cash flow), you can only select a single accounting period—unless you are running a trend report, in which case multiple periods may be chosen. Ad hoc reports may always use either single or multiple periods. To select an individual period, highlight the period using your mouse button. The period is now selected. To select a sequence of periods, highlight the first in the sequence using your mouse button. Then, holding down the key on your keyboard, highlight the last period in the sequence. The entire sequence is now selected. To select periods that are out of sequence (e.g., January, April, July, October), highlight the first period in the group. Then, holding down the key on your keyboard, highlight the next period you want to select. Continue highlighting periods with the key depressed until all desired periods are selected. The entire group is now selected.
You can export the generated financial data in tab-delimited format using the Export Contents option from the right-click menu.
For ad hoc reports (which do not use column layouts), specify the columns of information you want to include in the financial report. To be successful, these selections must also match the ad hoc report layout. If a column is not selected, it will not be included in the report. This option will be disabled for non-ad hoc reports, whose column choices are defined by column layouts.
Select to include a beginning balance column in the report. An alternate label may also be used to identify this field.
Select to include a beginning balance percentage column in the report. An alternate label may also be used to identify this field.
Select to include a debits column in the report. An alternate label may also be used to identify this field.
Select to include a debits percentage column in the report. An alternate label may also be used to identify this field.
Select to include a credits column in the report. An alternate label may also be used to identify this field.
Select to include a credits percentage column in the report. An alternate label may also be used to identify this field.
Select to include an ending balance column in the report. An alternate label may also be used to identify this field.
Select to include an ending balance percentage column in the report. An alternate label may also be used to identify this field.
Select to include a budget column in the report. An alternate label may also be used to identify this field.
Select to include a budget percentage column in the report. An alternate label may also be used to identify this field.
Select to include a column showing the difference between debits and credits in the report. An alternate label may also be used to identify this field.
Select to include a difference percentage column in the report. An alternate label may also be used to identify this field.
Select to include a custom column in the report. An alternate label may also be used to identify this field.
Select to include a custom column percentage column in the report. An alternate label may also be used to identify this field.
Select to generate a financial report which groups information across multiple time periods. This option may be used regardless of report type—and if used for one of the standard report types (i.e., balance sheet, income statement, or cash flow), the column layout option will be disabled. If selected, the following options will be available:
If selected, you may group together any number of accounting periods to include in your report. Use your mouse and a combination of the and keys to select multiple periods.
If selected, you may group together any number of quarters to include in your report. Use your mouse and a combination of the and keys to select multiple quarters.
If selected, you may group together any number of fiscal years to include in your report. Use your mouse and a combination of the and keys to select multiple fiscal years.
There is no relationship between the selected periods in a column layout and the trend report options available when viewing a financial report. Trend reporting ignores column layouts.
For ad hoc reports (which do not use column layouts), specify the columns of information you want to include in the financial report. To be successful, these selections must also match the ad hoc report layout. If a column is not selected, it will not be included in the report. This option will be disabled for non-ad hoc reports, whose column choices are defined by column layouts.
Select to include a beginning balance column in the report. An alternate label may also be used to identify this field.
Select to include a beginning balance percentage column in the report. An alternate label may also be used to identify this field.
Select to include a debits column in the report. An alternate label may also be used to identify this field.
Select to include a debits percentage column in the report. An alternate label may also be used to identify this field.
Select to include a credits column in the report. An alternate label may also be used to identify this field.
Select to include a credits percentage column in the report. An alternate label may also be used to identify this field.
Select to include an ending balance column in the report. An alternate label may also be used to identify this field.
Select to include an ending balance percentage column in the report. An alternate label may also be used to identify this field.
Select to include a budget column in the report. An alternate label may also be used to identify this field.
Select to include a budget percentage column in the report. An alternate label may also be used to identify this field.
Select to include a column showing the difference between debits and credits in the report. An alternate label may also be used to identify this field.
Select to include a difference percentage column in the report. An alternate label may also be used to identify this field.
Select to include a custom column in the report. An alternate label may also be used to identify this field.
Select to include a custom column percentage column in the report. An alternate label may also be used to identify this field.
Select to generate a financial report which groups information across multiple time periods. This option may be used regardless of report type—and if used for one of the standard report types (i.e., balance Sheet, income statement, or cash flow), the column layout option will be disabled. If selected, the following options will be available:
If selected, you may group together any number of accounting periods to include in your report. Use your mouse and a combination of the and keys to select multiple periods.
If selected, you may group together any number of quarters to include in your report. Use your mouse and a combination of the and keys to select multiple quarters.
If selected, you may group together any number of fiscal years to include in your report. Use your mouse and a combination of the and keys to select multiple fiscal years.
There is no relationship between the selected periods in a column layout and the trend report options available when viewing a financial report. Trend reporting ignores column layouts.
You may optionally select one or both of the following options:
Select to include account numbers for each row in the Group/Account Name column. If not selected, only account descriptions will be shown.
Select to include accounts with zero amounts for each row in the Group/Account Name column. If not selected, only accounts with non-zero amounts will be shown.
Display lists financial report details for the selected financial report, using the specified parameters. This display is a nested list, with a plus (+) sign located to the far left of the display next to each financial report group that may be expanded to lower levels. By clicking your mouse on a plus sign, you reveal lower levels of information related to the group. From the layout, you can right-click on individual accounts to view the underlying G/L transaction detail. The right-click feature is context-sensitive and works only on rows that contain G/L account numbers and columns that contain numbers for actual G/L account total values.
The following buttons are unique to this screen:
Select to add notes which will appear at the bottom of the financial report when the financial report is printed. Notes entered here must be associated with a specific accounting period. These notes are saved and remain associated with the accounting period. They will be included whenever you print a financial report that includes the accounting period. If the button is disabled, that means you have not selected a single, specific accounting period to write the notes to. For example, you cannot write notes on a trend report. You can, however, write notes on all the accounting periods covered by a trend report and then print the trend report and see the notes listed at the bottom. The notes entered here do not conflict with notes entered on the financial report definition itself. Those notes will also be printed at the bottom of the financial report—regardless of the reporting periods selected.
| |  | |
| 6.3. View Trial Balances |  | 7. Fiscal Calendar |