
|
xTuple Admin Guide |
|
|
xTuple Admin Guide |
| 9.2. Take a Practice Swing | ||
|---|---|---|
 | 9. Applying Updater Packages with the Updater |  |
Restore the backup into a new database so that you have something to practice on. By upgrading a copy you can test for problems that might arise during the upgrade:
Prerequisite check failures.
Upgrade performance.
Failures caused by false assumptions about the data or schema.
Start the Updater application and log in to the database you want to upgrade. This login procedure is the same as when logging into any xTuple application. Once you have logged in, select the menu option and choose the first package you want to use.
You should log in to the Updater as the default xTuple superuser (e.g., admin or mfgadmin) to ensure your upgrades are performed successfully. The Updater warns you if you try to log in without being a superuser.
By default, the Updater runs an entire series of upgrade scripts as a single commit that will be rolled back if any errors are encountered. This ensures that databases will not be left in a partially-upgraded state if errors are encountered during the upgrade process. Either a database is upgraded to the next version successfully, or the upgrade is cancelled and the database is restored to its original state.
When a package is loaded it will first check to see if your database meets a series of prerequisites. If those requirements are met, the Updater will indicate the check for requirements has been successful. This means you may proceed with the update. If those requirements are not met, you will see a list of messages describing the problems and you will need to fix the data before you can upgrade. See Debugging Upgrade Errors if you are unsure how to proceed at this point.
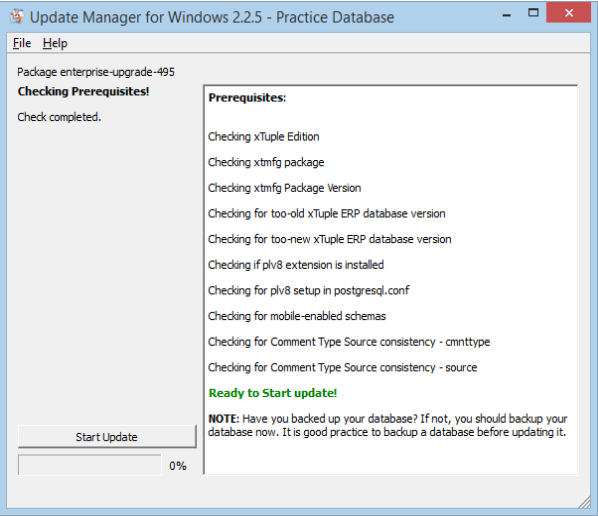
Version upgrade package loaded in Updater
After a successful requirements check, click the button to start update processing. As the update progresses, you will see various messages indicating the progress of the update. You will also see a progress bar just below the button.
Depending on the exact state of your database, you may get some error messages. Some of these errors may be safely ignored-- especially those which indicate plainly that they were ignored. Other errors may require you to take specific actions. You should examine such errors closely. After examination, you may either choose to ignore the error, retry after correcting the problem in the database, or abort the update altogether. If there were some errors which were ignored during the processing, newer versions of the Updater (2.0.0) will ask if you want to roll back the changes or accept them in spite of the errors. Either way, you can always go back to your original database as long as you remembered to make a backup copy before you started the upgrade.
Once all the structural database changes have been made, the Updater will update any new reports that are available.
Reports have grades. When printing reports, the report with the highest grade is the one printed first. You can have any number of reports with varying grades loaded into your database. Reports with a grade of 0 are considered xTuple stock reports. Reports with a grade higher than 0 are considered custom reports. If you have a custom report, you should be sure to save it with a grade of 1 or higher. Grading your custom reports appropriately will prevent custom reports from being overwritten by stock reports during the update process. xTuple reserves the right to overwrite any and all reports having a grade of 0 during the update process.
When the Updater progress bar reaches 100%, you may open a new package or close the Updater application. Your database is now updated to the next version.
Note that if you are updating over several releases, practicing now will help you find a lot of problems before you attempt to update your production database.
| |  | |
| 9.1. Before You Start |  | 9.3. The Real Deal |