
|
xTupleCommerce Product Guide |
|
|
xTupleCommerce Product Guide |
| 3. The Product Catalog | ||
|---|---|---|
 | Chapter 2. Product Management |  |
A product catalog is the method xTupleCommerce uses to group together the products you sell online. The catalog may include any number of high level groups, with related sold items rolled up underneath each group. In this way, customers can search for products online by logical category, thus improving the user experience.
The item groups feature in the ERP is used to create the online product catalog. The parent item group serves as the host, while the "child" or "nested" item groups represent the various product categories you define. The following screenshot provides an example:
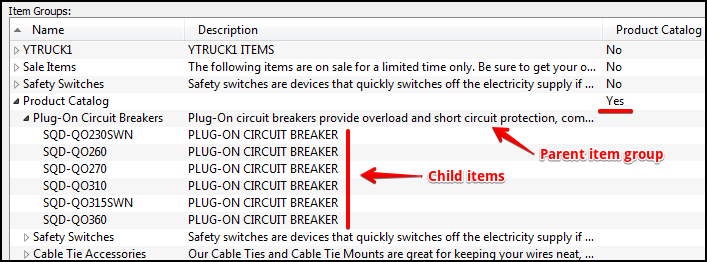
Product Catalog with nested item groups
To get started creating your product catalog, follow these steps:
Go to .
Create a new item group. This will be the parent item group (i.e., the product catalog).
Give the new item group an appropriate name―for example, "Product Catalog."
Be sure to select the check box for Product Catalog to alert xTupleCommerce that this is the parent item group whose contents should be displayed online.
Only one item group may be designated as the product catalog.
Click ―this will close the screen.
Create additional item groups to represent the various categories of products you intend to sell online. The description will be displayed under the item group name on the portal but is not a required field.
Each child item group needs to have a unique name. The name will be displayed as-is online.
For each item group in the product catalog, be sure to add the product catalog item group as its parent. This will ensure all child item groups will be displayed online as part of the product catalog.
Add items to each of the item groups as needed, using the Member Items tool.
Add an image to represent the item group on the web portal by using the tab on the item group. To learn more about how to add images, please read Section 2.3, “Images and Documents”.
Once finished, click .
Item groups are fairly flexible. If you do not like your initial setup, you can easily make changes and the changes will be reflected online. Here are a few points to note about item groups:
Items can be in more than one item group but they must have unique names.
You can add items to an item group, but delay activating them on the portal until a later time. Products will not appear online until you activate them by checking the Published on Web site checkbox on the tab of their item master.
You can create nested item groups (i.e., a nested item group is an item group within an item group).
Once you've added the product catalog, it should immediately appear on the portal. If the product catalog does not display for you immediately, clear the portal's cache. For more information about how to flush the cache, please read Section 1, “Flushing the Cache”.
| |  | |
| 2.8. Backorder Products |  | Chapter 3. Online Content Management |