
|
xTupleCommerce Product Guide |
|
|
xTupleCommerce Product Guide |
| 4.3. Form | ||
|---|---|---|
 | 4. Content Types |  |
Forms are another one of the available content types. With forms, you have the ability to create data entry forms that allow your customers and prospects to engage with and interact with you online. For example, a simple Contact Us form lets users communicate with you on subjects of interest to them. Your portal can contain multiple different forms, with varying levels of complexity. Users with manager-level privileges can create and edit forms.
To add a new form, follow these steps:
Go to .
Fill out the title and description for the form.
The description appears above the form on your page.
Then add a slug (a.k.a.. alias). The text of the slug will be used in the URL for the form. For example, the slug "contact us" would be displayed as https://www.example.com/contact-us.
To add the form to your portal's menu structure, select the option. This is optional.
Create a title for the menu link and an optional description.
Specify where in the menu structure you want the form to appear by using the Parent Item drop-down feature. Choose the parent menu item you want the form to appear under.
Click .
Once you've created your form, you'll need to define the fields it contains, and other information. To do this, follow these steps:
If you are still editing your form, you will see an option for in the Admin menu. Click on this option. (If you do not see it, look for the tab next to the tab on the main form view.)
Start by adding the label you want your form to contain in the New component name field. For example, a Contact Us form might include the following fields:
First Name
Last Name
Email Address
Phone Number
Date to Call for Demo
Comments
Select the type of field for each field you create. Types of fields include text field, email address, text area, options, etc. Below is an example of various components and fields:
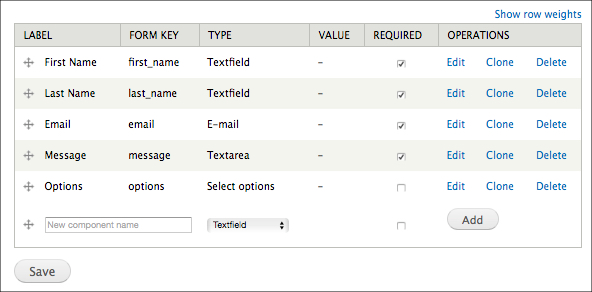
Webform fields
If the field of information is required, check the Required checkbox. This will tell the system that the user is not able to submit the form until all of the required fields are filled out. If a user tries to submit a form without answering a required field, they will receive an error.
Click .
You are free to update the Form Component page when it appears. However, the default settings are typically okay for most simple forms. The exception would be if you have an options field which requires you to include a list of the options. If you do not need to make any updates, scroll to the bottom of the page and click .
Repeat this process as many times as necessary, until you've added all the fields you need on your form.
Rearrange the ordering of the fields as necessary, using the cross hairs on the far left side of the table.
Click .
You can now view the full form as your end users would experience it, by navigating to the main form view.
Once form submissions start coming in, you will see the results on the tab of the form.
Once a form is submitted, an email will go out to the user confirming their form submission. In addition, an email will be sent to you or someone on your team notifying you of the form submission. All of the settings related to these form submission emails are managed on the web portal using the following steps:
Login to the web portal as a manager or editor.
Go to .
Click on the option.
In the Admin menu, notice to the right side of the menu that a new option has appeared called . Hover over it—don't click on it—and a drop-down list will appear, as shown below:
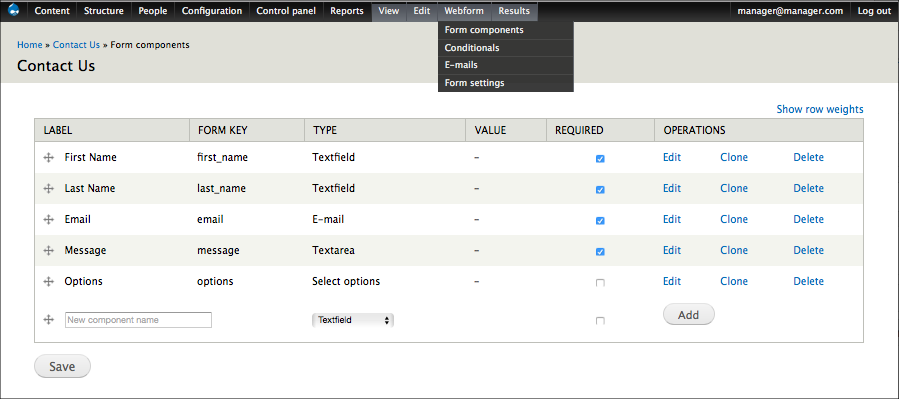
Form E-mails
If the drop-down doesn't appear, refresh your page and hover over again. The drop-down should appear now.
From the list, click .
Once on the E-mails page, you can add the email address of the person on your team who should be notified whenever new webform submissions come in.
Once you click the button to add the email address, you'll be sent to a page containing the various email-related fields. These fields include the email header info, the email template, and the included email values. The fields will initially display default settings. However, you can make updates to reflect how and what you want your form submission emails to say and include.
To make an update to the email header details, start typing in the desired Custom field. The radio button will automatically change. If the update is text-related, such as with the email template, you can start with the template and click for more options.
Once the fields have been updated to your liking, click to save the changes.
Creating custom forms requires technical proficiency. To learn more about forms, please see the article Creating Webforms with xTupleCommerce on xTupleUniversity. For help creating complex forms, please contact your xTuple support representative.
| |  | |
| 4.2. FAQ |  | 4.4. Page |