
|
xTuple ERP Reference Guide |
|
|
xTuple ERP Reference Guide |
| 7.1. Create New Vendor | ||
|---|---|---|
 | 7. Vendor |  |
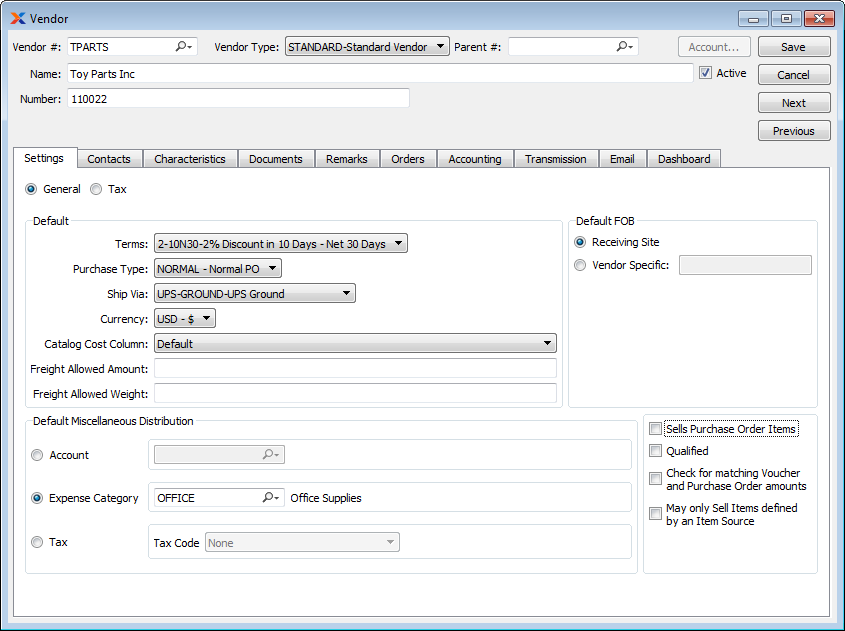
To create a new vendor, go to . The following screen will appear:
Vendors can also be created from the CRM account screen. Simply enter a new CRM account, selecting the Vendor relationship option.
When creating a new vendor, you are presented with the following options:
Enter a number to identify the vendor.
Specify the vendor type of the vendor.
Enter the vendor number for the parent vendor, if any.
Enter the name of the vendor.
Select if you are actively doing business with this vendor.
Use this field to indicate the account number the vendor assigns to your site.
To view or enter general vendor information, select the General radio button. The following information will appear:
Default settings for vendor.
Specify the default billing terms for the vendor.
Specify the default purchase type for the vendor. This type will be used when entering purchase orders for the vendor.
Specify default ship via for vendor.
Specify the currency to be used when conducting business transactions with the vendor. This option will only be visible in systems configured to use multiple currencies.
Allows you to set the desired column from the external vendor catalog for item pricing. After setting the Catalog Cost column to the desired column, you must run an update to complete the process.
Provides the ability to set the freight requirements for purchase orders by dollar amount. The Freight Allowed setting will be displayed on the List Open Purchase Order screen.
Provides the ability to set the freight requirements for purchase orders by weight. The Freight Allowed setting will be displayed on the List Open Purchase Order screen.
You have the option to select a default accounting distribution option to be used when entering vouchers for the vendor:
Select a general ledger account to use for the distribution.
Select a project to associate with the transaction. The project number will be added as the final segment of the G/L account number.
Select an expense category to use for the distribution.
Select a tax code to use for the distribution.
Indicate the default free on board (FOB) destination by selecting one of the following options:
Select if receiving site is default FOB destination.
Select if vendor specifies an FOB destination other than the receiving site. Enter alternate FOB details in space provided.
Select if vendor accepts purchase orders to render goods. This setting is informational only. It has no impact on the ordering process.
Select this flag to indicate that the vendor is a trusted vendor.
Select to perform voucher matching when entering voucher items for the vendor. If selected, users will be presented with a warning message whenever a voucher item amount does not match the corresponding purchase order item amount for the vendor. This option will not prevent users from proceeding. Instead, the warning message simply alerts users that a mis-match exists.
Select if you want to restrict items purchased from the vendor to items having a defined item source. If not selected, you may choose from all purchased items when entering a purchase order line item.
The following buttons are unique to this screen:
Select to open the vendor's account.
Select to open the Vendor master whose vendor number immediately follows the current vendor number.
Select to open the Vendor master whose vendor number immediately precedes the current vendor number.
To view or enter tax information for the vendor, select the Tax radio button. The following screen will appear:

When adding vendor tax information, you are presented with the following options:
To add a new vendor tax registration number, select the button. The following screen will appear:
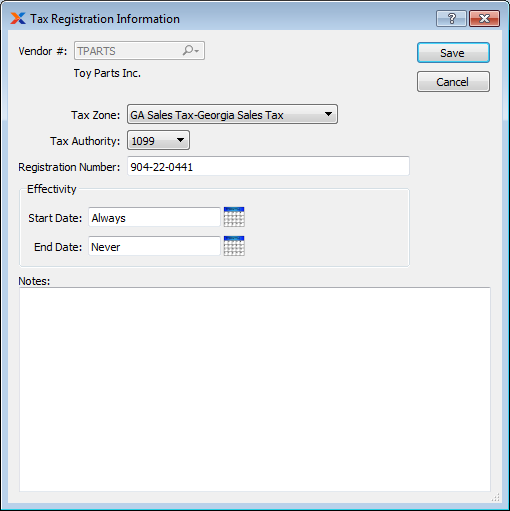
When adding a new vendor tax registration number, you are presented with the following options:
Displays the name and number of the vendor the tax registration applies to.
Specify the tax zone associated with the tax registration number.
Specify the tax authority associated with the tax registration number.
Enter the vendor's tax registration number for the specified tax authority. The registration number is used by tax authorities to identify businesses and/or individuals. An employer identification number (EIN) is an example of a tax registration number.
The vendor's tax registration number is used for identifying the vendor to relevant tax authorities. This information should not be confused with the tax registration numbers, which are used to identify your company to relevant tax authorities.
To view or enter vendor contact information, select the tab. The following screen will appear:
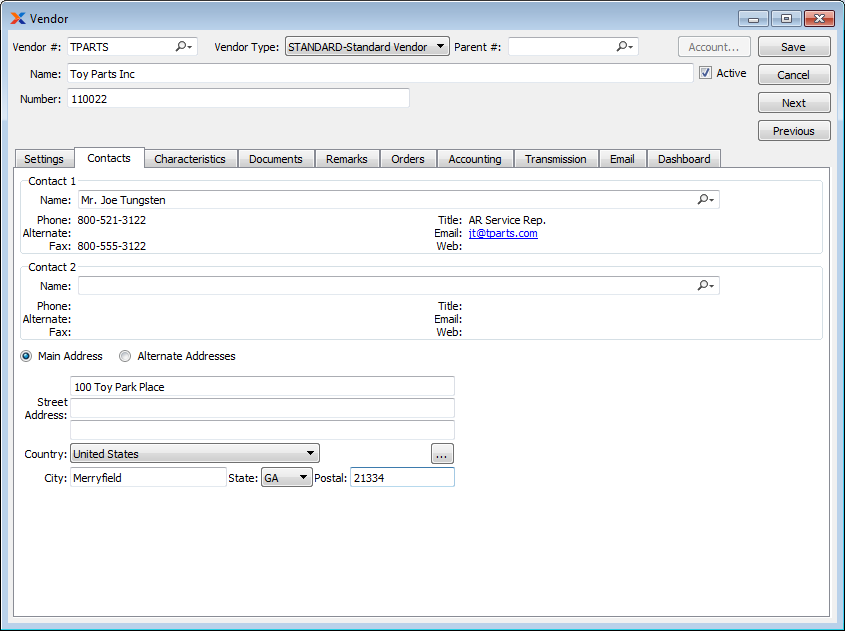
When adding vendor contact information, you are presented with the following options:
Manually enter contact information in the fields below—or use the lookup feature to select pre-existing contact information. If a new contact is manually entered here, that contact will be added automatically to the master list of contacts. For additional documentation related to creating contacts, see Section 7.1, “New Contact”.
Manually enter contact information in the fields below—or use the lookup feature to select pre-existing contact information. If a new contact is manually entered here, that contact will be added automatically to the master list of contacts. For additional documentation related to creating contacts, see Section 7.1, “New Contact”.
Select to manually enter the primary address information for the vendor—or use the lookup feature to select pre-existing address information. By default, this address will appear as the main address when entering purchase orders for the vendor. If a new address is manually entered here, that address will be added automatically to the master list of addresses. For additional documentation related to creating addresses, see Section 8.1, “ New Address”.
Select to list various alternate addresses for vendor.
To create a alternate vendor address, select the button. The following screen will appear:

When creating a new vendor address, you are presented with the following options:
Enter a number or code to identify the vendor address. Using the value "Remit" or "REMIT" or "remit" in this field will cause the specified address to be used as the default remit-to address when printing checks for the vendor.
The remit-to feature is only supported when printing checks using the APcheck report definition.
Enter the name of the vendor address.
Manually enter address information in the fields below—or use the lookup feature to select pre-existing address information. By default, this address will appear as the main address when entering purchase orders for the vendor. If a new address is manually entered here, that address will be added automatically to the master list of addresses. For additional documentation related to creating addresses, see Section 8.1, “ New Address”.
Manually enter contact information in the fields below—or use the lookup feature to select pre-existing contact information. If a new contact is manually entered here, that contact will be added automatically to the master list of contacts. For additional documentation related to creating contacts, see Section 7.1, “New Contact”.
This is a scrolling text field with word-wrapping for entering Notes related to the vendor address.
Vendor characteristics are user-defined definitions which may be used to provide additional layers of description about vendors. These descriptions are static and not processed by the system, but are useful for informational purposes. To enter characteristics associated with a vendor, select the tab. The following screen will appear:
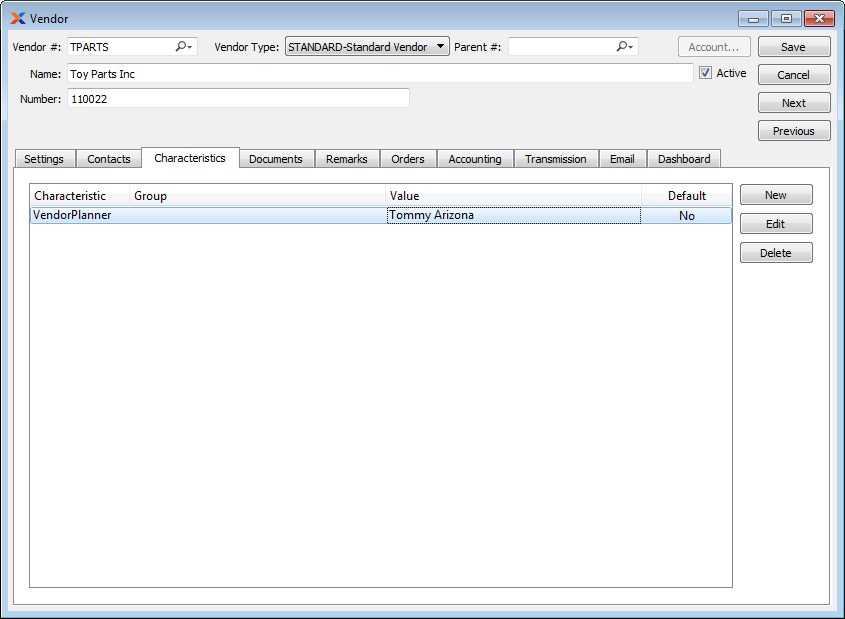
Vendor Characteristics
To create a new characteristic for your current context, select the button from the characteristics list. The following screen will appear:
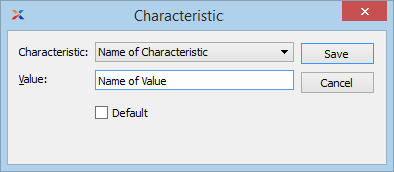
When creating a new characteristic, you are presented with the following options:
Select a characteristic from the list of characteristics available for your current context. To learn more about how characteristics are linked to specific contexts, please see Section 9.2.2.1, “Characteristic”.
Enter a value to associate with the characteristic.
In some contexts, the Default option will appear. Select if the value entered is the default value for the specified characteristic. Default values will always be listed first where characteristics are used.
To associate documents with a vendor, select the tab. The following screen will appear:
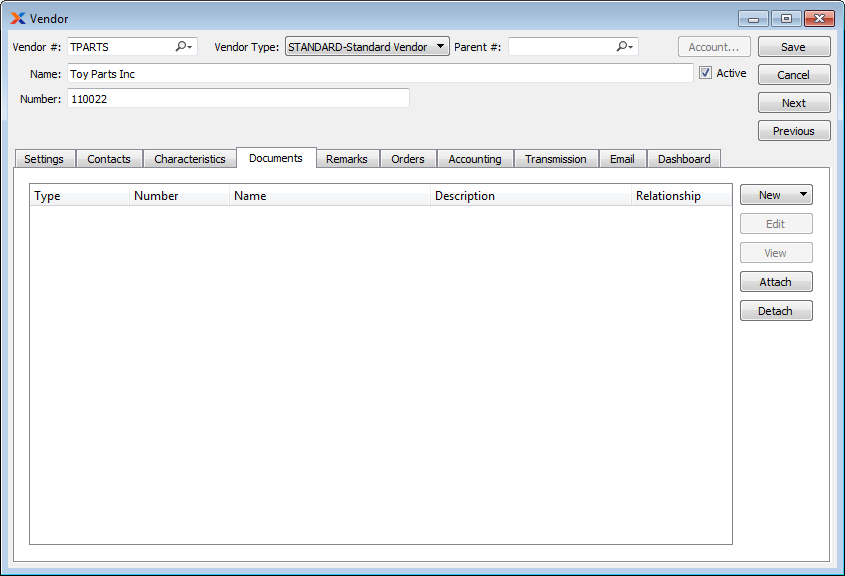
Vendor Documents
When associating documents, you are presented with the following options:
Select to create a new document and associate it with the current record. You may create the following document types:
Select to create a new image association.
Select to create a new fixed asset association.
Select to create a new maintenance order association.
Select to create a new incident and associate it.
Select to create a new project and associate it.
Select to create a new opportunity and associate it.
Select to create a new task and associate it.
Enables you to edit associated documents. The Edit screen is the same as that for creating a new document—except that when editing, the fields will contain document information. Double-clicking on a document will also bring you to the editing screen.
Highlight a document and then select this button to reach a read-only view of the Edit screen.
Select to associate already-existing documents. The following document types may be attached: contact, account, customer, employee, file, image, incident, item, opportunity, project, purchase order, sales order, vendor, web site, work order.
Highlight a document and then select this button to remove the association.
To associate already-existing documents, select the button. The following screen will appear:
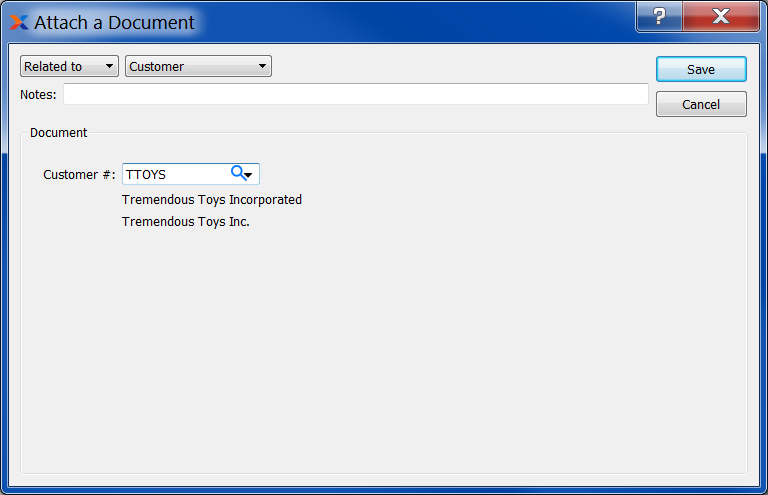
When associating already-existing documents, you are presented with the following options:
Indicate how the document is related to the current record. The following relationship options are available: related to, parent of, child of, duplicate of.
Specify the kind of document you want to associate. The following document types may be attached: contact, account, customer, employee, file, image, incident, item, opportunity, project, purchase order, sales order, vendor, web site, work order. When associating files, you will also be given the option to save the file to the database.
There is no file size restriction when saving files to the database. However, excessively large files could cause storage and performance issues.
Leave any notes on the document file as needed.
Use the lookup tool to identify the specific document you want to attach. The data entry options will vary depending on the document type you select.
To add notes and/or comments related to a vendor, select the tab. The following screen will appear:
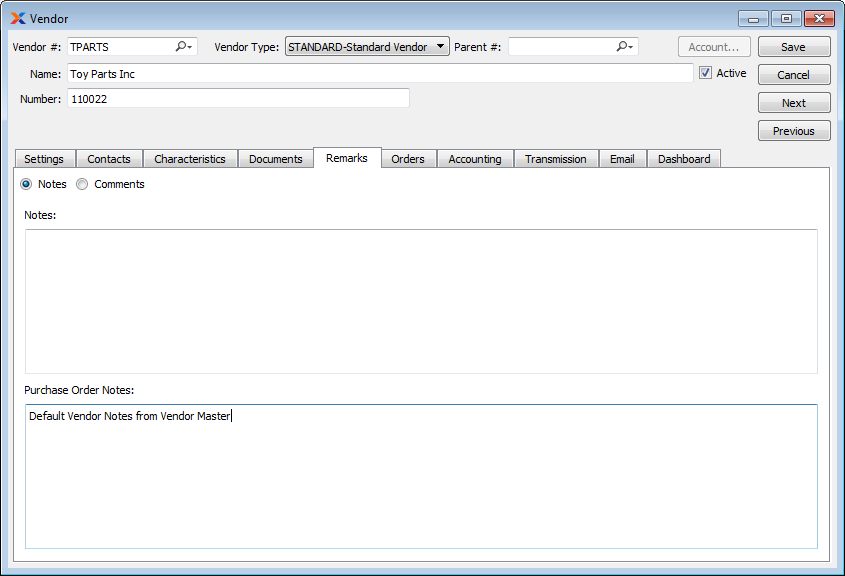
When adding notes related to a vendor, you are presented with the following options:
Use this field to enter general notes related to the vendor.
Notes entered in this field will be transferred to any purchase order you create for the vendor.
When adding or reviewing comments, you are presented with the following options:
Select to display all comments in the list in an expanded view which includes the entire text of each comment. To edit a comment, simply select the link next to the comment. That link will not be shown for changelog comments, which can't be edited. If the Verbose Text option is not selected, the comment list will display only header level information for each comment.
Display lists comments related to the record.
The following buttons are available:
Opens screen for creating a new comment.
Highlight a comment and then select this button to reach a read-only view of the Edit screen.
Enables you to edit highlighted comments—as long as the comments are not changelog comments. ChangeLog comments are system-generated and may not be edited. The Edit screen is the same as that for creating a new comment—except that when editing, the fields will contain comment information. Double-clicking on a comment will also bring you to the editing screen.
To enter a new comment, select the button. The following screen will appear:
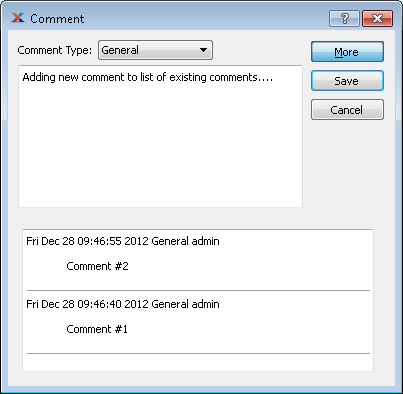
Select a comment type from the drop-down list to classify the comment. This is a required step. Comment types may be system-defined (i.e., changelog and general) or user-defined, as described in Section 13.2.3, “Comment Types”. Once you have specified a comment type, begin typing your comment in the main text area. The text area features word-wrapping and scroll-bar support for longer comments.
The following buttons are unique to this screen:
Select to show the complete list (i.e., thread) of comments associated with the record. To hide the list, simply select the button again. The comment thread will show the most recent comment first.
To view orders associated with the vendor, select the tab. The following screen will appear:

When viewing summary order information, you are presented with the following options:
Displays date of vendor's first purchase.
Displays date of vendor's most recent purchase.
Displays the value of purchase order line items which have not yet been received.
Displays value of vendor's purchases in the prior year.
Displays value of vendor's purchases year-to-date.
Displays the vendor's open payables balance.
To view purchase orders associated with the vendor, select the Purchase Orders radio button. The following screen will appear:
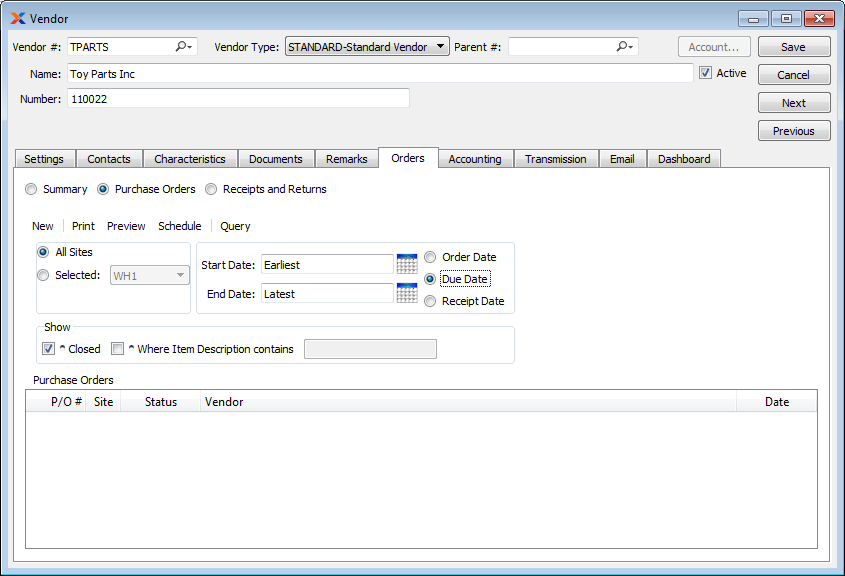
When viewing purchase order information, you are presented with the following options:
Select to display purchase orders in all sites.
Specify site whose purchase orders you want to display.
Enter a start date based on the corresponding date filter you choose. The following three date filters are available: order date, due date, or receipt date.
Enter an end date based on the corresponding date filter you choose. The following three date filters are available: order date, due date, or receipt date.
Select to display results by the order date.
Select to display results by the due date.
Select to display results by the receipt date.
Select from the following additional report options:
Select to display only closed purchase orders.
Select to display purchase orders whose item description matches the value entered in the corresponding field. This field supports pattern matching with regular expressions.
To view receipts and returns associated with the vendor, select the Receipts and Returns radio button. The following screen will appear:
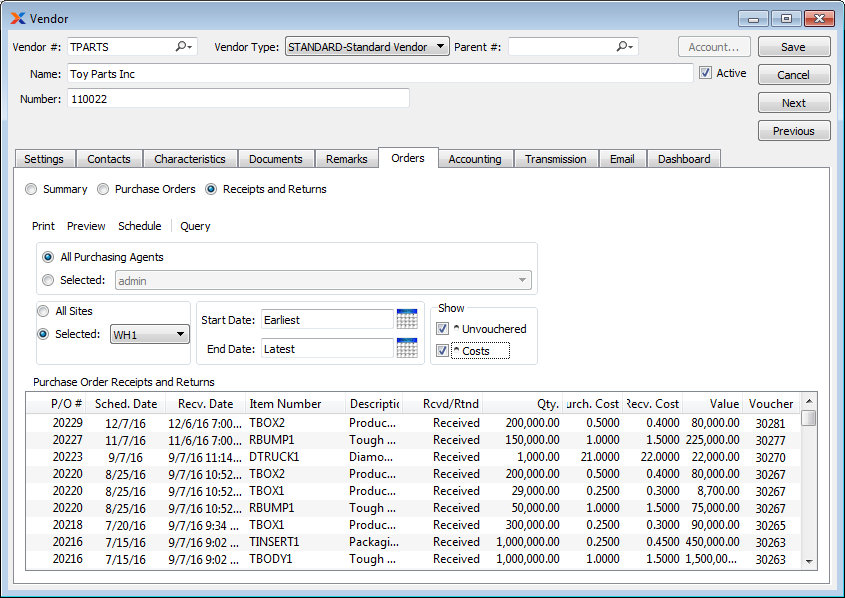
When viewing receipt and return information, you are presented with the following options:
Select to display receipts and returns by date for all purchasing agents.
Specify purchasing agent whose receipts and returns by date you want to display. Users may be designated as purchasing agents at the level.
Select to display receipts and returns by date for all sites.
Specify site whose receipts and returns by date you want to display.
Receipts and returns entered on and after this date will be displayed.
Receipts and returns entered on and before this date will be displayed.
Select from the following additional report options:
Select to include receipts and returns which have not been vouchered yet in the display.
Select to include purchase order costing information in the display.
To view accounting information associated with the vendor, select the tab. The following screen will appear:

When viewing payables information, you are presented with the following options:
Specify all dates or a date range for payables to include in the display.
Displays open receivables based on the due date specified.
You can void posted vouchers on the open payables screen—as long as they are unapplied. To un-apply documents, use the option on the Payables Application screen.
To view credit memos associated with the vendor, select the Credit Memos radio button. The following screen will appear:
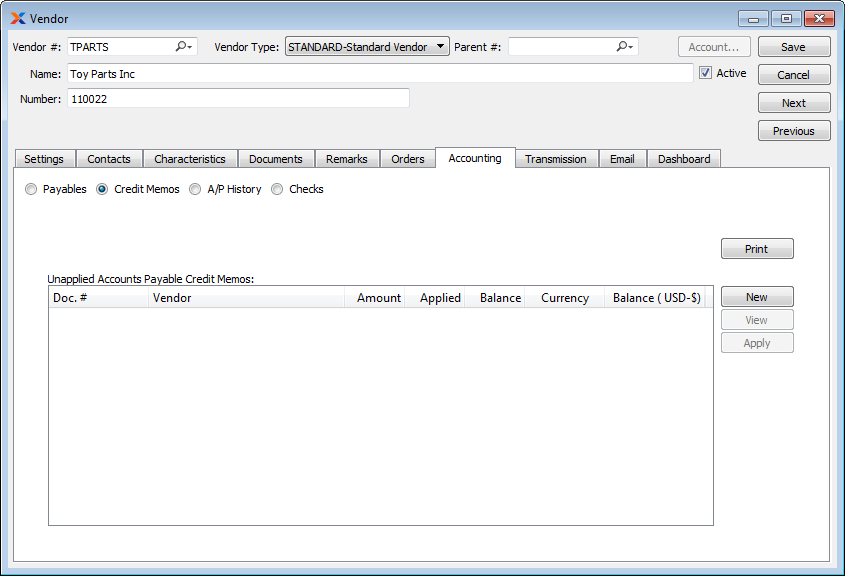
When viewing credit memo information, you are presented with the following options:
Displays vendor credit memos which have not yet been applied.
To view accounts payable (A/P) history associated with the vendor, select the A/P History radio button. The following screen will appear:
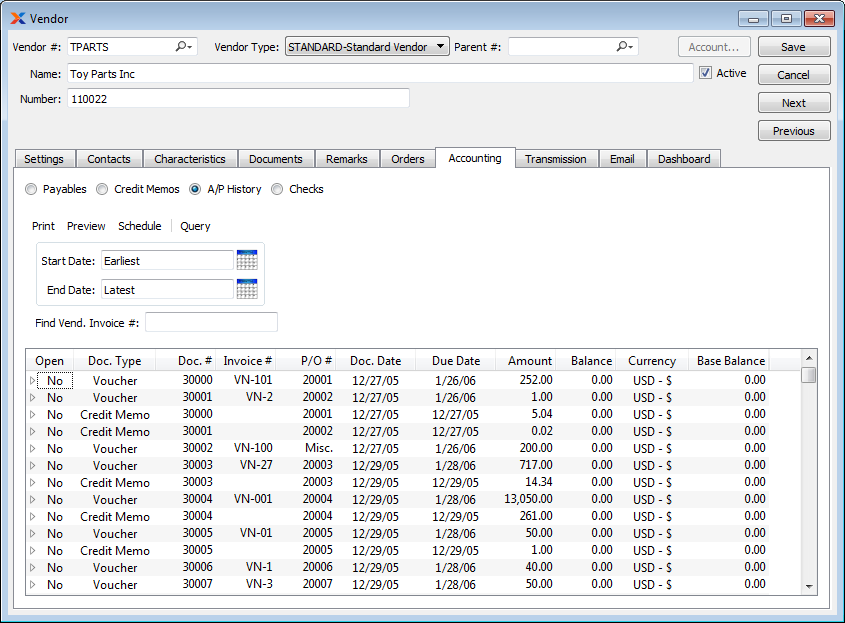
When viewing A/P history information, you are presented with the following options:
Vendor activity entered on and after this date will be displayed.
Vendor activity entered on and before this date will be displayed.
To search for an invoice in the Vendor History display, begin typing an invoice number into this field. As you type, the list will automatically scroll toward the invoice number you are typing. You can also search for invoices manually by scrolling through the list.
To view checks associated with the vendor, select the Checks radio button. The following screen will appear:
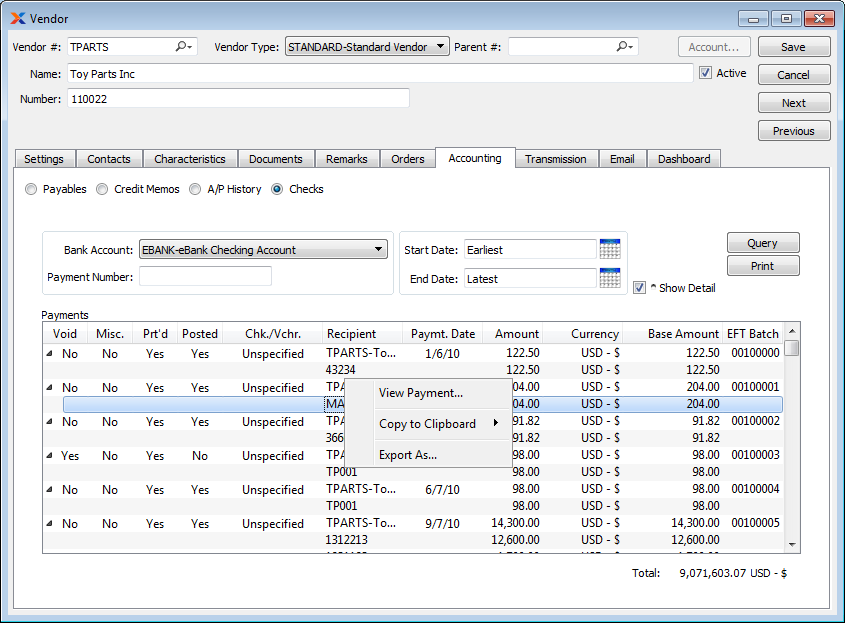
When viewing checks information, you are presented with the following options:
Specify the bank account whose payment register information you want to display.
Enter a payment number or regular expression. The display will show payment(s) matching the specified payment number(s).
Payments posted on and after this date will be displayed.
Payments posted on and before this date will be displayed.
Select to include payment detail information in the display. If selected, the vouchers and/or debit memos associated with payments will be displayed in a nested list. Be sure to use the button after selecting this option to ensure detail is included in the display.
The electronic data interchange (EDI) system enables you to exchange information electronically with your vendors. To set up a vendor to receive purchase orders, select the tab and select the EDI Profiles radio button. The following screen will appear:
Vendor Transmissions
The buttons to set up EDI profiles are disabled when creating a new vendor. If you want to set up EDI for a new vendor, save the vendor and edit it again.
When associating EDI profiles with EDI recipients, such as customers, ship-to addresses, and vendors, you are presented with the following options:
Display lists EDI profiles associated with this recipient (e.g., current customer) for a particular document type. It also shows whether EDI will be sent via email or FTP.
The following buttons are unique to this screen:
Connect an existing EDI profile to this EDI recipient for a particular document type.
Detach the selected EDI profile from the recipient for the selected document type.
Selecting the button will open the EDI profile so you can change it. All EDI recipients who share this EDI profile will be affected by changes.
To attach an existing EDI profile to the current recipient, select the button. The following screen will appear:
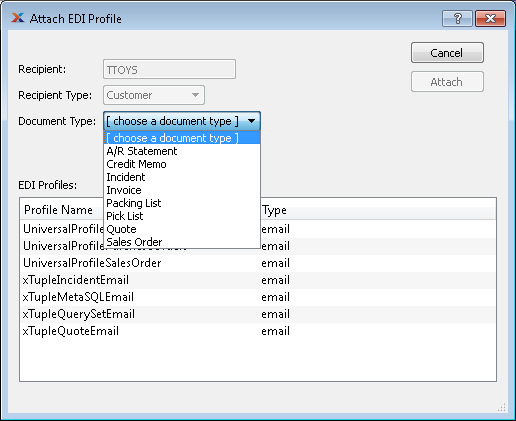
This screen lets you attach an existing EDI profile to the currently selected recipient for a particular document type. This tells xTuple Connect which documents should be sent by EDI and the EDI profile to use when sending documents of that type to a particular recipient. The recipient and recipient type are displayed for your information while attaching the EDI profile.
This shows the number of the customer, vendor, etc. which will receive EDI using the selected EDI profile.
This shows whether the recipient is a customer, vendor, etc. This reduces confusion in cases where a customer and vendor have the same number (i.e., the same CRM account is both a customer and vendor).
Choose from this list the type of document you want to use the EDI profile for. The list of available document types changes depending on the recipient type. For example, if the recipient type is vendor, the document type list will not contain "Sales Order."
The list of EDI profiles shows only those EDI profiles that have an EDI form for the currently selected document type by default. If this box is checked, all EDI profiles will be listed. You may attach an EDI profile without an appropriate EDI form but it will not be used until the right EDI form is added to the EDI profile.
Choose from this list the EDI profile you want to attach for the selected document type.
The following buttons are unique to this screen:
Attaches the EDI profile to the recipient and closes the screen, returning you to the previous screen.
If there is no existing EDI profile that suits your needs, you can create a new one by selecting the button. This does the same thing as clicking the button on the EDI Profiles window (see Section 13.2.9, “EDI Profiles”). After you have created the new EDI profile and saved it, the Attach EDI Profile window will appear with the new EDI profile selected. Now you can select the document type and click . If you click , the new EDI profile will still be saved but will not be attached to the recipient.
To enable electronic funds transfer (EFT) payment printing for the vendor, select the Payments option on the tab. The following screen will appear:
EFT Check Options
When configuring EFT check settings for the vendor, you are presented with the following options:
Select to enable online processing or EFT payment printing.
Enter bank account routing number.
Enter bank account check number.
Select type of bank account associated with routing and account numbers.
Select to use alternative vendor identification information other than vendor number and name.
Enter alternate vendor identification number (i.e., tax ID number).
Enter alternate vendor name (i.e., name of parent company). Allows for a maximum of 22 characters.
To view email associated with the vendor, select the tab. The following screen will appear:
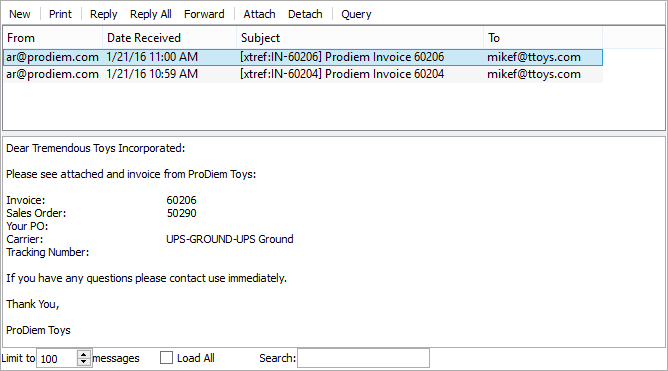
When viewing associated emails, you are presented with the following options:
Display lists associated emails.
The content of a highlighted email will be displayed here.
Specify the maximum number of associated emails you want to be displayed in the email list. If the list is extremely long, you may experience some slowness when opening the screen.
Select to load all associated emails into the list.
Enter a string of letters or complete words to search for matches in the list of associated emails. The search will scan through subject lines, To addresses, and From addresses.
The following buttons are unique to this screen:
Select to send a new email, using the default email program on your computer.
Highlight an email and then select this button to print a copy of the email.
Highlight an email and then select this button to reply to the email's sender, using the default email program on your computer.
Highlight an email and then select this button to reply to everyone associated with the email, using the default email program on your computer.
Highlight an email and then select this button to forward the email to another person(s), using the default email program on your computer.
Highlight an email and then select this button to attach an email associated with a contact in your contact list.
Highlight an email and then select this button to remove the associated email from the list.
To view the dashboard associated with your vendor, select the tab. The following screen will appear:
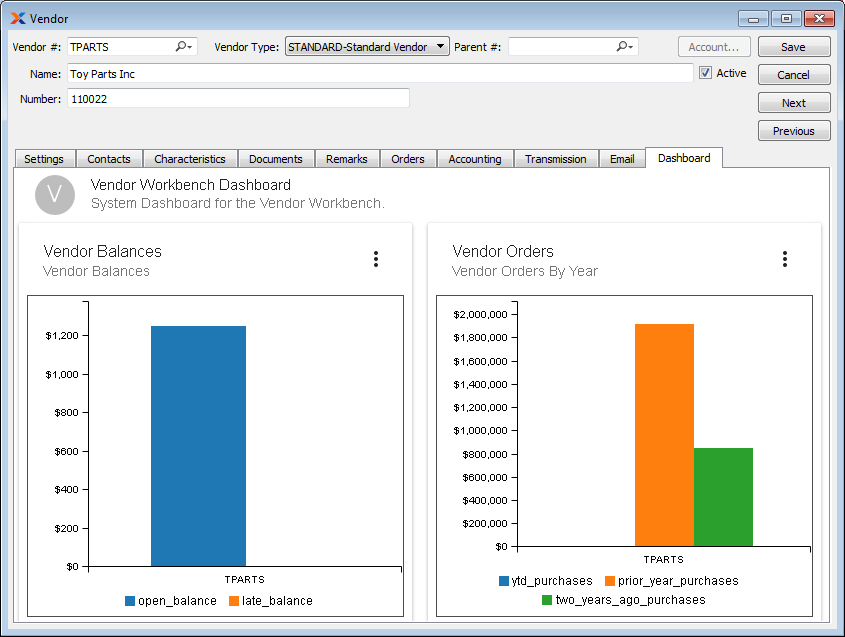
The vendor dashboard includes the following pre-loaded dashboard panes, which you can either remove or supplement with additional panes at any time:
Displays your open and late balances with your vendor.
Displays your summarized vendor order volume, by year.
Displays your vendor returns percentage for the current month.
Dashboard panes are used to contain charts, which are populated using datasources. To create a new dashboard pane, select the button located toward the bottom of the Dashboard window. The following screen will appear:
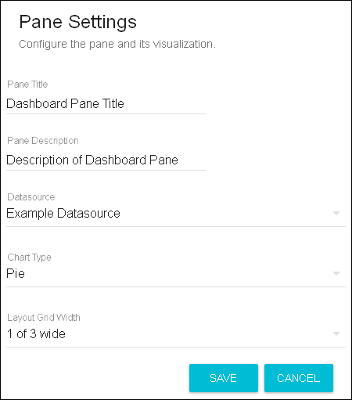
When creating a new dashboard pane, you are presented with the following options:
Enter a title to identify the pane.
Enter a brief description to describe the pane.
Specify which datasource you want to use as the source for the dashboard pane's chart. The dashboards package includes several stock datasources. You may also create custom datasources on your own. For more information, please see the xTuple Dashboards Product Guide.
Specify which chart type you want the dashboard pane to display. The chart type options will be limited to the types specified on the selected datasource definition.
Specify how many panes you want displayed in a row on the Dashboard screen, from as few as one to as many as three across. The layout grid width options will be limited to the layout options specified on the selected datasource definition.
| |  | |
| 7. Vendor |  | 7.2. Vendors |