
|
xTuple ERP Reference Guide |
|
|
xTuple ERP Reference Guide |
| 9.2.2. Characteristics | ||
|---|---|---|
 | 9.2. Master Information |  |
Characteristics may be used to create additional layers of information about items, customers, CRM accounts, and more. For example, characteristics defined on an Item master may be associated with sales order items. And, if the sales order leads to the automatic generation of additional orders (i.e., work orders or purchase orders), then the subsequent orders will inherit the parent sales order characteristics.
To access the master list of characteristics, go to . The following screen will appear:
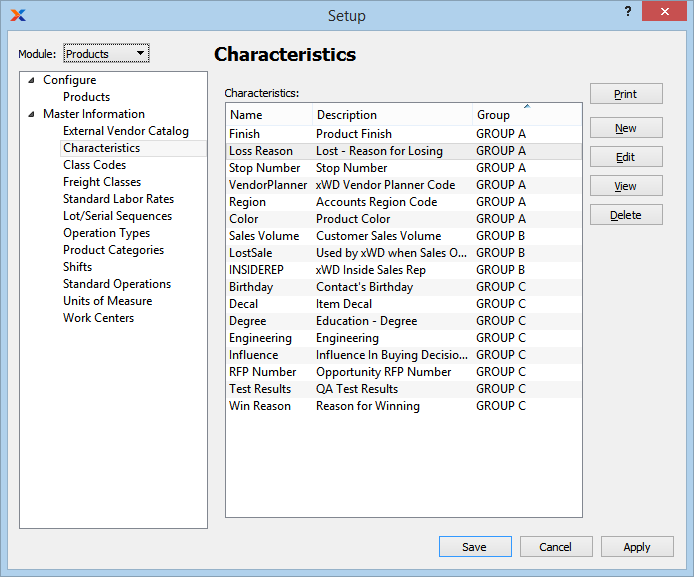
The Characteristics screen displays information on all existing characteristics, including characteristic name, description, and group (if any).
To create a new characteristic, select the button. The following screen will appear:
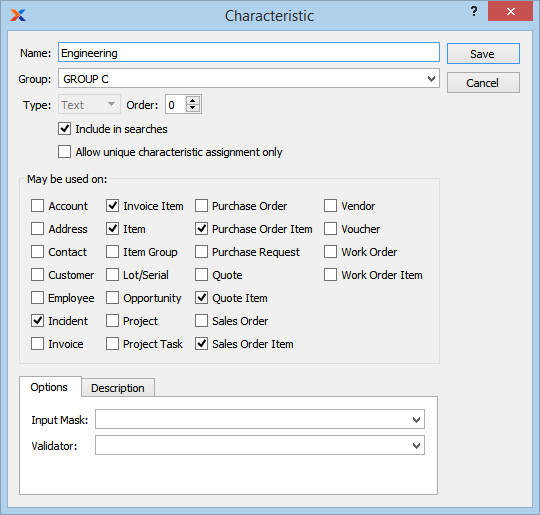
Create new Characteristic
When creating a new characteristic, you are presented with the following options:
Enter a unique name to identify the characteristic. The text entered under the tab is used to further identify the characteristic.
You have the option to add characteristics into free-form groups. This can help with sorting characteristics wherever they are displayed (i.e., in lists found under tabs). To add a characteristic to a characteristic group, type a name to identify the group in the blank space provided—or choose an already-existing group name from the drop-down list to the right of the field.
Specify one of the following characteristic type options:
Select if you want the characteristic to be a text string. Text type characteristics have access to the Input Mask and Validator options.
Select if you want the characteristic to present a list of possible values. If selected, you will have the option to enter possible characteristic values and their preferred sort order.
Select if you want the characteristic to be a date string. The formatting of date type characteristics conforms to the Locale setting for the logged in user.
Specify the sort order for the characteristic. This option is useful whenever you present multiple characteristics in a given context. For example, if you have five contact characteristics defined, the sort order will determine which characteristic appears at the top of the sort order when a contact record is being entered or edited. The field allows for a maximum of '999'.
Select to indicate you want the characteristic to be included in searches related to records where the characteristic is used. Not selecting this option means the characteristic will not be included in searches. This feature exists to help improve potential performance penalties incurred when multiple characteristics are included in search criteria. If you use multiple characteristics to define certain records (e.g., items, customers, etc.), you can improve search performance by choosing to only include in searches those characteristics which you are most likely to search on.
Select if you want to restrict use of the characteristic to only once per object association. For example, if want to make sure a contact characteristic is used only once per contact record, then you should select this option.
Select one or more of the following characteristic assignment options by selecting the relevant check boxes. The characteristic will then be available for use in the specified screen(s). The following characteristic assignments options are supported: account, address, contact, customer, employee, fixed asset, incident, invoice, invoice item, item, item group, lot/serial, maintenance order, opportunity, project, project task, purchase order, purchase order item, purchase request, quote, quote item, sales order, sales order item, vendor, voucher, work order.
The options presented will vary depending on the characteristic type you choose. The range of possible options are described below:
The following options will be available for text type characteristics. These advanced options are not required, but if used they will enforce greater consistency and control over the values entered for your text type characteristics. Typically when using these advanced validation features, you will specify either an input mask or a validator. If you decide to use both at once, they must be coordinated and consistent—otherwise users will experience difficulties when attempting to enter text type characteristic values.
Select from the available options—or manually enter an input mask of your own design. An input mask creates a template to guide users as they enter values for a characteristic. It is a form of light data validation. For example, if you specify the input mask 00/00/0000, then users will be presented with the following template when they are entering values for the characteristic: __/__/____. In this case, users will simply have to fill in the blanks between the separators.
Select this format to prompt users to enter a date format with the pattern shown (e.g., MM/DD/YYYY).
Select this format to prompt users to enter a numerical format with the pattern shown. This example would be a good match for telephone numbers (e.g., 757-555-1111).
Select this format to prompt users to enter a numerical format with the pattern shown. This example would be a good match for social security numbers (e.g., 012-34-5678).
Select this format to prompt users to enter a price format with the pattern shown.
Select from the available options—or manually enter a validator of your own design. A validator is used to strictly enforce the format of data users can enter in a field. If you specify a validator for a characteristic, then users will have to conform to the format when entering values for the characteristic. Values which do not conform will not be accepted.
Select this boolean validator to require users to enter Y or N for yes or no.
Select this validator to require users to enter one or more non-white-space characters. So, for example, this validator would accept the value Inventory but not Inventory Availability.
Select this validator to require users to enter a number from 1-9999.
Select this validator to require users to enter a value where the first character is A-Z, the next five characters are numbers 0-9, and the last character is a number 1-9. While this pattern may not be very useful for most people, it does illustrate how you can create your own regular expressions to design a validator to meet your own custom needs.
Select this validator to require users to enter a website address (e.g., www.xtuple.com).
The following options will be available for list type characteristics:
Select to create a new value for the characteristic.
Use your mouse to click in the Value field. Once you see the cursor in the Value field, you can begin typing your value information. The value entered here will appear as a listed option when the specified characteristic is used. For example, possible values might be True and False—or any other combination of values you can imagine.
Specify the sort order for each value in the list. If the order of the value True is 1 and the value for False is 2, then True will appear above False in the characteristic list.
Highlight a characteristic value and select this button to remove the value from the list.
There are no options for date type characteristics. The formatting of date type characteristics conforms to the Locale setting for the logged in user.
The number option allows you to enter numeric values only into the value field. Special character separators for the numeric values are not support.
Use the tab to enter a brief description of the characteristic.
| |  | |
| 9.2.1. External Vendor Catalog Configurations |  | 9.2.3. Class Codes |