
|
xTuple ERP Reference Guide |
|
|
xTuple ERP Reference Guide |
| 7.1. User Account | ||
|---|---|---|
 | 7. Maintain User Accounts |  |
To create a new user account, select the button. The following screen will appear:
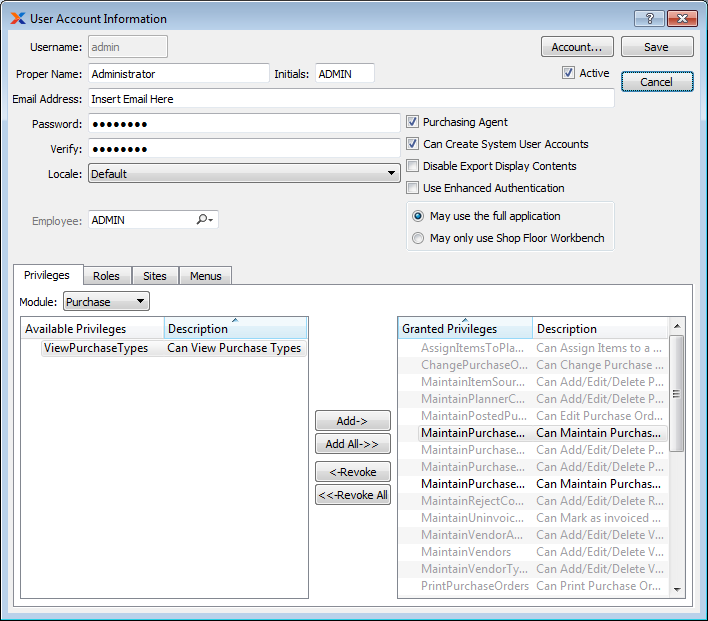
When creating a new user account, you are presented with the following options:
Enter a unique username to clearly distinguish the new user account from existing user accounts. The username is case-sensitive. This is a required field.
Select to open the user account's CRM account.
Select to mark the user account as active. Not selecting marks the user account as inactive. User accounts cannot be deleted from the system; however, marking them inactive prevents them from logging into the application. In some cases, inactive user accounts may still be associated with valid documents in the system. Whenever that is the case, the user account's name will appear with horizontal lines striking through it. Re-saving documents with this inactive user account relationship may cause the username to be dropped from the record.
Enter the user account's first name and last name (e.g., John Smith).
Enter the user account's initials.
User account passwords are established to ensure application and system security. Passwords are case-sensitive. As you can see in the example, this field does not display the values entered on the screen. Instead, individual keystrokes are replaced by asterisks (*) to protect the password from being viewed. Once the user account's password is entered, it can only be reset by an system administrator who must overwrite the existing password.
Verify the accuracy of the user account's password by retyping it in this field. Again, individual keystrokes will be replaced by asterisks (*) to protect the password from being viewed.
Select one of the available locales. Use the Default option if you want the operating system to determine the correct locale for the user account. Locale settings affect how information is formatted and displayed on a user account's screen. Only user accounts who have been granted the MaintainLocales privilege can define and maintain locale settings. For more information on locales and locale settings, see Section 13.2.13, “Locales”.
If the user account is an employee, then the employee code will be displayed here. The link between the user account and employee records will be made automatically if the username matches the employee code.
Select if the user accounts is authorized to make purchases. Not selecting means the user account is not authorized to make purchases.
Select if the user account is authorized to create new user accounts. Not selecting means the user account is not authorized to create new user accounts.
System administrators are able to assign and/or revoke privileges on a module-by-module basis. The application provides granular security settings for each module, down to the submenu level.
Select to prevent user account from exporting display contents. The option can be found on right-click menus throughout the application. If selected, the user account will be blocked from using this option.
Select to require user accounts to use enhanced authentication when they log in to the application. Enhanced authentication adds a layer to the authentication process used to log in to the system. When this feature is turned on, user account passwords are stored in the database in a modified form. The end result is that user accounts may only log in to the database using the xTuple Client. If user accounts try to access the database using a tool other than an xTuple application, they will not be able to connect. User account passwords entered when logging in via the xTuple client will not be recognized if the xTuple client is not used. If enhanced authentication is specified for a user account, that user account must also select the Use Enhanced Authentication flag in their log in options. If enhanced authentication is not specified, user accounts will be permitted to log in to the database using database tools other than the xTuple client.
The enhanced authentication option will only affect user accounts whose passwords are created or updated after the option is enabled/disabled. Legacy user accounts will not be affected if the option is not used. Legacy user accounts may continue logging in as before this feature was implemented.
Select if the user account should have access to all screens in the application, restricted only by their assigned privileges.
Select if you want the user account to have access only to the simple sales order—and to no other screens. The simple sales order must be enabled for this option to apply. If selected, the Simple Sales Order will be the only screen the user will have access to when they log in to the database. The log in screen for this user account will be the same as for all user accounts. However, once logged in, the user account will only be able to see and use the simple sales order. This option will override any other privileges which may have been assigned previously to the user account. For more information about the simple sales order, please see Section 2.1, “New Simple Sales Order”.
Select if you want the user account to have access only to the Shop Floor workbench—and to no other screens. If selected, the Shop Floor workbench will be the only screen the user account will have access to when they log in to the database. The log in screen for this user account will be the same as for all user accounts. However, once logged in, the user account will only be able to see and use the Shop Floor workbench. This option will override any other privileges which may have been assigned previously to the user account. For more information on related privileges and other aspects of using and configuring the Shop Floor workbench, please see Section 4.4, “Shop Floor Workbench”.
Select an individual module to assign privileges for that module. Assign privileges to the user account on a module-by-module basis. Select one module, assign the appropriate privileges, and then repeat for each subsequent module the user account will need access to. All application modules are included in the list.
You can dramatically speed up the process of adding new user accounts by adding privileges by user account role.
Select appropriate privileges from the list of available privileges. Descriptions of each privilege will be shown. The privileges listed in this column represent the full range of privileges available for the specified module. The list of available privileges will change as different modules are specified. To grant privileges to a user account, highlight an available privilege and then click the button. The highlighted privilege will be added to the user account's list of granted privileges. Double-clicking on a privilege will also move it to the granted privileges column. You can grant all privileges for a specified module by clicking on the button.
Displays granted privileges for the specified user account. Descriptions of each privilege will be shown. To remove a user account's granted privileges for a specified module, highlight a granted privilege and then click the button. The highlighted privilege will be removed from the user account's list of granted privileges. Double-clicking on a privilege will also remove it from the granted privileges column. You can remove all granted privileges for a specified module by clicking on the button.
Many of the available privileges govern user accounts' ability to either view or edit information. In some cases, however, it may be possible to perform editing tasks on screens where only view privileges have been granted. Take item sites, for example. Item sites exist as their own objects with their own privileges independent of items. When you edit an item site, you are not editing the item itself, but an object associated with the item. By contrast, when you edit item notes, item transformations, or item aliases, you are editing things which belong exclusively and intrinsically to item records. On the Item screen, there is an option to view/edit item sites for the item. Let's imagine a user account has privileges to edit item sites but to only view items. Following this example, xTuple would allow the user account to edit item sites from the item record, even when in view mode.
Here are some examples of independent objects which may be editable from a parent window, even in view mode:
Sales orders when viewing a customer
Item sources when viewing an item
Contacts when viewing a CRM account
Documents from any screen that supports them
Conversely, here are examples of attributes that belong exclusively to and are editable only from a parent window in edit mode:
Number
Name
Notes
Characteristics
Alarms
Comments
Transformations (Item)
Ship-to Addresses (Customer)
The following buttons are located between the Available Privileges and Granted Privileges columns:
Highlight a specific privilege in the Available Privileges column, then select this button to transfer the privilege to the Granted Privileges column. Double-clicking on an available privilege will also transfer it to the Granted Privileges column.
Select this button to automatically transfer all available privileges to the Granted Privileges column.
Highlight a specific privilege in the Granted Privileges column, then select this button to remove the privilege from the Granted Privileges column. Double-clicking on a granted privilege will also remove it from the Granted Privileges column.
Select this button to automatically remove all granted privileges from the Granted Privileges column.
While you may assign individual privileges by user account, you also have the option to add user account privileges by user account role. Adding user account privileges by user account role can dramatically speed up the process of adding new user accounts. You can learn more about user account roles here Section 9, “Maintain Roles”.
If individual user account privileges appear to be disabled, that means the user account is assigned to a user account role. The only way to change individual privileges in this case is to remove the user account from the role.
To add user account role privileges to a user account profile, select the tab, as shown in the following screen:
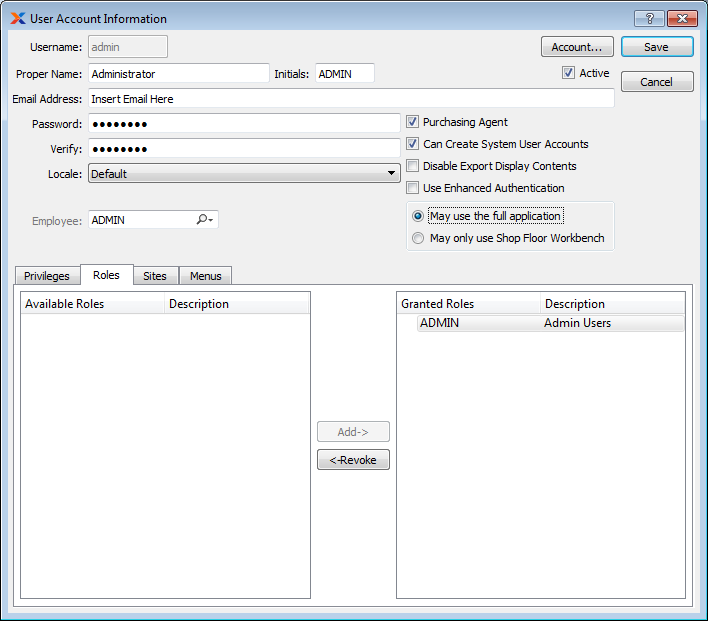
When adding user account role privileges to a user account profile, you are presented with the following options:
Don't forget to select the button when you have finished entering a user account's information.
Select an available user account role from the list. To grant user account role privileges to a user account, highlight an available role and then click the button. The highlighted role will be added to the user account's list of granted roles. Double-clicking on a role will also move it to the Granted Roles column.
Displays granted roles for the specified user account. To remove a granted role from the user account, highlight a granted role and then click the button. The highlighted role will be removed from the user account's list of granted roles. Double-clicking on a role will also remove it from the Granted Roles column.
The following buttons are located between the Available Privileges and Granted Privileges columns:
Highlight a specific role in the Available Roles column, then select this button to transfer the role to the Granted Roles column. Double-clicking on an available role will also transfer it to the Granted Roles column.
Highlight a specific role in the Granted Roles column, then select this button to remove the role from the Granted Roles column. Double-clicking on a granted role will also remove it from the Granted Roles column.
Multiple site installations have the option of defining user account site security. User account site security provides a method for restricting a user account to a single or multiple sites. All of the screens in the application will honor this restriction. On the multiple site documents, such as purchase orders and sales orders, the user account will be able to view restricted sites, however, they will not be able to edit restricted sites. To add user account site security to a user account profile, select the tab, as shown in the following screen:

When adding user account site security to a user account profile, you are presented with the following options:
Select this option if the user account has full unrestricted access to all sites defined in the application.
Select this option if the user account has restricted access to the sites defined in the application.
Select an available site from the list. To grant access privileges to a user account, highlight an available site and then click the button. The highlighted site will be added to the user account's list of granted sites. Double-clicking on a site will also move it to the Granted Sites column.
Displays granted sites for the specified user account. To remove a granted site from the user account, highlight a granted site and then click the button. The highlighted site will be removed from the user account's list of granted sites. Double-clicking on a site will also remove it from the Granted Sites column.
The following buttons are located between the Available Sites and Granted Sites columns:
Highlight a specific site in the Available Sites column, then select this button to transfer the site to the Granted Sites column. Double-clicking on an available site will also transfer it to the Granted Sites column.
Highlight a specific site in the Granted Sites column, then select this button to remove the site from the Granted Sites column. Double-clicking on a granted site will also remove it from the Granted Sites column.
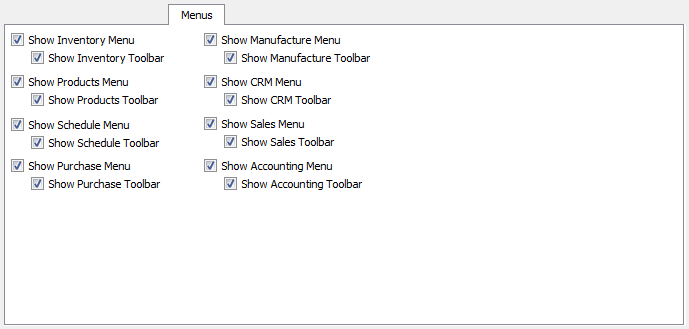
The menus and toolbars a user sees can be customized. To define menu preferences, select the tab. The following options will appear:
When specifying a preferred menu style, you are presented with the following options:
For a complete list of all the toolbar buttons available for each module, see Section 2.2.7, “Toolbar Buttons”.
Select to display the module menu on the user's main application window.
Select to display the module toolbar buttons on the user's main application window.
Select to display the module menu on the user's main application window.
Select to display the module toolbar buttons on the user's main application window.
Select to display the module menu on the user's main application window.
Select to display the module toolbar buttons on the user's main application window.
Select to display the module menu on the user's main application window.
Select to display the module toolbar buttons on the user's main application window.
Select to display the module menu on the user's main application window.
Select to display the module toolbar buttons on the user's main application window.
Select to display the module menu on the user's main application window.
Select to display the module toolbar buttons on the user's main application window.
Select to display the module menu on the user's main application window.
Select to display the module toolbar buttons on the user's main application window.
Select to display the module menu on the user's main application window.
Select to display the module toolbar buttons on the user's main application window.
| |  | |
| 7. Maintain User Accounts |  | 8. User Privilege Audit |