
|
xTuple ERP Reference Guide |
|
|
xTuple ERP Reference Guide |
| 13.2.13. Locales | ||
|---|---|---|
 | 13.2. Master Information |  |
Locales are associated with users and define the format for date, time, and numbers. Locales are also used to search for translation files and to specify decimal precision and some of the colors that the user sees on the screen. This is a powerful feature that allows each user to interact with the application in their native language and formats.
Part of defining a locale is setting the language and, optionally, the country. It is the combination of language and country that determines date and numeric formats and which translation file will be used. For example, a locale that references English and the United States will display as follows:
M/D/YY
12 hour format
1,999.00
A locale that refers to German and Germany will display like this:
DD.MM.YY
12 hour format
1.999,00
Translation information is stored in .qm files, which xTuple uses to display the user interface in a different language. When a language is selected in a locale and the country is left as Default, the xTuple client expects to find the file xTuple.xx.qm (where xx is the ISO two letter language code) located in the directory where the xTuple client is located. The U.S. Library of Congress is the ISO registration authority for language codes and makes the list of languages available on its language codes website. Please contact xTuple for more information about the availability of .qm files for various languages.
When both a language and a country are selected, the xTuple client looks for the file xTuple.xx_yy.qm located in the directory where the xTuple client is installed. The xx is the ISO two letter language code and yy is the two letter country code. You can find country codes in xTuple by navigating to and observing the Abbreviation column. If the xTuple client does not find a file that matches both language and country (xTuple.xx_yy.qm) it next looks for a file that contains the language only (e.g., xTuple.xx.qm).
If no .qm translation file is found, the xTuple client will report the error and continue the log on. The user will be presented the screens in the default language, which is English. The conventions established for the locale that define date, time, decimal precision, and color will be presented based on the locale associated with the user. If you don't want to see this error message again, go to the Preferences window and check the Ignore Missing Translations check box.
Numbers are generally formatted by the application in accordance with the conventions associated with the selected language and country. These conventions mostly concern the character used to distinguish the fractional part of a number from the integer part, commonly called the decimal point or decimal separator, and the character used as the group separator or, at least in the U.S., the thousands separator. In addition to the core numeric format, the xTuple application lets you choose the precision of numeric display and data entry for different kinds of number.
To access the master list of Locales, go to . In the Setup window, from the left side menu, select . The following screen will appear:
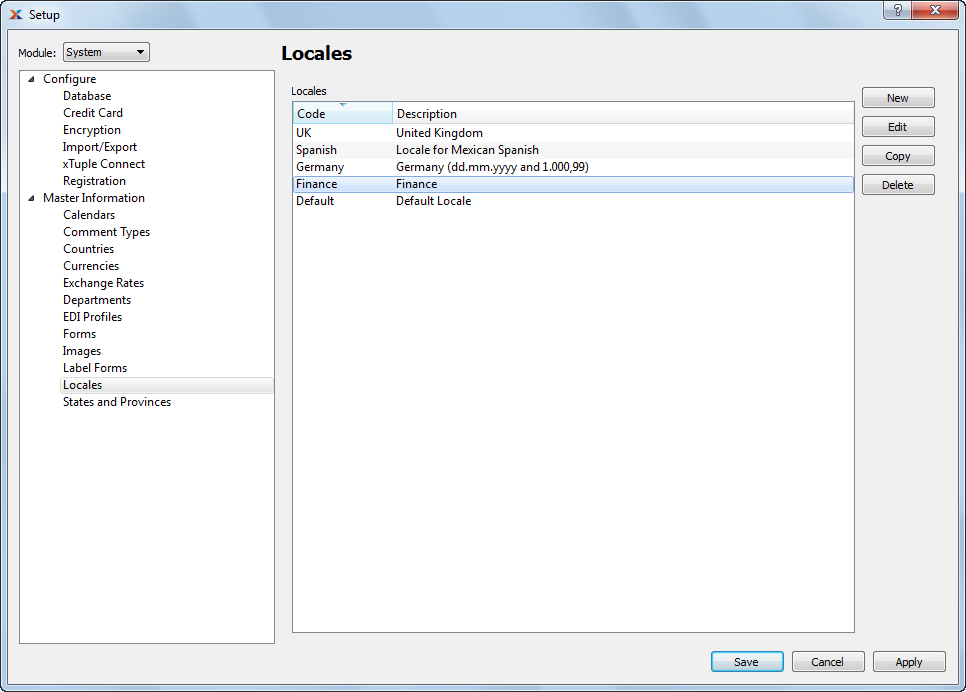
The Locales screen displays information on all existing locales, including locale name and locale description.
Locales are used to present information to users in the formats and language appropriate for their site. For example, the formatting of dates, times, and currency are controlled by locales. Translation of the application into a user's local language is also controlled by locales.
Make the link between users and their locales on the Maintain Users screen.
The xTuple locale functionality is designed to coordinate with the settings in your local operating system. Because of this, it should only be necessary to specify the default language and country value—and xTuple ERP will follow your operating system settings. For example, let's say you are located in China, running an operating system configured for China. In that scenario, using the default xTuple locale values should result in xTuple ERP being formatted appropriately for China.
While in most cases using the default values will work, you may have the need to modify your locale settings for specific cases. To create a new locale, select the button. The following screen will appear:
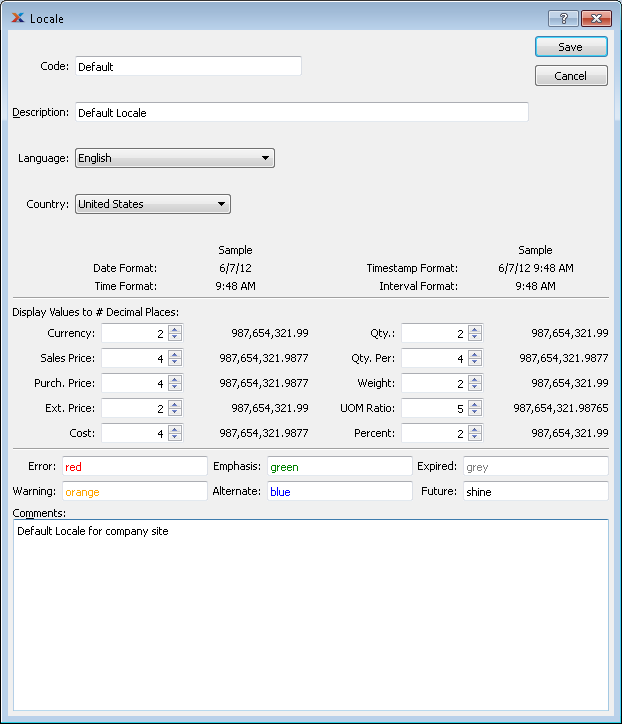
When creating a new locale, you are presented with the following options:
Enter a code to uniquely identify the specified locale setting. This code is referenced in the Maintain Users section, where locales are associated with individual users.
If you plan to use the default locale, then it may not be necessary to define any additional locales. By using the default locale you allow your operating system settings to govern the presentation of xTuple ERP.
Enter a brief description to further define the specified locale.
Select a language from the list of languages—or specify to indicate you want your operating system to define the language option for you. The language selection impacts date and time formatting. It also tells the system which language translation file it should use. You can automatically download the latest translation file for your language by using the button on the User Preferences screen. To learn more about this feature, please see Section 5, “User Account Preferences”.
xTuple ERP supports multi-language translations of the product interface through the use of .qm files. To learn more about xTuple translation and how you can get involved translating the interface for your language, please visit the translation portal here: www.xtuple.org/translate.
Select a country from the list of countries—or specify to indicate you want your operating system to define country option for you. The available countries will vary depending on the language selection. The country selection combined with the language selection impacts date and time formatting.
The following date and time formatting will be used, based on your language and country selections. If you are using the default language and country selections, then the formatting will be inherited from your operating system.
Displays the format used for dates within the application.
Displays the format used for times within the application.
Displays the timestamp format used to display any timestamp data within the application. Timestamps are typically used in transaction logs that record the specific date and time when an activity occurs within the system.
Displays the format used for intervals within the application. The interval format is used to define how work order clock-in/clock-out times and effort are displayed.
While date and time formatting and the general format of numeric values are governed by the language and country selections, you do have the ability to manually determine the number of decimal places displayed for various types of numeric value. The following formatting options are available:
The currency format is used to display most monetary data within the application.
The sales price format is used to display any sales price data within the application.
The purchase price format is used to display any purchase price data within the application.
The extended price format is used to display any extended price data within the application.
The cost format is used to display costing data within the application.
The quantity format is used to display quantity data within the application.
The quantity per format is used to display quantity ratios within the application.
The weight format is used to display weight data within the application.
The unit of measure ratio format is used to display unit of measure ratios within the application.
The percent format is used to display percentages within the application.
Specify RGB values, or use color names. You have the ability to define the colors used by the application to emphasize special cases in the data. When entering color choices, you can either use standard RGB (red, green, blue) values or any of the color names found on the available colors list. If you choose to enter RGB values then the format is either #RGB, #RRGGBB, or #RRRGGGBBB. Colors may be defined for any of the following cases:
Specify the color-coding for errors.
Specify the color-coding for warnings.
Specify the color-coding for emphasis.
Specify the color-coding for alternate text.
Specify the color-coding to indicate the expired condition.
Specify the color-coding to indicate the future condition.
To enter comments related to the locale, use the Comments field:
This is a scrolling text field with word-wrapping for entering comments related to the locale.
| |  | |
| 13.2.12. Label Forms |  | 13.2.14. States and Provinces |