
|
xTuple ERP Reference Guide |
|
|
xTuple ERP Reference Guide |
| 4.4. Shop Floor Workbench | ||
|---|---|---|
 | 4. Transactions |  |
The Shop Floor workbench offers enhanced labor tracking and streamlined work order processing for either operations or production posting environments. Its built-in time clock functionality ensures precise run-time reporting, as workbench users are required to clock-in to and clock-out of work orders.
When posting operations, users have the option to post either standard or specified times—and the run time recorded will vary depending on the option chosen. The standard times are drawn from the routing item definitions. By contrast, the specified times are based on the users' clock in/out times (i.e., effort). The specified effort for an operation may be complicated by the fact that users can be clocked into more than one work order at a time. In this case, the users' effort will be spread across the various work orders they have clocked into.
The clock-in requirement applies only to Shop Floor workbench users. If you don't use the workbench, no clock-in is required.
Some users may be Shop Floor workbench only users, meaning the only screen they see when they log in to xTuple is the Shop Floor workbench. These users do not require any privileges to run the Shop Floor workbench. The ability to post production or post operations is baked into the Shop Floor workbench only user functionality.
However, if your site is configured to use the post Production style for the Shop Floor workbench, the following privileges may be used to enhance the capabilities of Shop Floor workbench users:
AlterTransactionDates
CloseWorkOrders
ChangeNonPickItems
By contrast, if you are configured to use the post Operations style, the following privileges are available:
OverrideWOTCTime
CloseWorkOrders
AlterTransactionDates
ChangeReceiveInventory
In addition, the following privileges may be assigned to allow for accessing Shop Floor workbench features and reports from the main application menu:
woTimeClock to open the Shop Floor workbench from the menu
ViewWoTimeClock to run the display/report windows to see the data (such as production time clock)
MaintainWoTimeClock to turn on the ability to change the clocked times
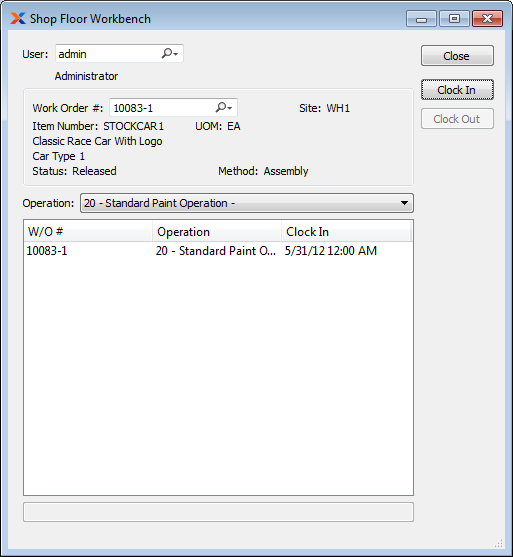
To access the Shop Floor workbench, go to . The following screen will appear:
The Shop Floor workbench must be configured for either operations posting or production posting. You may not use the workbench for both methods simultaneously. To configure the method used by the Shop Floor workbench, use the Configure Manufacture screen.
When accessing the Shop Floor workbench, you are presented with the following options:
Enter the name of the user wanting to clock-in or clock-out of a work order. Once a username is entered, the display at the bottom of the screen will show all the work orders the user is currently clocked-in to.
In , you can restrict a user's privileges so the Shop Floor workbench is the only interface they see when they log in to the application.
Enter the work order number of the work order the user wants to clock-in to or clock-out of. Only released (R) and in-process (I) work orders may be processed using the Shop Floor workbench.
A work order must be released (R) before users may clock-in or clock-out. The release of a work order occurs after the work order has been exploded.
Displays site code automatically when work order number is entered into Work Order # field.
Displays item number automatically when work order number is entered into Work Order # field.
Inventory unit of measure.
Displays work order status automatically when work order number is entered into Work Order # field. Only released (R) and in-process (I) work orders may be processed using the Shop Floor workbench.
Indicates work order method is either assembly or disassembly.
If the workbench is configured for operations-posting, select an operation from the list of operations. Users are required to clock-in and clock-out of individual operations. This allows run-time calculations to be performed on an operation-by-operation basis. A user may be clocked-in to multiple operations simultaneously. Also, multiple users may be clocked-in to the same operation. Whatever the case, the run-time clock starts when a user(s) clocks in to an operation, and it stops when the user(s) clocks out.
The following buttons are unique to this screen:
Select to clock-in to the specified work order. When a user clocks-in to a work order, the run-time clock starts running from that point. The clock stops when a user clocks-out of the work order. The elapsed time—or effort—is used for labor reporting purposes. Users may only clock-in to work orders they are not already clocked-in to. However, users may clock-in to and clock-out of the same work order as many times as necessary. Each clock-in starts the run-time time clock; each clock-out stops it.
Select to clock-out of the specified work order. When selected, the run-time clock stops for the specified work order. The time elapsed since the user last clocked-in is added to the run time total for the work order. This run-time calculation is automatic and cannot be overridden—except by users who have override privileges. Users may only clock-out of work orders they are already clocked-in to. If the workbench is configured for operations-posting, the Post Operations screen will be presented immediately after the button is selected. By default, the Scrap Work Order Material screen will immediately follow the Post Operations screen.
Shop Floor workbench users should only scrap top-level items after they have posted production sufficient to cover the scrap quantity. For example, if a user assembles 10 top-level items successfully but significantly damages the 11th, the user should post a quantity of 11 produced and then scrap one (i.e., 11 - 1 = 10).
If the workbench is configured for production-posting, the Post Production screen will be presented immediately after this button is selected. The button will be hidden if the workbench is configured for operations-posting.
| |  | |
| 4.3. Scrap Work Order Material |  | 4.5. Post Operation |