
|
xTuple ERP Reference Guide |
|
|
xTuple ERP Reference Guide |
| 1.4.1. Approve Payments | ||
|---|---|---|
 | 1.4. Payments |  |
Before you can pay a vendor an amount due, you must first approve the relevant open payable(s) for payment. Open payables are generated by the posting of vouchers and miscellaneous payables debit memos. To approve an open payable for payment, go to . The following screen will appear:
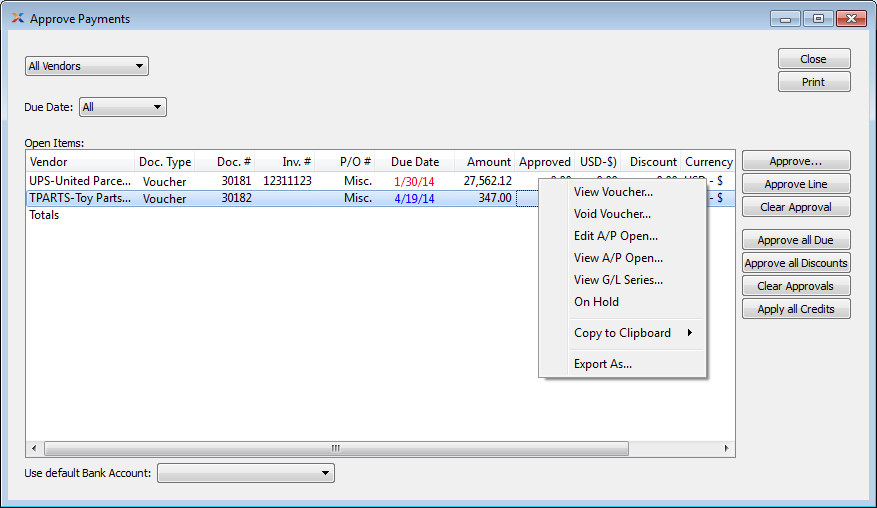
You may approve multiple vouchers for payment by using the or key and your mouse.
If you need to void a posted voucher, you can do this from the right-click menu. Voiding a voucher reverses all ledger transactions created by the original voucher. Only open vouchers may be voided. Vouchers with apply-to records cannot be voided. You will be given the option to specify a void date when voiding a voucher. Apply-to records will also be reversed on the void date you specify.
When approving open payables for payment, you are presented with the following options:
Select all or specific vendors whose open payables you want to display.
Select one of the following display options:
Select to show all open payables for all due dates.
Select to show open payables whose due date is older than the date entered.
Select to show open payables whose due date falls within a specified range.
When a check is created to satisfy an open payable, the value displayed in the amount due column will be adjusted automatically to reflect the check amount. For example, if a check is issued for the full amount due, the value in the amount due column will adjust to 0. Once a check for the full amount is posted, the open payable will be removed from the Approve Payments list altogether.
Display lists open payables. If a document is past due or on hold, the line for that document will display in red type.
Open items may be placed on hold—or reopened— using the right-click menu on this screen. When on hold, open items may not be approved for payment.
Be alert to negative balances in the amount due column. A negative balance indicates that checks have been issued for more than the amount due. To correct this situation, view your check run and void any superfluous checks.
Specify the default bank account to be used whenever an open payable is approved for payment during the current session. If you choose a bank account then only the open payables with the same currency as the bank account's currency are displayed. If you do not use this default option, you must specify a bank account each time you approve an open payable for payment.
The following buttons are unique to this screen:
Highlight an open payable and then click this button to manually review and approve the item for payment. This option brings you to the individual Approve Payment screen, where you will find the full range of payment options.
Highlight an open payable and then click this button to automatically approve the open item for payment. Any available terms discount will also be applied automatically.
Highlight an open Payable and then choose this button to clear the approved payment. This option effectively reverses the action of the option.
Select this button to approve for payment all open payables whose payment date is due or past due and whose currency is the same as the bank account's currency.
Select this option to automatically approve all open payables which are eligible for a terms discount and whose currency is the same as the bank account's currency. The terms discount will be applied automatically to all approved open items.
Select this button to clear all approved payments due. This option effectively reverses the action of the option.
When selected, the application will start with the oldest open and unapplied credit memo (based on its due date) and apply it to the oldest open items (i.e., vouchers and debit memos) until the credit is fully applied—or until there are no more open items for the credit to be applied against. This process continues applying all available credit memos based on their due date.

Right-clicking on an AP payment will give you the option. Selecting this option will open the On Hold Comment screen. When putting an AP payment on hold, you have the option to record a comment or reason when changing the payment's status. This comment will clear upon releasing the payment.
To select for payment all open payables whose payment date is due or past due, choose the button. The following screen will appear:
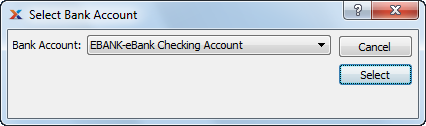
When selecting for payment all open payables whose payment date is due or past due, you are presented with the following options:
Specify the bank account to be used for paying all selected payments due.
To approve an individual open payable for payment, choose the button. The following screen will appear:
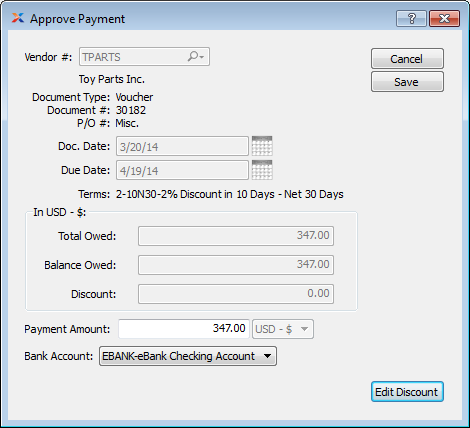
When specifying payment details for an approved open payable, you are presented with the following options:
Displays the name of the vendor who is owed payment.
Displays the document number of the document being approved for payment.
Valid document types include posted vouchers and miscellaneous payables debit memos.
Displays the purchase order number (if any) of the purchase order associated with the document.
Displays the document's origination date.
In the case of a voucher, the document date is the same as the invoice date.
Displays the date payment is due.
The due date is determined based on the billing terms selected at the time the document is posted.
Displays the billing terms selected at the time the document was posted.
Displays the total amount due to the vendor.
The total owed is equal to the vouchered amount—or to the amount of the miscellaneous payables credit memo at the time of posting.
Displays the balance due to the vendor.
The balance owed will differ from the total owed if discounts are applied based on the specified billing terms.
Specify the amount to be paid to the vendor. If a billing terms discount is applied, the payment amount will be reduced automatically by the discount amount.
The payment amount is the amount which appears on checks when they are created.
Specify the bank account to be used for paying the open payable.
The following buttons are unique to this screen:
Select to apply any billing terms discount you may be eligible for.
To apply a billing terms discount and have the discount amount deducted from the total owed, select the button. The following screen will appear:
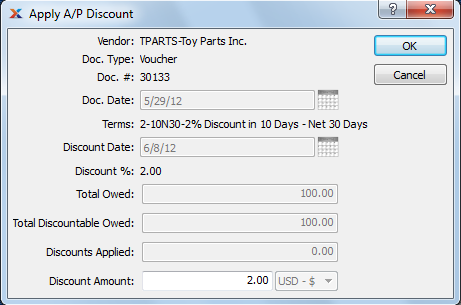
Discounts are posted to the general ledger (G/L) when the check they are associated with is posted. Any time prior to the posting of the check, the discount can be edited or reversed.
When applying a billing terms discount, you are presented with the following options:
Displays the name of the vendor who is owed payment.
Displays the document type. Valid document types include posted vouchers and miscellaneous payables debit memos.
Displays the document number of the document being selected for payment.
Displays the document's origination date. In the case of a voucher, the document date is the same as the invoice date.
Displays the billing terms selected at the time the document was posted.
Displays the expiration date for the billing terms discount period. The discount date will display in red type once the discount period has expired. Once the discount period has expired, the system will no longer automatically update the Discount Amount field.
Displays the discount percentage, as specified in the billing terms.
Displays the total amount from the original document.
Displays the total amount due of voucher line items marked as discountable. If line items are not marked as discountable, they will not appear in this total.
Displays the amount of any discounts previously applied to the selected document.
Enter the amount of the discount to be applied to the total owed. As long as the discount period has not expired, the system will automatically calculate the discount amount for you. The discount amount will be equal to the total owed multiplied by the discount percentage. The account used for posting discounts to the G/L is defined on the Payables Assignments screen.
The following buttons are unique to this screen:
Select to apply the entered discount amount to the selected document.
| |  | |
| 1.4. Payments |  | 1.4.2. List Approved Payments |