
|
xTuple ERP Reference Guide |
|
|
xTuple ERP Reference Guide |
| 3.1. Enter New Bill of Materials | ||
|---|---|---|
 | 3. Bill of Materials |  |
To create a new bill of materials (BOM), go to . The following screen will appear:
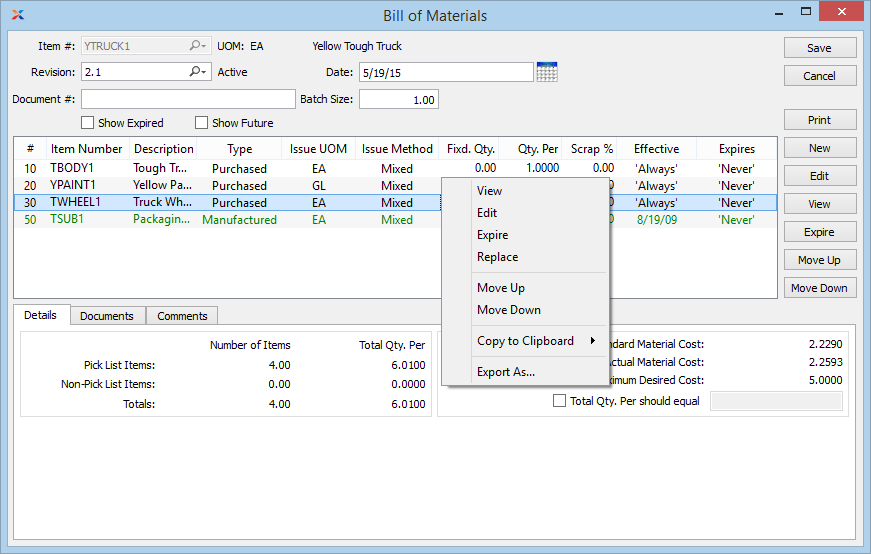
When creating a new BOM, you are presented with the following options:
Enter the item number of the manufactured item you want to create a BOM for.
Inventory unit of measure (UOM).
Select to display expired components in the BOM display. Expired components are components that have been expired from the BOM.
Select to display future components in the Bill of Materials display. Future components are components that will be added to the BOM at a future point in time.
If revision control is enabled at your site, specify the BOM revision number you want to view. If none exists, simply enter a value to create one. The status of the revision will also be displayed. The following statuses apply to revisions:
This is the current, default revision used for costing and material requirements planning (MRP). Only one revision can be active at the same time. Active revisions may be modified. However, once a revision has been deactivated, it may only be reactivated if you have enabled the configuration option to allow for substitute revisions.
The active revision becomes inactive when a pending or substitute revision is activated. To activate a pending or substitute revision, right-click on the magnifying glass next to the item number and select . Inactive revisions cannot be modified.
This is a revision that has never been used, but is under development or consideration. You may store multiple pending revisions. When a pending revision is entered in the Revision field, an option to activate the item will dynamically appear in the context menu after you right-click on the magnifying glass next to the item number. Select from this context menu to convert a pending revision to the active revision.
If you have enabled the configuration option to allow for substitute revisions, this status will be available. If enabled, any active revision will become a substitute revision when it is deactivated. Substitute revisions serve as alternate revisions which can be activated at a later date.
This is a formerly active revision. Inactive revisions cannot be modified—only viewed. They are stored to provide historical, point-in-time build information, which may be used for various purposes throughout the application. For example, privileged users may select inactive revisions when processing work orders or purchase orders. There is no limit to the number of inactive revisions you may save.
If desired, enter a document number to further identify the BOM.
Indicates the date of the revision.
The batch size is used to determine per unit setup cost when costing manufactured items which have routings. For example, if you have $100 in setup costs and a batch size of 100, then your per unit setup cost would be $1. Batch size also impacts material costs when component items are specified as using fixed quantities on a BOM. For example, let's say you have a BOM component listed as having a fixed quantity of 10 and the batch size for the manufactured item is 100. Dividing the batch size by the fixed qty. (100/10) gives you a material requirement of 10 component items. This material requirement is added to the qty. per requirement for the component item, thus having an impact on the material cost of the assembly.
Display lists component items for the BOM. Some line items may be color-coded for ease of use. Manufactured subcomponents will display in green text, expired components will be red, and future components will be blue.
Displays the total number of component items which are also pick list items. Items may be marked as pick list items on the Item master.
Displays the total number of component items which are not pick list items.
Displays the total number of component items.
Displays the current standard cost for the component items. The displayed cost includes all standard costs associated with the component items. Any non-material costs associated with manufactured subcomponents (e.g., labor and overhead) would also be included in this total.
Displays the current actual cost for the component items. The displayed cost includes all actual costs associated with the component items. Any non-material costs associated with manufactured subcomponents (e.g., labor and overhead) would also be included in this total.
Displays the maximum desired cost for the component items. The maximum desired cost is defined on the Item master. It provides a visual guide to help determine whether component item costs—either standard or actual—have exceeded the maximum desired cost.
Select if you want to require the total qty. per units to equal a certain number. Enter the number you want the total qty. per units to equal. If selected, you will not be able to save the BOM until the total qty. per requirement is met. To remove the requirement, simply de-select this option.
To associate documents with a BOM, select the tab.
When associating documents, you are presented with the following options:
Select to create a new document and associate it with the current record. You may create the following document types:
Select to create a new image association.
Select to create a new fixed asset association.
Select to create a new maintenance order association.
Select to create a new incident and associate it.
Select to create a new project and associate it.
Select to create a new opportunity and associate it.
Select to create a new task and associate it.
Enables you to edit associated documents. The Edit screen is the same as that for creating a new document—except that when editing, the fields will contain document information. Double-clicking on a document will also bring you to the editing screen.
Highlight a document and then select this button to reach a read-only view of the Edit screen.
Select to associate already-existing documents. The following document types may be attached: contact, account, customer, employee, file, image, incident, item, opportunity, project, purchase order, sales order, vendor, web site, work order.
Highlight a document and then select this button to remove the association.
To associate already-existing documents, select the button. The following screen will appear:
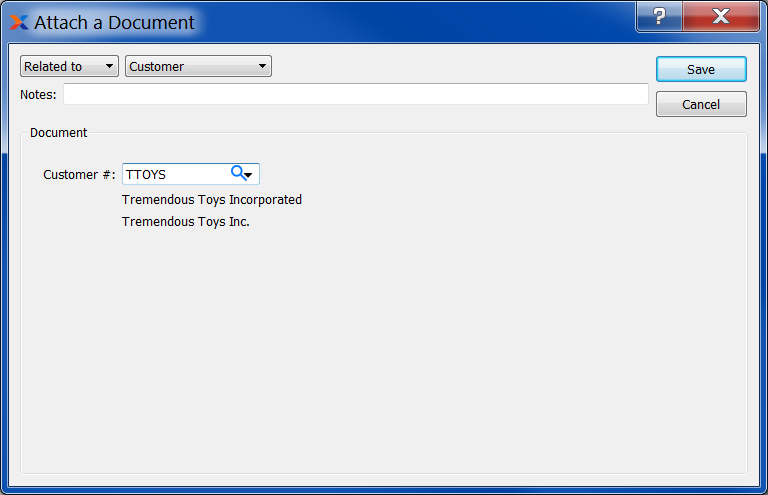
When associating already-existing documents, you are presented with the following options:
Indicate how the document is related to the current record. The following relationship options are available: related to, parent of, child of, duplicate of.
Specify the kind of document you want to associate. The following document types may be attached: contact, account, customer, employee, file, image, incident, item, opportunity, project, purchase order, sales order, vendor, web site, work order. When associating files, you will also be given the option to save the file to the database.
There is no file size restriction when saving files to the database. However, excessively large files could cause storage and performance issues.
Leave any notes on the document file as needed.
Use the lookup tool to identify the specific document you want to attach. The data entry options will vary depending on the document type you select.
To associate comments with a BOM, select the tab.
When adding or reviewing comments, you are presented with the following options:
Select to display all comments in the list in an expanded view which includes the entire text of each comment. To edit a comment, simply select the link next to the comment. That link will not be shown for changelog comments, which can't be edited. If the Verbose Text option is not selected, the comment list will display only header level information for each comment.
Display lists comments related to the record.
The following buttons are available:
Opens screen for creating a new comment.
Highlight a comment and then select this button to reach a read-only view of the Edit screen.
Enables you to edit highlighted comments—as long as the comments are not changelog comments. ChangeLog comments are system-generated and may not be edited. The Edit screen is the same as that for creating a new comment—except that when editing, the fields will contain comment information. Double-clicking on a comment will also bring you to the editing screen.
To enter a new comment, select the button. The following screen will appear:
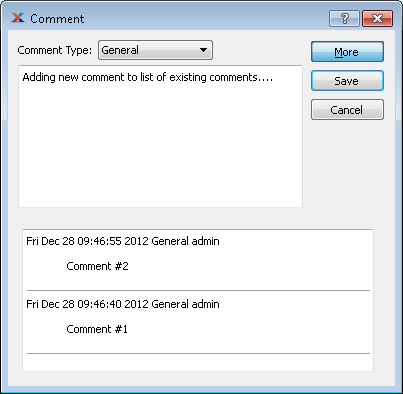
Select a comment type from the drop-down list to classify the comment. This is a required step. Comment types may be system-defined (i.e., changelog and general) or user-defined, as described in Section 13.2.3, “Comment Types”. Once you have specified a comment type, begin typing your comment in the main text area. The text area features word-wrapping and scroll-bar support for longer comments.
The following buttons are unique to this screen:
Select to show the complete list (i.e., thread) of comments associated with the record. To hide the list, simply select the button again. The comment thread will show the most recent comment first.
The following buttons are unique to this screen:
Highlight a component and then select this button to expire the item from the BOM.
Highlight a component item and then select this button to move the component up the BOM list. Sequence numbers are automatically adjusted to reflect the change in position.
Highlight a component item and then select this button to move the component down the BOM list. Sequence numbers are automatically adjusted to reflect the change in position.
| |  | |
| 3. Bill of Materials |  | 3.1.1. Bill of Materials Item |