
|
xTupleCommerce Product Guide |
|
|
xTupleCommerce Product Guide |
| 1. Checkout Process | ||
|---|---|---|
 | Chapter 5. Shopping Cart |  |
The following steps outline the basic process flow for shopping carts:
Once a user clicks the button on a product page, the item is added to their shopping cart and the number of units is updated to reflect how many of the units they added.
At this point, the user can continue shopping and adding items to the cart.
While a user is shopping online, a quote containing their selected items is being assembled simultaneously in the ERP. Navigate in the ERP to to see the quote, which is synchronized with the web portal in real time. If the user updates their cart on the web portal, the information will also update the quote. You may need to refresh the Quote screen or hit the button to see the changes. Likewise, any changes you make to a quote in the ERP will be visible in the web portal, whenever the user refreshes the page.
The following screenshot shows both the online order and the back-end quote:
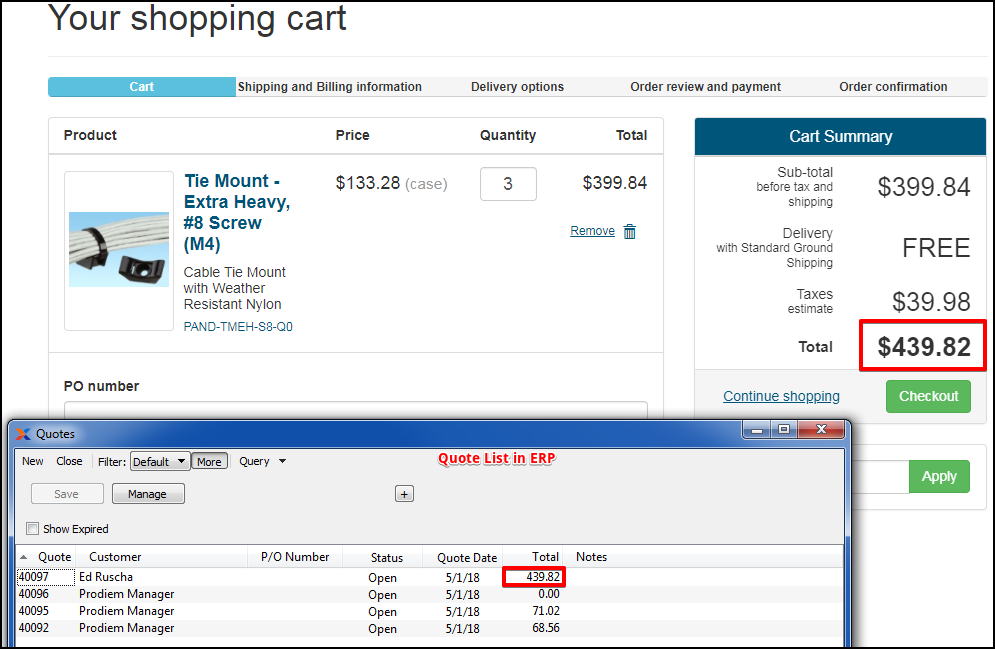
Shopping cart with ERP Quotes list superimposed
When a user is done shopping and is ready to check out, here are the steps they would follow:
Navigate to the shopping cart, either by clicking on the cart icon or the notification that appears when an item is added to the cart.
Review the products, prices, quantities, and total for the cart.
To view product details, click on the title, image, or SKU of the item to be brought to the Product page.
To increase or decrease the quantity on an item(s), change the quantity in the Quantity field and tab out of the field. The open fields on the page will be grayed out and disabled while the page is updating the Sub-Total and Total.
To remove a line item from the order, click the link.
If needed, users can add purchase order (PO) or customer reference numbers with their order. This information will appear in the ERP, all the way through to the invoice.
Order notes can also be added. This information will also travel with the order through to invoicing.
To continue shopping, the user can either click the button or navigate the menus manually (i.e., , , etc.).
Finally, select the button to move to the next step in the process.
| |  | |
| Chapter 5. Shopping Cart |  | 1.1. Authentication |