This section provides recommendations on how to configure xTuple Connect to send EDI. The example EDI Profile we created in Section 3.2, “Create a Simple EDI Profile” of Chapter 4, Basic EDI had significant limitations:
The email address of the recipient was fixed
The salutation in the message body was specific to this one customer—"Dear Tremendous Toys,"
The text of the message body was specific about the Document Type—"Attached please find a current invoice"—but did not provide the Invoice Number
The Profile had only one EDI Form—it could only be used to send Invoices
Then, in Section 1.2.2, “Defining New EDI Tokens”, we looked at ways to make EDI Profiles more flexible by finding and using document-specific information such as document numbers and appropriate email addresses in an EDI Profile.
Here are some suggestions on how to build a set of EDI Profiles that is flexible enough to do what you need without creating more EDI Profiles than you can manage.
First of all, start with sending EDI to just one Customer or one Vendor. Pick one Document Type. Pick one file format. Don't try to set up xTuple Connect to send every document electronically to every business partner. Once you have one thing working, then you can expand your usage.
Think about your business partners. Which partners do you want to send documents to electronically? Who do you send the most Invoices or Purchase Orders to? How many of your partners should get their documents in the same format?
Pick as your starting Document Type the one that your biggest business partner or the largest number of your business partners want to receive as EDI. Pick as your file format the one your largest or the largest number of partners want to receive.
Now build and test an EDI Profile with a single EDI Form. As you go, try to replace anything specific to a single Customer or single document or single Document Type with an EDI token. Build your query to generate custom EDI tokens carefully. Think about where it might have problems:
Sales Reps who are not Employees might not have email addresses in the xTuple ERP database
The billing Contact for a Customer might not have an email address, so have a fall-back option such as the correspondence contact
The API Views might not have all of the data you need, so you might have to build more complicated queries using the regular xTuple ERP database tables
Once you have things set up for one Document Type, one file format, one business partner, decide where to expand next.
The safest thing to do is attach that same EDI Profile to other business partners first. This lets you test what you've done already to make sure it really is general and will work well.
Then add a second Document Type to that same EDI Profile, configure it with the same caution, and then expand usage to more business partners.
Over time you may learn that all you need is one EDI Profile with a couple of EDI Forms, all attached to all of your Customers.
As the business environment changes and your partners start to change their businesses, you may find that you need to build new EDI Profiles for particular partners. This is fine. As long as you started slowly and started generally, you should find that the number of EDI Profiles will stay relatively small and easy to manage.
You have decided to follow the recommendations above. The first EDI Profile you want to build will send Invoices by FTP to your Customers. Unlike email used in the previous examples, where there are contact records and user records with email addresses, there is no fixed place in the database to store FTP information. How do you build a general EDI Profile to send files to different FTP server for different Customers?
The example below creates and uses four EDI tokens that are not part of the standard set. It uses Customer Characteristics to hold the FTP hosts, user names, passwords, and directories. This approach has some security problems but will serve as an example of the kinds of thing you can do.
Follow this path:
Click the NEW button
In the "Name" field, enter "Sales_FTP_CSV"
Leave the "EDI Type" set to "FTP"
Check the "Review Before Sending" box
In the "Server" field, enter
</ftpserver>In the "Login Name" field, enter
</ftplogin>In the "Password" field, enter
</ftppassword>In the "Directory" field, enter
</ftpdirectory>Create an EDI Form for Invoices
In the "Query" field, enter the following text to retrieve the FTP connection information required to send an Invoice:
SELECT (SELECT charass_value
        FROM charass JOIN char ON (charass_char_id=char_id)
        WHERE charass_target_type='C'
          AND charass_target_id=cust_id
          AND char_name = 'ftpserver') AS ftpserver,
       (SELECT charass_value
        FROM charass JOIN char ON (charass_char_id=char_id)
        WHERE charass_target_type='C'
          AND charass_target_id=cust_id
          AND char_name = 'ftplogin') AS ftplogin,
       (SELECT charass_value
        FROM charass JOIN char ON (charass_char_id=char_id)
        WHERE charass_target_type='C'
          AND charass_target_id=cust_id
          AND char_name = 'ftppassword') AS ftppassword,
       (SELECT charass_value
        FROM charass JOIN char ON (charass_char_id=char_id)
        WHERE charass_target_type='C'
          AND charass_target_id=cust_id
          AND char_name = 'ftpdirectory') AS ftpdirectory
FROM invchead JOIN custinfo ON (invchead_cust_id=cust_id)
WHERE (invchead_id=<? value("docid") ?>);
Click SAVE to save the EDI Form
Click SAVE to save the EDI Profile
One alternative to using Customer Characteristics, one that would address the security concerns, is to write a small xTuple Extension package with a table to hold the FTP data and associate these data with particular Customers. Then the server, login, and password information could be stored in encrypted form.
Now that we have a rather generic EDI Profile, we have to set up the Customers to use this Profile. There are several ways we can do this. We've chosen to store the FTP connection information in Customer Characteristics. To take this approach we must do the following:
Create the Characteristics
Define values for these characteristics for each Customer
Attach the EDI Profile to each Customer for all three Document Types
If you read the query in the previous section, you'll know that it looks for four Characteristics associated with the Customer: ftpserver, ftplogin, ftppassword, and ftpdirectory. These do not yet exist in the database, so we have to add them:
Follow this path:
Click the NEW button
In the "Name" field, enter "ftpserver"
Check the "Customer" field
In the "Description" field, enter "Used for EDI Profiles"
Click the SAVE button
Repeat these steps to create the other three Characteristics that we need: "ftplogin", "ftppassword", and "ftpdirectory".
To send FTP to your Customers, you'll need to get the address for their FTP servers, either a host name (e.g., ftp.xtuple.com) or an IP address (e.g., 192.168.57.122), and a user name and password. You might also get a directory name in which to put the transferred files. In the example below, we'll use "localhost" for the FTP server, "xtedi" for the login and password, and the Customer Number for the directory.
The process to set up the Characteristics and enter values for each Customer depends on whether your Customers have a Customer Type that Enables Characteristics Profiles or not. For Customers who have Characteristics Profiles enabled, first follow these steps to add the Characteristics to the Characteristic Profile:
Follow this path:
Select a Customer Type with Enabled Characteristics Profiles (e.g. "NORMAL")
Click the EDIT button
Set the "Characteristic" field to "ftpserver"
Click the Save button
Repeat for "ftplogin", "ftppassword", and "ftpdirectory"
Click the SAVE button on the Customer Type window
Next, set the individual Characteristic values for each Customer you want to send EDI to. Follow these steps to do so:
Follow this path:
Select one of your Customers from the list that has the Customer Type you just edited (e.g. TTOYS)
Click the EDIT button
Click on the "Characteristics" tab
Double-click on the "Value" column of the "ftpserver" row
Type "localhost"
Double-click on the "Value" column of the "ftplogin" row
Type "xtedi"
Double-click on the "Value" column of the "ftppassword" row
Type "xtedi"
Double-click on the "Value" column of the "ftpdirectory" row
Type the Customer Number (e.g. "TTOYS")
At this point, the Characteristics tab of the Customer window should look like this:
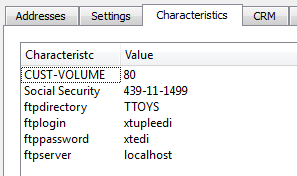
Sample settings of Customer Characteristics for FTP EDI
Repeat this last set of steps for every Customer you want to set up to use the FTP EDI Profile just created. The process for adding Characteristics to a Customer without the Enable Characteristics Profiles limitation is much simpler. See the xTuple ERP Reference Guide for more information.
The final configuration step is to attach the EDI Profile to each Customer. This ensures that the system finds the right EDI Profile and sends the right data in the right format whenever sending EDI for this Customer. Customers who do not have EDI Profiles defined will not receive any EDI (with the exception of Incident EDI if the CRM module is configured to send EDI for Incidents).
To attach the EDI Profile we created to a Customer, follow these steps:
Follow this path:
Select one of the Customers you set the FTP Characteristics for from the list of Customers (e.g., TTOYS)
Click on the "Transmission" tab
Click the ATTACH button
The "Attach EDI Profile" window will open
Set the "Document Type" to "Invoice"
Select "Sales_FTP_CSV" from the list
Click the ATTACH button
Repeat steps 4-8 for "Sales Order" and "Quote"
Repeat steps 2-9 for another Customer
You're now done with your EDI configuration!