In addition to CSV and HTML formats, xTuple Connect can build and send XML files. These files can be built very simply or can be transformed using XSLT into any format you need. You are only limited by the data you can extract from the xTuple ERP database and your ability to write XSLT.
Just as with CSV and HTML formats, the email message or FTP'ed file will contain the results of running one or more queries. The root element of the XML document will be xtupleapi. Then the queries in the Query Set will be run in order. Each row of query output will be wrapped in an element with the name of the Query Item. Each field in the output will be an element with the name of the column and will contain the value of that field. This is perhaps easier to understand with an example. The following example shows the same Invoice as the HTML and CSV examples, but in XML format:
<!DOCTYPE xtupleimport>
<xtupleimport>
 <header>
  <invoice_number>60096</invoice_number>
  <order_number>[NULL]</order_number>
  <invoice_date>2010-07-09</invoice_date>
  <ship_date>2010-07-09</ship_date>
  <terms>2-10N30</terms>
  <customer_number>TTOYS</customer_number>
  <billto_name>Tremendous Toys Incorporated</billto_name>
  <billto_address1>Tremendous Toys Inc.</billto_address1>
  <billto_address2>101 Toys Place</billto_address2>
  <billto_address3></billto_address3>
  <billto_city>Walnut Hills</billto_city>
  <billto_state>VA</billto_state>
  <billto_postal_code>22209</billto_postal_code>
  <billto_country>United States</billto_country>
  <shipto_name>Olde Towne Store 1</shipto_name>
  <shipto_address1>Olde Towne Toys Store 1</shipto_address1>
  <shipto_address2>1 Duke Street</shipto_address2>
  <shipto_address3></shipto_address3>
  <shipto_city>Alexandria</shipto_city>
  <shipto_state>VA</shipto_state>
  <shipto_postal_code>22201</shipto_postal_code>
  <shipto_country>United States</shipto_country>
  <po_number></po_number>
  <ship_via>UPS-GROUND-UPS Ground</ship_via>
  <misc_charge_description></misc_charge_description>
  <misc_charge>0.00</misc_charge>
  <freight>0.00</freight>
  <currency>USD</currency>
  <payment>0.00</payment>
 </header>
 <lineitems>
  <invoice_number>60096</invoice_number>
  <line_number>1</line_number>
  <item_number>BTRUCK1</item_number>
  <misc_item_number></misc_item_number>
  <site>WH1</site>
  <misc_item_description></misc_item_description>
  <sales_category>[NULL]</sales_category>
  <customer_part_number></customer_part_number>
  <qty_ordered>100.0000</qty_ordered>
  <qty_billed>100.0000</qty_billed>
  <net_unit_price>9.8910</net_unit_price>
  <tax_type>Taxable</tax_type>
  <qty_uom>EA</qty_uom>
  <price_uom>EA</price_uom>
  <notes></notes>
 </lineitems>
 <lineitems>
  <invoice_number>60096</invoice_number>
  <line_number>2</line_number>
  <item_number>CTRUCK1</item_number>
  <misc_item_number></misc_item_number>
  <site>WH1</site>
  <misc_item_description></misc_item_description>
  <sales_category>[NULL]</sales_category>
  <customer_part_number></customer_part_number>
  <qty_ordered>25.0000</qty_ordered>
  <qty_billed>25.0000</qty_billed>
  <net_unit_price>27.0000</net_unit_price>
  <tax_type>Taxable</tax_type>
  <qty_uom>EA</qty_uom>
  <price_uom>EA</price_uom>
  <notes></notes>
 </lineitems>
 <lineitems>
  <invoice_number>60096</invoice_number>
  <line_number>3</line_number>
  <item_number>YTRUCK1</item_number>
  <misc_item_number></misc_item_number>
  <site>WH1</site>
  <misc_item_description></misc_item_description>
  <sales_category>[NULL]</sales_category>
  <customer_part_number></customer_part_number>
  <qty_ordered>75.0000</qty_ordered>
  <qty_billed>75.0000</qty_billed>
  <net_unit_price>9.8000</net_unit_price>
  <tax_type>Taxable</tax_type>
  <qty_uom>EA</qty_uom>
  <price_uom>EA</price_uom>
  <notes></notes>
 </lineitems>
</xtupleimport>
If you need the data in some other format, you will need to write an XSLT stylesheet. Stylesheets can do things like rename elements, change their order, move the line items to be child elements of the parent Invoice, or even convert XML to CSV files. Once you have a stylesheet, copy it to a location on the computer where the xTuple Connect Batch Manager runs.
You must register your XSLT stylesheet with xTuple ERP:
Follow this path:
Click on the "XSLT Settings" tab
In the "Default XSLT File Directories" field for the operating system where the xTuple Connect Batch Manager is running, enter the directory where you just placed the XSLT stylesheet
Click the NEW button next to the list of XSLT filters
Enter a name for this XSLT Map that you will remember is associated with this EDI Profile
In the "Document Type" field type the name of the root element your XSLT stylesheet will produce
In the "Export XSLT File Name" field type the name of the XSLT file
Click SAVE
On the Configure Import and Export screen again, type the XSLT processor command just as you would on the command line. However, type
%xinstead of the name of the XSLT stylesheet and type%finstead of the name of the XML file to transform.Click SAVE
Now mark the EDI Form to use it:
Follow this path:
Select the EDI Profile you want to change
Click the EDIT button
Select the EDI Form you want to change
Click the EDIT button
Make sure the "Output Format" reads "XML"
Under "Destination Format" click on "Alternate XML"
Select the XSLT Map you created above
Make sure the right Query Set is selected
The EDI Form screen will look something like this now:
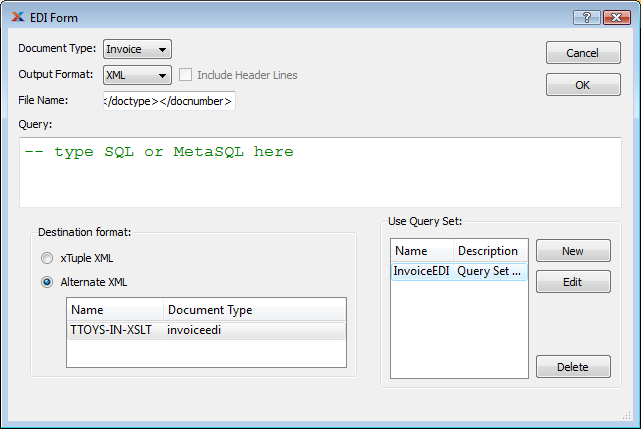
EDI Form for XML
Click the OK button