An EDI Profile is composed of several pieces. Most of these were briefly shown in Chapter 4, Basic EDI. This section discusses them in more detail.
EDI Profiles have a parent/child relationship with some of their components. This is similar to Sales and Purchase Orders, which consist of the orders themselves (the parent) and individual line items (the children).
The EDI Profile parent record holds the common information, such as Email addresses and subject lines and message bodies as we have already seen, or information on how to interact with FTP servers (see Section 2, “Using FTP to Send EDI”). This parent record also stores notes about the profile as a whole and a flag indicating whether to show the Review EDI screen to users or not when preparing to send EDI.
EDI Forms are one kind of child record for EDI Profiles. They describe how a particular type of document should be handled by the parent EDI Profile. Each EDI Profile can have one EDI Form for each Document Type that xTuple Connect can send electronically. This includes A/R Statements, Invoices, Purchase Orders, Quotes, Sales Orders, and some Credit Memos. A few special Document Types are discussed in Section 7, “System EDI Profiles”.
Here is an example of the EDI Form screen:
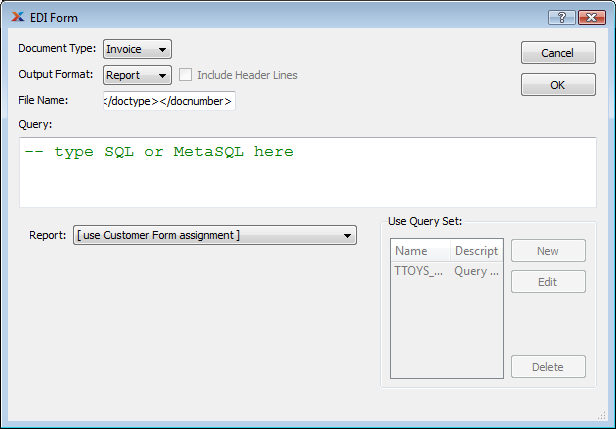
Sample EDI Form screen
The"Output Format" fields tells xTuple Connect how to format documents of the selected type that will be sent using the parent EDI Profile. There are four options for "Output Format":
- Report
xTuple Connect should run one of the OpenRPT reports defined in the xTuple database and send a PDF file
- CSV
xTuple Connect should run one or more queries and send a text file with the results. The contents of the file can be separated by commas or almost any other single character between fields. This is discussed in more detail in Section 3, “Sending CSV Files”.
- HTML
xTuple Connect should run one or more queries and send an HTML file with the results in one or more HTML tables. This is discussed in more detail in Section 4, “Sending HTML Files”.
- XML
xTuple Connect should run one or more queries and send an XML file with the results. The contents of the XML file can be edited automatically before the file is sent. This is discussed in more detail in Section 5, “Sending XML Files”.
The information shown on the bottom of the EDI Form window changes depending on the selected Output Format. In the example here, you can choose between allowing the Customer Form Assignment to determine the report to run when sending Invoices or selecting a particular report to run from the list of all reports in the xTuple ERP database.
The "File Name" field tells xTuple Connect what to call the file that gets built. This file name is used internally when saving the data and is also used as the name of the email attachment for email EDI Profiles and for the destination file name when sending by FTP. xTuple Connect will automatically add an appropriate suffix when it creates the file if that is not typed here (e.g. ".pdf" or ".csv").
The "Query" field lets you define tokens for use in your EDI Profile beyond the basic five listed in Section 1.2.1, “Basic EDI Tokens”. After reviewing the basic tokens, we will discuss how to use the Query field to define your own.
EDI tokens and their values can be used in EDI Profiles in several ways.
Fill in specific details for email subject lines and message bodies
Fill in delivery details, such as email addresses or FTP server connection information
Pass parameters to OpenRPT reports
We described the basic EDI tokens in Section 1.2.1, “Basic EDI Tokens”. Here is a simple list as a reminder:
</docnumber>
</doctype>
</docid>
</doctypefull>
and one more, which is specific to the Document Type being processed (e.g.,
</invchead_id>)
In addition, Sales Orders also receive the </sohead_id> token and CRM Incidents also receive the </reason> token.
You can also define your own tokens for more complex needs. Any database query that you can write with MetaSQL and the basic tokens above can be used to create custom tokens and set their values.
Note
For a complex, real-life example, see Chapter 6, Connecting with Incidents.
This capability is useful in several ways:
Some stock xTuple ERP reports require more parameters than just the basic five
You might want to share EDI Profiles between Customers, and so need to select different email addresses for different Invoices
You might want to share EDI Profiles between different Document Types for a single Customer but copies of these documents get sent to different people within your own company
Defining and using your own EDI Tokens requires about the same amount of knowledge as writing your own OpenRPT report—a little SQL, a little MetaSQL, and a little bit about the tables in the xTuple ERP database. The basic idea is that you write a database query that returns one record. You can use any of the basic tokens as MetaSQL parameters in that query. The names of the columns in that returned record become the names of the new tokens and the values in that record become the values of the tokens.
For example, let's say you want an EDI Profile that emails a copy of every Invoice to the Customer's billing Contact and to the Sales Rep for that Customer. So create an EDI Profile with an Invoice EDI Form that describes how to get the billing Contact and Sales Rep email addresses:
Set up the EDI Profile just as described in Section 3.2, “Create a Simple EDI Profile”
Change the "To" email address to
</customeremail>(this is our first custom EDI token)Change the "Cc" email address to
</salesrepemail>(our second custom token)Select the Invoice line in the list of EDI Forms and click EDIT
Change the "Query" field to this:
SELECT cntct_email AS customeremail,
       usr_email   AS salesrepemail
  FROM invchead
  JOIN custinfo ON (invchead_cust_id=cust_id)
  JOIN cntct    ON (cust_cntct_id=cntct_id)
  JOIN salesrep ON (cust_salesrep_id=salesrep_id)
  JOIN emp      ON (salesrep_emp_id=emp_id)
  JOIN usr      ON (emp_number=usr_username)
 WHERE (invchead_id=<? value('invchead_id') ?>);
This query uses the basic token
invchead_idas a MetaSQL parameter to find the particular Invoice. It assumes that the Customer has been set up with a Billing Contact and the Sales Rep has been set up as an Employee and xTuple ERP user. A more complicated query could use the correspondence contact if the billing contact has no email address and could work around the assumptions about the Sales Rep setup.Check the Transmission tab on the Customer window to make sure that the desired Customers have this EDI Profile attached for Invoices.
The other kind of child an EDI Profile can have is a xTuple Connect Batch Manager job. When you mark an EDI Profile as recurring on the Batching tab, this really creates one or more xTuple Connect Batch Manager jobs with the "Action" EDIBatch. The recurrence information and email notification settings are stored with the xTuple Connect Batch Manager jobs and not the EDI Profile itself. All of the submissions to xTuple Connect using this EDI Profile are queued up and sent on a schedule.
By default EDI jobs are submitted to the xTuple Connect Batch Manager for immediate processing. As a result, your business partners will receive an intermittent stream of email messages or files on their FTP servers as the business day progresses. Some companies, however, prefer to receive all of their orders or invoices at a fixed time of day. Use the Recurring option on EDI Profiles for these business partners.
Every time the xTuple Connect Batch Manager processes an EDIBatch action, a new xTuple Connect Batch Manager job is created for each EDI message in the queue for that EDI Profile. An email message describing the EDI jobs that were created is sent using the email properties on the "Batching" tab of the EDI Profile. The individual EDI jobs then get processed to build and send the individual EDI messages.