
|
OpenRPT Product Guide |
|
|
OpenRPT Product Guide |
| 1.4. Adding Barcodes | ||
|---|---|---|
 | 1. Modifying an Existing Report |  |
Now that we have a made a few cosmetic changes to a report definition, we are now ready to make a more significant change. In this next exercise, we will add a barcode object to print usernames in barcode format.
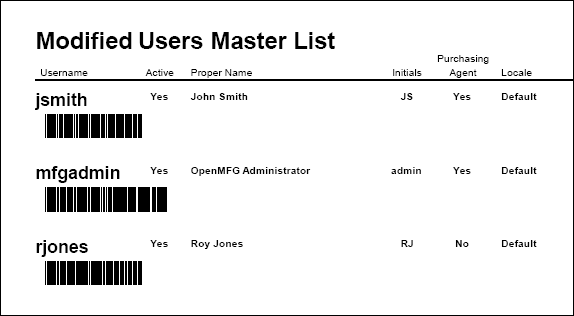
The mechanics of adding a barcode object are the same as adding a human-readable field object. When we are done, we will have a report that looks like the following:
We will be adding the barcode object just below the field object containing the human-readable username. To do so, we first need to expand the lower boundary of the UsersMasterList detail section.
To expand the height of a section, simply hold your mouse over the lower boundary of the section. When the double arrows of the resize cursor appear, use your mouse to expand the section.
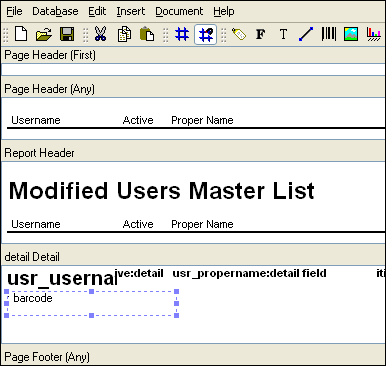
Once the Detail section has been expanded, we select the barcode option from the toolbar and then click in the section just below the Username field. We have now inserted the barcode object into the report definition, as shown in the following screen.
We must now specify the properties of the barcode object. To do so, we double-click on the barcode object. The following screen will appear:
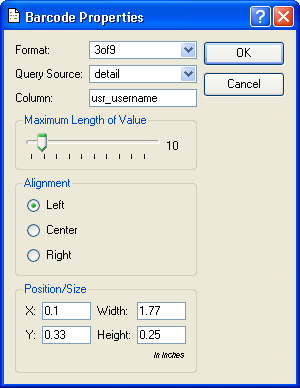
Like field objects, barcode objects contain dynamic information retrieved from a database. As you can see, the barcode properties screen requires a query source and column name. The dynamic information we need for this exercise is the same as we needed previously—namely, usernames retrieved from the usr table. The only difference here is that we will be representing usernames in barcode format. We enter the following parameters:
3of9 (The report writer supports the following barcode formats: 3of9, 3of9+, 128, ean13, ean8, upc-a, and upc-e.)
detail
usr_username
10 (Specifies the maximum number of characters the barcode is expected to contain.)
After we select the button, we see the barcode object has been updated in the report definition, as shown below:
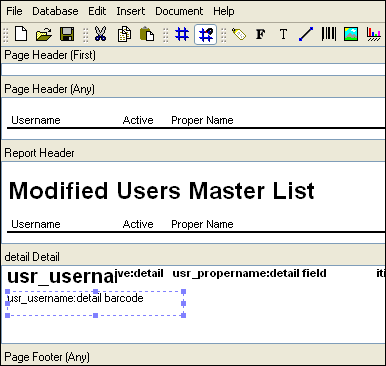
As you can see, the barcode object is now identified with the name usr_username:detail barcode. This name refers to the column and query source which will be used to generate username data in barcode format. Before we save our changes to the database, we click on the right side of the barcode object and drag it to make it longer.
We have now successfully created a barcode object that will print in "3of9" format—one of several widely-used barcode formats supported by the report writer. Now let’s print the report and see the results.
To print the Users master list, select the option from the module menu. When the master list of users appears, select the button. The following screen shows a portion of the printed report:
As you can see, the final result matches the result we expected to see when we began this section. The usernames on the Users master list are now both human-readable and machine-readable.
| |  | |
| 1.3. Editing Fields |  | 2. Column Headings |