
|
OpenRPT Product Guide |
|
|
OpenRPT Product Guide |
| 3.11. Text Areas | ||
|---|---|---|
 | 3. The Toolbar |  |

'Insert Text' Icon
The icon enables you to create new text area objects. Text area objects are used for pulling dynamically generated, multi-line data into a report from the database the report writer is connected to. By definition, text area objects are designed to handle multiple lines of data.
To create a new text area object, first select the icon. Then click in the section of the report definition where you want the text area to be located. Doing so will create the text area object in that section.
For more information on using text area objects in report definitions, see the Getting Started chapter.
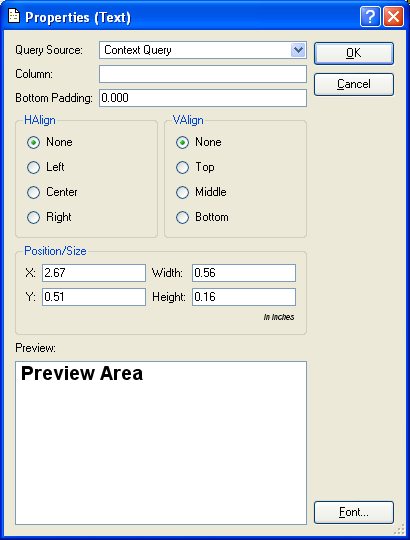
Once the text area object has been created, you may then define the text area object's properties. To define a text area object's properties, double-click on the text area object. The following screen will appear:
By definition, text area objects are designed to handle multiple lines of data.
When defining the properties of a text area object, you are presented with the following options:
Select a query source from the drop-down menu by clicking on the arrow to the right of the field. Query sources are used to populate report definition objects with dynamic data from the database the report writer is connected to.
Specify the name of the database column you want to use from the selected query source. A query source may refer to multiple columns in its SELECT statement. By indicating a specific column, you instruct the query source to return data only for that specified column. Other columns appearing in the SELECT statement will be ignored.
For more information on query sources and the link between database fields and report definition objects, please see the Getting Started chapter.
Specify the minimum amount of space between the last line of text in the text area object and the end of the section where the text area object is located, measured in inches. The amount of space between the last line of text and the end of a section will always be equal to at least the bottom padding value.
Specify how you want text to be aligned horizontally within the text area object:
Select if you do not want to specify a horizontal alignment.
Select to align text on the left margin.
Select to align text in the center.
Select to align text on the right margin.
Specify how you want text to be aligned vertically within the text area object:
Select if you do not want to specify a vertical alignment.
Select to align text on the top margin.
Select to align text in the middle.
Select to align text on the bottom margin.
Specify how you want the text area object to be positioned and sized within the section where it is located.
Specify the distance, measured in inches, from the section’s left border to the upper-left-hand corner of the text area object.
Specify the width of the text area object, measured in inches.
Specify the distance, measured in inches, from the section’s top border to the upper-left-hand corner of the text area object.
Specify the height of the text area object, measured in inches.
The position and size of a text area object may be modified manually when editing a report definition.
Displays a preview of the text area object, using the specified font. Selecting the button will bring up the Select Font screen, where you may specify font name, font style, font size, and font effects.
To the far right of the screen, the following buttons are available:
Select to save your settings.
Closes the screen without saving any changes, returning you to the Application desktop.
| |  | |
| 3.10. Fields |  | 3.12. Lines |