|
xTuple for Service Businesses Demo Guide |
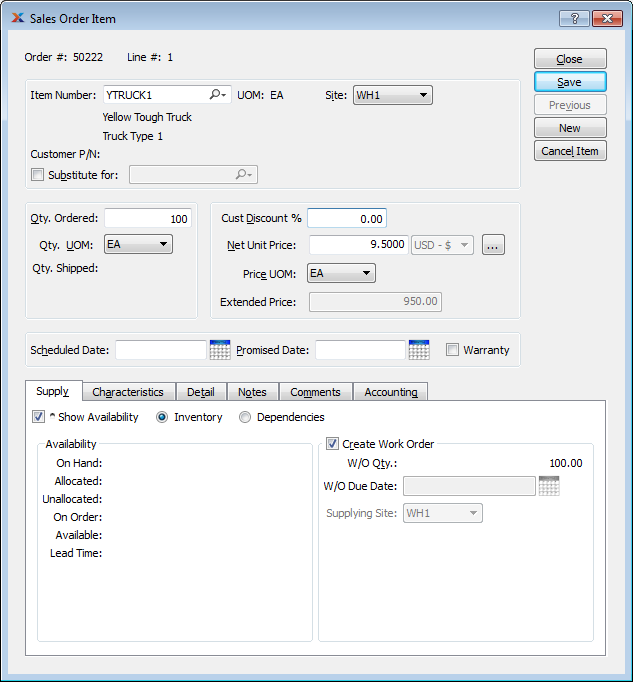
We will now add item YTRUCK1 to the sales order, specifying a quantity of 100 units, a unit price, and a due date set to a date in the future. If you are following along using your xTuple ERP client, be sure to specify an order quantity of 100 units for item YTRUCK1. To access the New Sales Order Item screen, follow these steps:
From the Sales Order header screen, click on the tab.
Then click the button on the right side of the screen.
The following screen will appear:

You can add as many line items to a sales order as you want, but in this scenario we will be adding just one item—100 units of item YTRUCK1. To do so, follow these steps:
Enter item YTRUCK1 into the Item Number field using the magnifying glass—or enter the number manually, followed by the key.
Specify an order quantity of 100, then hit the key.
Specify a date nine (9) days in the future by entering "+8" in the Scheduled Date field. If the system prompts you to confirm the changed scheduled date, click the button.
On the tab, check the Show Availability box to see that we have no product available for delivery according to the date entered and that.
Still on the tab, select the Supply Order radio button and check the Create Work Order box (if not already checked). This is important, as later we will process the resulting work order.
Click the button on the Sales Order Item screen and then click the button.
On the Sales Order screen click the button and then the button.
Note on the Customer workbench screen that your new order is displayed on the tab. Click the button on the Customer screen to exit the Customer workbench.