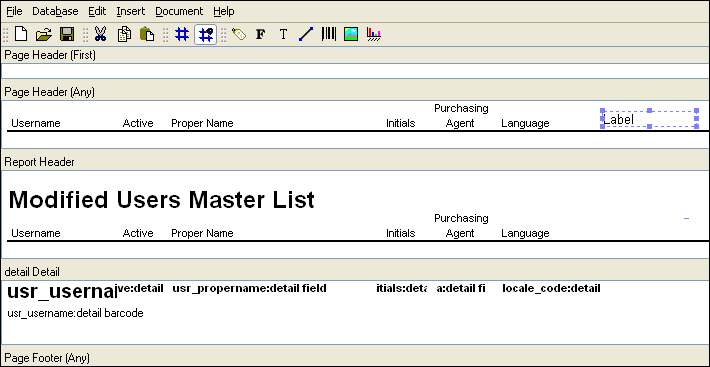
The “UsersMasterList” report definition utilizes three different Header types: Page Header (First), Page Header (Any), and Report Header. The following screenshot shows how each of these Headers fits within the report definition:

You may be wondering if we need both a Page Header (First) and a Page Header (Any)—particularly since the Page Header (First) is empty. But this technique actually serves a useful purpose, as explained below:
- Page Header (First)
This is blank because the Report Header, which always displays on the first page only, contains column headings. The Page Header (Any) also contains column headings. Following the report writer’s rules of precedence, a Page Header (First), if defined, prints in place of a Page Header (Any). This logic ensures the Page Header (Any) does not print on the first page—and so we avoid having two sets of column headings on the first page.
Note
For more information on precedence and other Header details, see the “Report Headers” and “Page Headers” sections in the Report Writer Basics chapter.
- Page Header (Any)
This Header contains the column headings that appear on the second page and all subsequent pages. The Page Header (Any) will not print on the first page because a Page Header (First) is defined.
- Report Header
The Report Header displays on the first page only. In this case, the Report Header contains both a report title and report columns.
For this exercise, we will change the wording of the “Locale” column heading. As you can see in the following screenshot, this column heading appears in both the Page Header (Any) and Report Header sections:
A Locale is frequently used to define a user’s language. And so, for the purpose of this exercise, let’s change the column heading from “Locale” to “Language.” To edit the column heading, double-click on the Label object which contains the text. The following screen will appear:
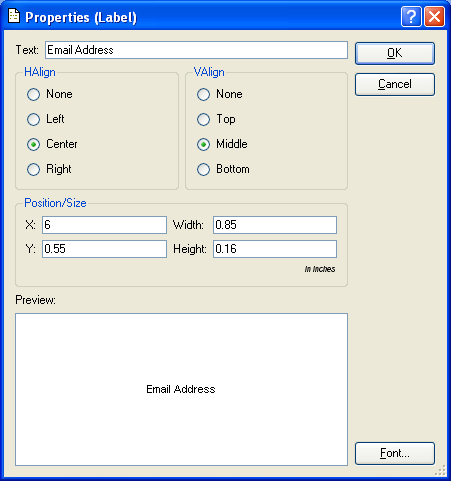
As you can see, we have entered the new wording in the “Text” field. We make the same change to the “Locale” column heading found in the Report Header. And after saving the changes to the database, we see them both applied to the report definition, as shown below:
The techniques used to edit Label objects are the same regardless of where a Label object is located in the report definition.
Over the course of the next few sections, we will perform the steps necessary to add email addresses to our Users Master List. The first step is to add a column heading. The new “Email Address” column heading will ensure the data we retrieve from the database is labeled appropriately.
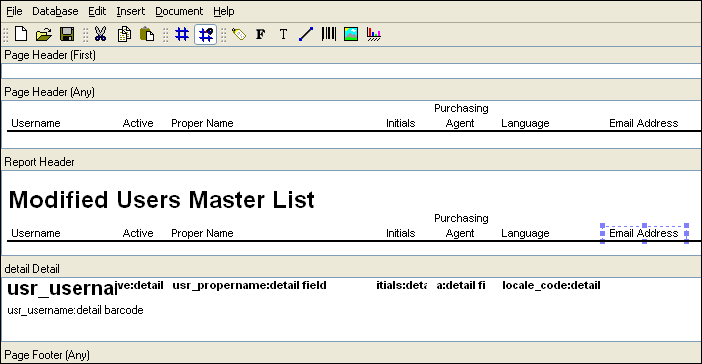
To add the new column heading, we select the Label option from the toolbar and then click in the Page Header (Any) section. We place the Label object to the right of the “Language” column heading, as shown in the following screen:
Now that we have placed the Label object, we must define its properties. Double-clicking on the Label object opens the Label properties screen:
As you can see, we have entered “Email Address” in the “Text” field. This is the text which will appear as a column heading. We repeat the same steps to add the same new column heading to the Report Header section. And after moving the Label objects into place using our mouse and saving the changes to the database, the column headings are located where we want them, as shown in the following screen:
Adding column headings for email addresses is only the first step in the multi-step process of inserting email addresses into the report. In the following sections, we will examine how to retrieve the needed information from the database.