An xTuple CRM Incident can be used to track the different initiatives you have in your organization. For example, you can track Customer inquiries, product-related quality issues, Vendor-related quality issues, or the status of a marketing campaign. When an Incident is created or modified, it can be emailed to interested parties. This is done through the Batch Manager. In this section, we will show how this process flow is configured and put into action.
Caution
Some of the information provided in this section is technical in nature. If you have trouble following the steps described here, please contact your system administrator for assistance.
The xtbatch package includes a pre-defined EDI Profile for emailing CRM Incidents. This EDI Profile is called xTupleIncidentEmail and is one of only two EDI Profiles built in to the xtbatch package (the other is for Quotes). For this scenario, we will be configuring CRM to use this xTupleIncidentEmail EDI Profile for some but not all Incidents.
Note
You can learn more about configuring EDI Profiles in Chapter 4, Advanced EDI.
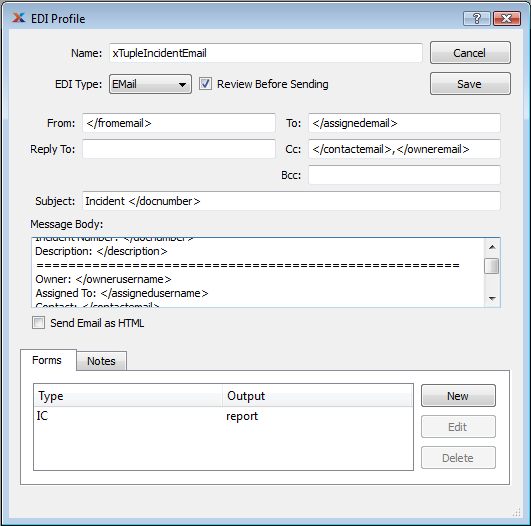
The xTupleIncidentProfile's EDI Profile showing the use of customized tokens and the presence of an IC (Incident) EDI Form
The xTupleIncidentEmail EDI Profile uses the basic tokens described in Section 2.2.2, “EDI Tokens” plus an additional token that is set by the xtbatch package:
- </docnumber>
Incident number
- </doctype>
"IC"
- </doctypefull>
"Incident"
- </docid>, </incdt_id>
Incident primary key id
- </reason>
A short phrase describing what changed about the Incident, such as "The following Incident has been ASSIGNED"
In addition this particular EDI Profile uses the query on the EDI Form window to define a number of new tokens specific to this profile:
- </assignedemail>, </email2>
The email address of the Incident assignee (the </email2> token is deprecated and should not be used)
- </assignedusername>
The application username of the Incident assignee
- </category>
Incident category
- </comments>
Incident comments
- </contactemail>, </email3>
The email address of the incident contact (the </email3> token is deprecated and should not be used)
- </description>
The Incident Summary
- </fromemail>
The email address of the user creating or changing the Incident
- </history>
The full history of this Incident record
- </itemnumber>
The Item Number if this Incident is associated with a particular Item
- </lotserial>
The Lot or Serial Number of this Item if this Incident is associated with a lot- or serial-controlled Item
- </notes>
Incident owner email address
- </owneremail>, </email1>
The email address of the incident owner (the </email1> token is deprecated and should not be used)
- </ownerusername>
The application username of the incident owner
- </priority>
Incident priority
- </resolution>
Incident resolution
- </receivabledoc>
The document number if this Incident is associated with a particular document, such as an Invoice or Credit Memo
- </receivabletype>
The document type if this Incident is associated with a particular document, such as an Invoice or Credit Memo
- </severity>
Incident severity
- </status>
The status abbreviation for this incident
The names of these tokens and their values are set by writing a database query. This query is part of the EDI Form with the "IC" tag associated with the EDI Profile. This query can use any of the basic tokens, such as </docid> or </incdt_id>. It can get as much information about this incident as you want. The only requirements are that all of the data be returned in a single row and that they can be found using just the basic tokens. The new token names are the column names returned by the query. The token values are the values of these columns returned by the query.
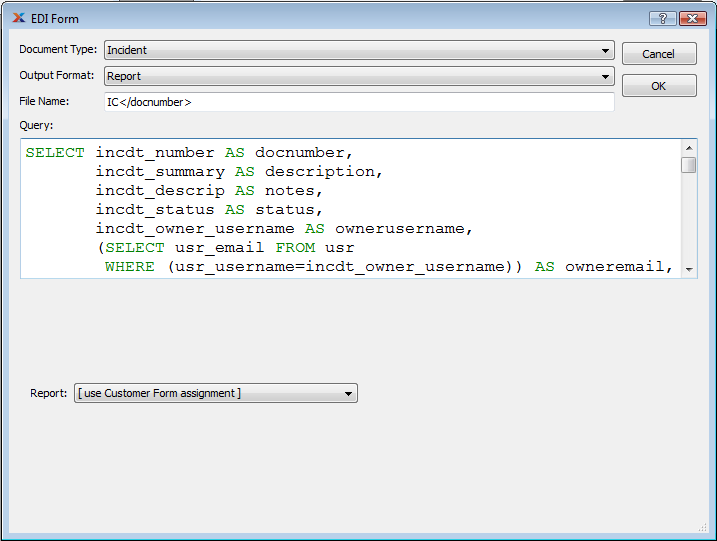
The xTupleIncidentProfile's EDI Form for Incidents showing part of the query to define new tokens
You can look at the full definition of this EDI Profile and its associated EDI Form by following this path:
Now that we have reviewed our EDI Profile, we need to configure the CRM Module to send emails for CRM Incidents. Follow these steps if you want to send email for all Incidents:
Follow this path:
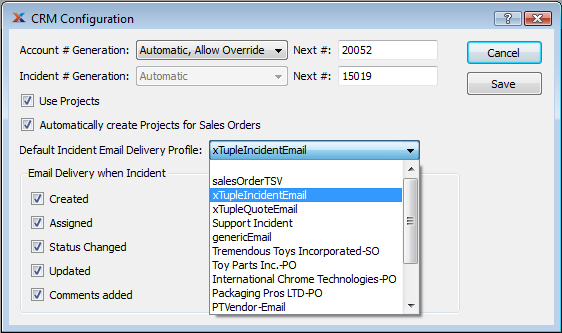
In the "Incident Email Delivery Profile" field, select the "CRM-Customer" profile
Under the "Email Delivery when Incident" section, select all options
The screen will look like the following:
Finally, select the SAVE button. Then, to ensure these configuration changes have taken effect, log out of xTuple ERP, then log back in again.
This next two steps are optional. However, we've included them because they enable you to establish a link between an Incident Category and a unique EDI Profile specifically designed for that category. If you choose not to set this relationship, then xTuple ERP will use the EDI Profile defined in the CRM Configuration for all Incidents—regardless of which Incident Category they belong to.
If you find that you need to customize the EDI sent for a particular set of Incidents, you'll need to create a special EDI Profile and then link it to a special Incident Category. To create the customized Incident EDI Profile, follow these steps:
Follow this path:
Select the NEW button
In the "Name" field, enter "CRM-Customer"
In the "EDI Type" field, select "Email"
In the "From" field, enter "</fromemail"
In the "To" field, enter "</owneremail>"
In the "Cc" field, enter "</assignedemail>,</contactemail>"
In the "Subject" field, enter "Prodiem [ or your company's name] incident </docnumber>"
In the "Message Body", enter the following:
This message contains important information about Prodiem [ or your company's name ] issue # </docnumber>.
</description>
</notes>
</comments>
Leave "Send Email as HTML" unchecked
Click the NEW button to create an EDI Form
The application will ask if you want to save the EDI Profile before continuing; click the OK button
Select "Incident" from the Document Type list
Leave the Output Format as "Report"
Set the File Name to "</doctype></docnumber>.pdf"
Set the "Query" to
SELECT incdt_number AS docnumber,       incdt_summary AS description,
       incdt_descrip AS notes,
      (SELECT usr_email FROM usr WHERE (usr_username=incdt_owner_username))    AS owneremail,
      (SELECT usr_email FROM usr WHERE (usr_username=incdt_assigned_username)) AS assignedemail,
       cntct_email AS contactemail,
      (SELECT usr_email FROM usr WHERE (usr_username=CURRENT_USER))            AS fromemail,
      (SELECT xtbatch.concatAgg(comment_user || ' - ' || comment_date || '\n' ||
                                comment_text ||  '\n.....................................................\n')
       FROM (SELECT comment_user, comment_date, comment_text
             FROM comment
             WHERE ((comment_source='INCDT')
                AND (comment_source_id=incdt_id))
             ORDER BY comment_date) dummy) AS comments
FROM incdt LEFT OUTER JOIN cntct ON (incdt_cntct_id=cntct_id)
WHERE (incdt_id=<? value("incdt_id") ?>);
Click OK
Your screen should look similar to the following:
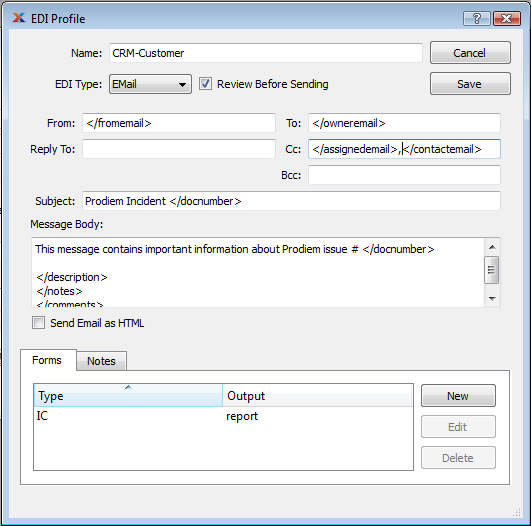
Customized Incident EDI Profile
To create an Incident Category to handle your special Incident EDI requirements, follow these steps:
Follow this path:
Select the NEW button
In the "Incident Category" field, enter "Customer"
In the "Order" field, enter "30"
In the "Email Delivery Profile" list, select the "CRM-Customer" profile
In the "Description" field, enter "Customer Incident"
The screen will look like the following:
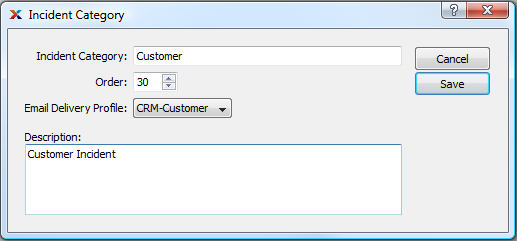
To save this information, select the SAVE button
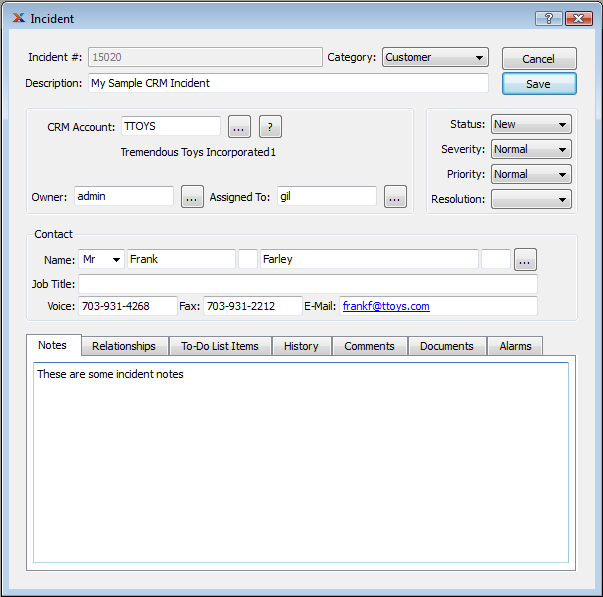
At this point, the configuration steps are all done. Now we can create a simple CRM incident—and follow it through to email delivery. The Incident screen contains a multitude of fields. But for this exercise, we are only going to fill in the minimum necessary—so we can save our example and submit it to the Batch Manager. To begin, follow these steps:
Follow this path:
Set the "Category" field to "Customer"
Enter some text in the "Description" field
Select a CRM Account in the "CRM Account" field
Caution
Be careful, as you are about to send an email to a Contact related to the CRM Account. For testing purposes, you may want to enter your email address instead of the selected Contact's email address.
In the "Owner" field, enter your user
In the "Assigned To" field, enter another user
Select a Contact using the browse button
Enter some notes in the "Notes" field
Set the "Status" to "New"
Set the "Severity" to "Normal"
Set the "Priority" to "Normal"
Leave "Resolution" blank
The results will look like the following screen:
After you select the SAVE button, you will be presented with the email delivery screen, as shown in the following screenshot:
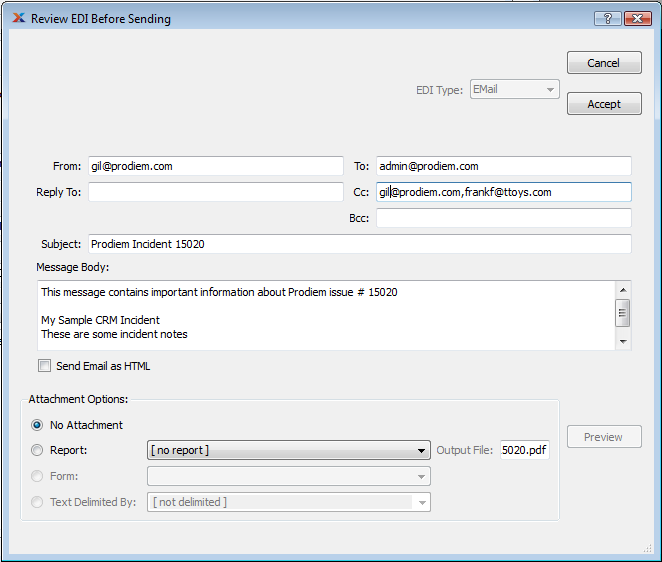
As we saw when we emailed other business documents, the tokens we included have been replaced with their actual values. To send the job to the Batch Manager, select the ACCEPT button.
