To get started using the Batch Manager to process xTuple ERP jobs, you will first have to complete some configuration steps within the xTuple ERP client. Using your xTuple ERP client, log in to the database you just applied the Batch Manager package to. Then follow this path to reach our first configuration screen: . Once you get there, follow these steps:
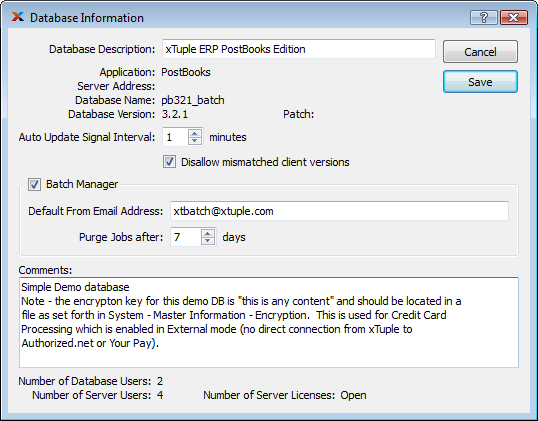
Enable the Batch Manager by selecting the "Batch Manager" check box.
Note
If the "Batch Manager" option is not selected, you will not be able to submit jobs to the Batch Manager. In fact, none of the Batch Manager features will be enabled in xTuple ERP until this option is selected. You may need to restart your xTuple ERP client to see the full range of Batch Manager features after you select this option.
Assign a default "From Email Address" to an appropriate email address. This address will only be used if a user submits a job to the Batch Manager and does not have an email address defined in their xTuple ERP user record.
Specify the number of days you want to save Batch Manager jobs before they are purged. This setting controls how long completed jobs will still display on the Batch Manger screen before they are automatically deleted
The following screen shows this information already added:
Once you are finished entering the required information, follow these additional steps:
Select the SAVE button
Exit the xTuple client
Log in again to the xTuple client
All the Batch Manager features—including System > Batch Manager—will now be visible throughout the xTuple client.
The next step is to assign several Batch Manager privileges to your admin user. To do so, navigate to the following path: . On the User List screen, follow these steps:
Highlight your admin user
Select the EDIT button
On the "Privileges" tab, select the System Module
The screen will look as follows:

As you can see in the screenshot, the System Module contains the following three privileges related to Batch Manager features:
- EditEDIBeforeSending
Users will need this privilege to modify Electronic Data Interchange (EDI) messages before they are sent. Users who have this privilege may edit the message recipients, subject, and body of email messages sent through the Batch Manager; edit the destination of messages sent via File Transport Protocol (FTP); and change the report that will be run or change the delimiter character for text files that will be attached to the message. Users without this privilege will be able to see these characteristics but not change them before sending the job to the Batch Manager.
- IssueSystemMessages
All users will need this privilege to issue a system message. This can also result in an email sent through the Batch Manager
- MaintainEDIProfiles
Administrators will need this privilege to setup EDI Profiles, which are used to setup standard email instructions that can be linked to Customers, Suppliers, and CRM Categories
- MaintainServer
The administrator will need this privilege to schedule "Server Maintenance" through the Batch Manager. Server Maintenance executes a VACUUM ANALYZE FULL and REINDEX. Newer versions of PostgreSQL enable AUTO VACUUM by default, but a regular VACUUM ANALYZE FULL and REINDEX is still a good idea. A normal interval is daily to weekly.
To assign these privileges to your admin user, follow these steps:
Select the ADD ALL button
This will move all the privileges to the "Granted Privileges" column.
Tip
To move one privilege at a time, simply highlight the privilege, then select the ADD button.
Select the SAVE button
Finally, follow this path to complete the process:
You may also exit and re-log in to xTuple ERP instead of running Rescan Privileges
Note
If you have not given the user you are logged in with the MaintainServer privilege, then the Schedule Server Maintenance option under the System Module menu will not be available.
The Electronic Data Interchange (EDI) system in xTuple ERP supports the export of documents and files using either of the following two delivery methods:
Email
FTP
EDI Profiles are the master records which describe what mechanism to use to send data electronically and the basic structure of what will be sent. For email messages this means what the subject line and message body should contain, who should receive the email, and what data will be sent. For FTP messages, the delivery details include the address of the FTP server, the username and password to use, and the directory to put the file in. Here is an example of what the EDI Profile definition window might look like for sending email:

The following output formats are available:
xTuple Report (.PDF)
Delimited Text (e.g. .CSV and .TSV)
Using different combinations of delivery methods and output formats, you have the flexibility to create a wide range of unique EDI Profiles.
Tip
The EDI system sends files using the Batch Manager. The Batch Manager must be installed and running at your site for EDI exports to be successful.
Each EDI Profile needs additional information to describe what information should be sent for different document types. These extra details are described using EDI Forms. There should be one EDI Form for each document type you want to use with this EDI Profile. For example, if you create an EDI Profile just to send Invoices, you need exactly one EDI Form for this EDI Profile.
This sample EDI Form window shows the basic information for sending an xTuple ERP report when sending Invoices electronically:
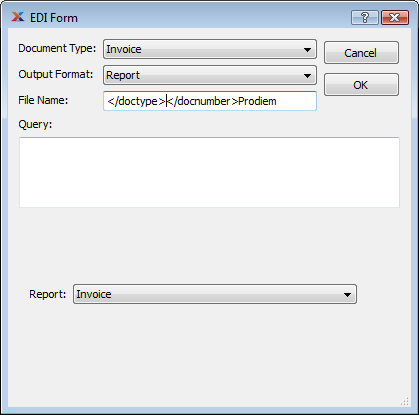
Sample EDI Form
You can choose whether to send Invoices as a PDF report or as a CSV file (really any single-character delimited text file) and can give the file a name. This name will be used by the Batch Manager to save the file before sending it and will be the name of the email attachment or FTP'ed file. You can also choose which report you want to run.
Tokens are used in EDI Profiles as a means for automatically placing specific information in an email when the email is actually created. There is a small number of basic tokens that are available for all supported document types. For example, note the </docnumber> in the File Name field of the sample EDI Form screenshot above - this will be replaced with the actual invoice number when an Invoice is about to be sent.
The following tokens are available to support EDI Profiles wherever they are used:
- </docnumber>
The document number (e.g., Invoice Number)
- </doctype>
The document type (e.g., IN)
- </docid>
The primary key id for the document
- </doctypefull>
A human-meaningful version of the document type (e.g., Invoice)
- a document-type-specific token
The primary key id for the document, named for the primary key field of that document (e.g., </invchead_id>)
You can also define your own tokens for more complex needs. Any database query that you can write with the basic tokens above and MetaSQL can be used to create custom tokens and set their values. This capability is used to support CRM Incidents.
Note
To learn more about how EDI tokens are used in practice and how to define your own, please see Section 8, “Emailing CRM Incidents” and Chapter 4, Advanced EDI.
As we have noted, Batch Manager features appear throughout xTuple ERP―assuming the Batch Manager is installed and enabled―and the range of features varies depending on your xTuple ERP edition. The following directory lists the jobs and reports that can be submitted to the Batch Manager from xTuple ERP. For ease of use, we have separated the list by xTuple ERP edition (where applicable):
- All xTuple ERP Editions
Update Actual Costs By Class Code (Products)
Update Actual Costs By Item (Products)
Post Actual Costs By Class Code (Products)
Post Actual Costs By Item (Products)
Post Standard Costs By Class Code (Products)
Post Standard Costs By Item (Products)
Time Phased Usage Statistics By Item (Inventory)
Update OUT Level By Item (Inventory)
Update OUT Levels (Inventory)
Update OUT Levels By Class Code (Inventory)
Update Reorder Level By Item (Inventory)
Update Reorder Levels (Inventory)
Update Reorder Levels By Class Code (Inventory)
Send Electronic Purchase Order (Purchase)
Send Electronic Quote (Sales)
Send Electronic Sales Order Form (Sales)
Send Electronic Invoice (Accounts Receivable)
Time Phased Booking By Customer (Sales)
Time Phased Booking By Item (Sales)
Time Phased Booking By Product Category (Sales)
Time Phased Sales History By Customer (Sales)
Time Phased Sales History By Customer By Item (Sales)
Time Phased Sales History By Customer Group (Sales)
Time Phased Sales By Item (Sales)
Time Phased Sales By Product Category (Sales)
Post Invoices (Accounts Receivable)
A/R Aging (Accounts Receivable)
A/P Aging (Accounts Payable)
- xTuple ERP Standard and Manufacturing Editions
Run MRP (Schedule)
Release Planned Order By Planner Code (Schedule)
Time Phased Availability (Schedule)
- xTuple ERP Manufacturing Edition
Run MPS (Schedule)
Update Status by Planner Code (Schedule)
Update Status by Item (Schedule)
Work Order Operation Buffer Status By Work Center (Manufacture)