The Batch Manager can be used to email an Invoice to a Customer as a .PDF attachment. To accomplish this, we have to establish the Customer's email details, along with the contents of the message we want to send. We also need to review the Customer's Form Assignments. Then we will need to generate an Invoice and indicate we want it delivered via email. Let's see how these simple steps are accomplished.
The report definition that is used when an Invoice is printed or emailed is determined by the Customer Form Assignment screen. To reach this screen, follow these steps:
Follow this path:
The following screen will appear:
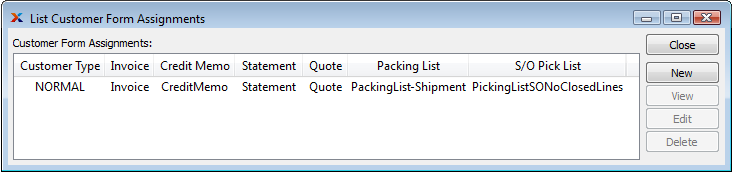
As you can see in the screenshot, the Customer Form Assignments are based on Customer Type. This means that whenever Invoices are printed for or emailed to a Customer, the Form assignment for that Customer's Customer Type will be used. In this example, no changes are required. However, there may be cases where you would want to associate different Invoice Forms with different Customer Types.
To enter the Customer's email details may be entered, go to the Customer master screen and create an EDI Profile. To do so, follow these steps, which are illustrated with screenshots below:
Follow this path:
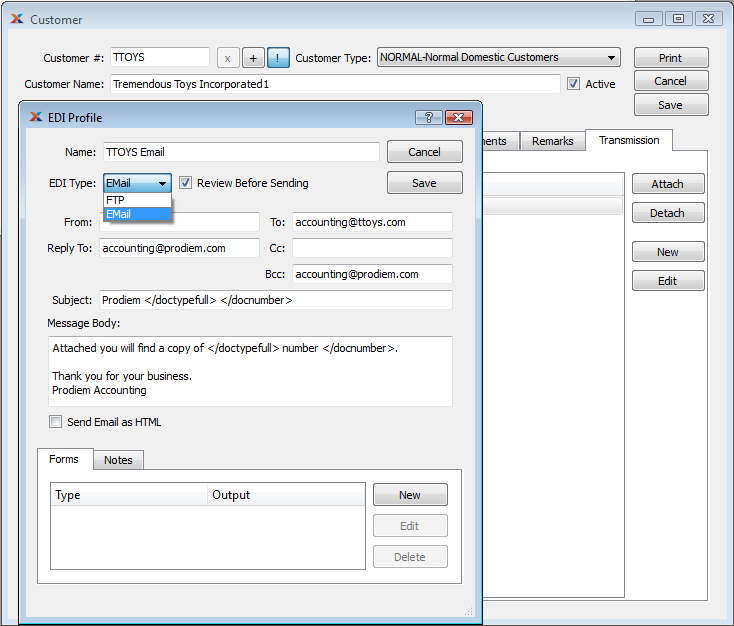
Open a Customer record for editing
Select the "Transmission" tab
Click the "New" button
In the "EDI Profile" window that appears, select "Email" from the list of EDI Types
Click the "Review Before Sending" box
In the "To" field, enter the email address to which you want to send the Invoice.
Tip
You may enter multiple email addresses by separating each address with a comma (",").
In the "Cc" or "Bcc" field, specify addresses you want to receive a copy of the email
If you want replies automatically sent to a particular address, put that in the "Reply To" field
In the "Subject" field, specify a subject―optionally include the </docnumber> token to dynamically include the Invoice Number in the subject line
In the "Message Body" section, enter a detailed message to the Customer to be used whenever Invoices are emailed to the Customer―optionally include the </docnumber> token to dynamically include the Invoice Number in the message body
Tip
Make certain the content of your message appears legitimate so that spam filters will not reject it.
 Creating a Customer EDI Profile for Invoicing
Click the "New" button on the "Forms" tab.
In the window that appears, select "Invoice" from the "Document Type" list
Set the "File Name"―this is the name that will be given to the email attachment; using
</doctype></docnumber>is usually the best choiceMake sure the "Output Format" is set to "Report" and that the "Report" is set to "[ use Customer Form assignment ]"
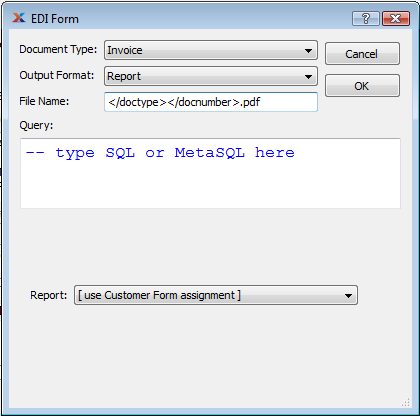
Selecting the Document Type for an EDI Form
Click "OK", which opens the "Attach EDI Profile" window
Select "Invoice" from the "Document Type" list
Click the "Attach" button
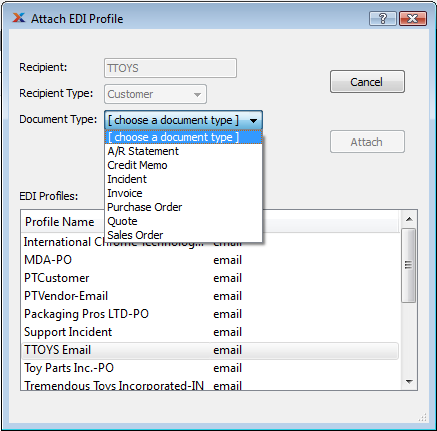
Attaching the new EDI Profile to the Customer
This seems like a lot of work to do something relatively simple. In particular the steps to select the document type and attach the new EDI Profile to the Customer may seem redundant. They are necessary if you define EDI Profiles from the Customer window. However, in Chapter 4, Advanced EDI we'll explain how to build more complex EDI Profiles that can be reused for multiple Customers and multiple document types. In this latter case all you have to do is attach an existing EDI Profile to your Customer, which should only require 4 mouse clicks.
This next step assumes you know how to create an Invoice from a shipped Sales Order in xTuple ERP―and that you already have one created for the Customer you've been using in the exercise. We'll begin on the E-mail Invoice screen. To get there, follow these steps:
Follow this path:
Select an Invoice
The following screen will appear:
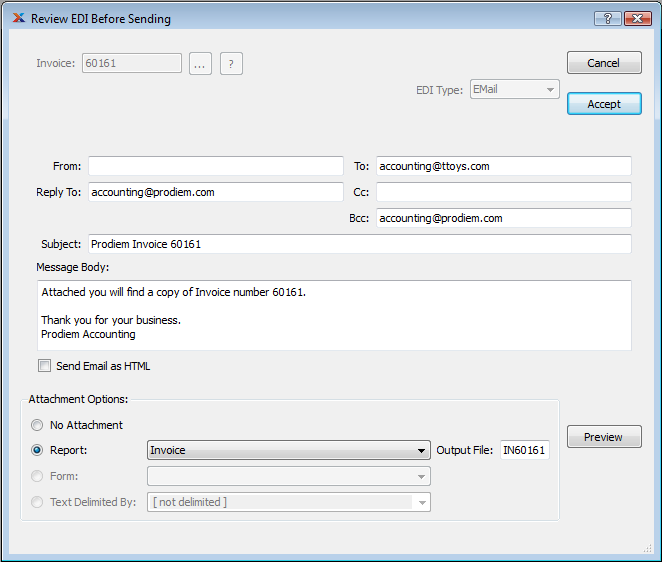
As you can see in our example, all the details from the EDI Profile we defined earlier have been transferred to the email message. Notice how in several places the </doctype>, </doctypefull>, and </docnumber> token have been replaced by the values "IN", "Invoice", and the actual Invoice Number. You may at this point manually edit the email body if you want to change the default information displayed there or choose a different invoicing report. Any edits made to the email body will be included in the email to the Customer. However, if you want to make permanent changes to the default outgoing message, you need to make those changes on the EDI Profile.
Once you select the "Accept" button, the job will be sent to the Batch Manager, awaiting its turn to be processed. When the job is completed, the Customer will receive an email with a .PDF of the Invoice attached.
Note
To check on the status of the job, simply open the Batch Manager screen―either in xTuple ERP or the Batch Manager client―and review the information there. In this case, look for jobs whose "Action" type is "RunReport". To see jobs which have already been processed, use the "Show Completed Actions" option.
Finally, we want to see what our Customers see when they receive emails from us with Invoices attached. The following screen illustrates a sample email received by our Customer:
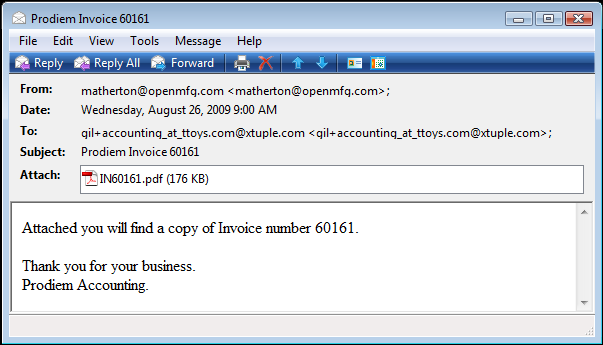
As you can see in the sample email, our Invoice is attached in .PDF format. The following screenshot shows what the file looks like when the .PDF is opened:

Note
The attached Invoice in .PDF format will look exactly the same to the Customer as it does to you when you print the same document yourself in xTuple ERP.