
|
xTuple ERP Reference Guide |
|
|
xTuple ERP Reference Guide |
| 1.7.1. Uninvoiced Receipts and Returns | ||
|---|---|---|
 | 1.7. Payables Reports |  |
To view uninvoiced receipts and returns, go to . The following screen will appear:

When displaying uninvoiced receipts and returns, you are presented with the following options:
Select to display uninvoiced receipts and returns for all sites. You must select this option to include non-inventory receipt information in the display. Because non-inventory items, by definition, do not have item sites, you cannot report on them by individual site(s).
Specify site whose uninvoiced receipts and returns you want to display.
Select to display uninvoiced receipts and returns for all purchasing agents.
Specify purchasing agent whose uninvoiced receipts and returns you want to display. Users may be designated as purchasing agents in the menu.
Display lists uninvoiced receipts and returns, using the specified parameters.
The primary path for marking purchase order line items as invoiced is on the Voucher Item screen. If received (or returned) quantity is tagged as Yes on the Voucher Item screen—and the voucher is then posted—the quantity will no longer appear on the Uninvoiced Receipts and Returns screen.
To mark a line item receipt as invoiced, highlight the receipt and then select the option from the right-click menu. The following screen will appear:
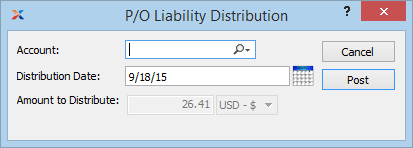
When marking a line item receipt as invoiced, you are presented with the following options:
Select the account you want to use opposite the P/O liability clearing account. When this transaction is posted, the P/O liability clearing account will be debited with the distribution amount—and the account you specify will be credited. In this way, you will be sure to clear P/O liability when marking receipts as invoiced outside of the typical vouchering process flow.
Specify the date you want the transaction to be posted to the general ledger. By default, the current day's day will be entered here.
Displays the line item receipt amount to be distributed to the general ledger when the transaction is posted.
The following buttons are unique to this screen:
Select to post the distribution, using the specified account.
To make corrections to a purchase order receipt, select the Correct Receiving option from the right-click menu. The following screen will appear:
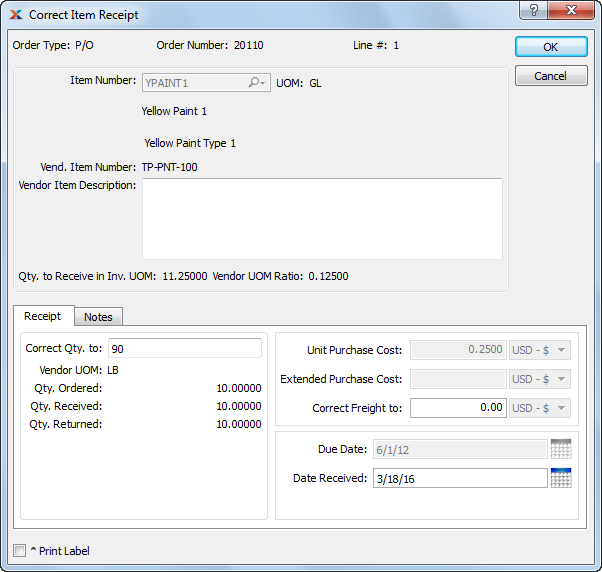
When correcting a purchase order receipt, you are presented with the following options:
Display the type of order received (e.g., purchase order, transfer order).
Displays the order number of the selected order.
Displays the selected line item number from the specified order.
Displays item number associated with the specified line item number.
Inventory unit of measure (UOM).
Displays the item number the vendor uses.
Displays the description for the vendor item number.
Displays the quantity received in its inventory UOM.
Displays the ratio between your inventory UOM and the vendor's UOM. For example, if you store an item in single units, but a vendor sells you the item in cases of 12, then the ratio would be 12—or 12:1. When a vendor ratio is specified, the system allows you to purchase items using the vendor's UOM; however, when the items are received, the system will automatically convert the inventory to your inventory UOM.
Enter the quantity you want to correct the received quantity to. This correction will create adjusting general ledger entries when the button is selected.
Displays the UOM the vendor uses for the specified item.
Displays the original line item quantity ordered.
Displays the total line item quantity received to date.
Displays the total line item quantity returned to date.
Displays the per unit cost for the line item.
Displays the extended cost for the line item quantity.
Enter the amount you want to correct the line item freight to. This correction will create adjusting general ledger entries when the button is selected.
Displays the date when the line item is due.
Displays the date when the line item was received.
Select the tab to reach a scrolling text field with word-wrapping for entering notes related to the correction.
The following buttons are unique to this screen:
Select to post the correction. This action will result in adjusting general ledger transactions.
Select to print a receiving label at the time when you select the button.
To post a credit memo offsetting a purchase order return, select the Create Credit Memo option from the right-click menu. The following screen will appear:
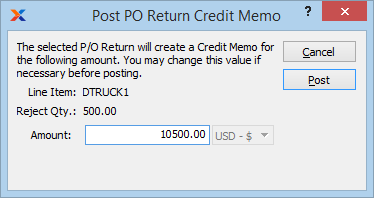
The offsetting credit memo may also be created and posted at the time when the return is posted.
When posting a credit memo for a purchase order return, you are presented with the following options:
Displays the item number of the item being returned.
Displays the quantity of the item being returned.
Shows the extended unit price for the line item quantity, as indicated on the originating purchase order. Before you post the credit memo, you have the option to override the amount if you want to.
The following buttons are unique to this screen:
Select to post the credit memo to the ledger.
| |  | |
| 1.7. Payables Reports |  | 1.7.2. Open Payables |