
|
xTuple ERP Reference Guide |
|
|
xTuple ERP Reference Guide |
| 13.1.4. Import/Export | ||
|---|---|---|
 | 13.1. Configure |  |
The import and export configuration allows you to set a number of options for importing data from XML and CSV files. These data might be generated manually or by other database or e-commerce systems. For example xTuple supports importing orders from Yahoo! stores.
Importing data files is a multi-step process:
The files have to be received from the originator and placed on a computer file system where the xTuple application can find them.
Any wrapper information has to be stripped off, such as mail headers for files received by electronic mail.
XML may have to be converted from its original format to one understood by the xTuple application.
The file has to be read by the xTuple application and its contents inserted into the database.
The xTuple Connect extension package can be used to automate much of this processing, including retrieving files from remote FTP servers, converting XML files to a usable format, and importing the contents of XML and CSV files.
xTuple uses XSLT to convert XML files from one format to another. XML file formats are described in DTDs. The xtupleimport DTD defines an XML file format which can be directly imported by the xTuple application. This DTD defines XML tags with names that correspond exactly with the names of views and columns in the xTuple import API.
An XSLT file for transforming Yahoo! OrderList files for import into an xTuple database is available from xTuple. If you need to import data files in other XML formats you must write your own XSLT to convert the data to conform to xTuple's DTD.
To configure which transformations to use for XML files in various formats, go to . Click the tab and the following screen will appear:
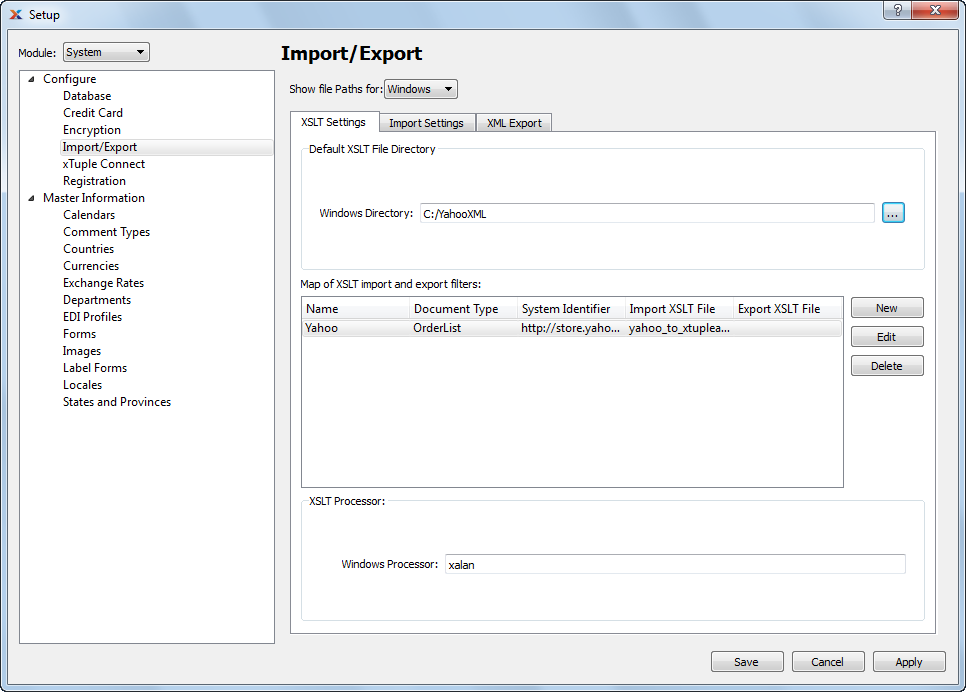
Configure XSLT
When configuring XSLT mapping, you are presented with the following options:
The XSLT files used to perform the translation between XML data formats must be present on the file system of the computer which is running the xTuple application. This set of options lets you define one directory for each operating system platform where the application should look for XSLT files.
This is a list of document transformations recognized by the xTuple application. These transformations are called filters.
XSLT is a language for transforming XML documents. To apply an XSLT stylesheet to a given XML document you need an XSLT processor. This is a program that interprets or compiles the XSLT and then performs the transformation on the XML file.
Each XSLT processor has its own command-line syntax.
The XSLT Processor field lets you define the command line that the xTuple application should execute to perform the transformation. Two arguments that will always be required are the name of the XSLT file which describes the transformation and the XML file to be transformed. When typing the command line that should be run to call the XSLT processor, put %f where the XSLT processor expects to find the name of the XML file and %x where the XSLT processor expects to find the name of the XSLT file.
To create a new XSLT map, select the button. The following screen will appear:
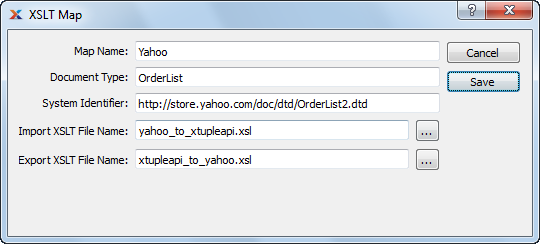
XSLT Map
When creating a new XSLT map, you are presented with the following options:
This is a name you choose to describe this map.
This is the XML document type that the application will use to find the correct filter to use when importing an XML document. When the application starts to import an XML document, it looks for the DOCTYPE processing directive at the top of the file. If the DOCTYPE is xtupleimport then no transformation is required. Otherwise it searches for a match in the Document Type and System Identifier columns to find the correct filter to use when importing the file.
The document type of an XML file is the name of its root element.
This is the system identifier that the application will use to find the correct filter to use when importing an XML document.
The system identifier is a URI that describes how to get the DTD for the XML document.
This is the name of the XSLT file that will be used to transform XML files with this document type and system identifier to xTuple's format for XML files. If the name of the file is a full path, starting with a drive letter on Windows or a / on Macintosh or Linux, then the application will look for this file using this full path specification. If the name is a simple filename (like myTransform.xsl) or a relative pathname (like oasis/from_ubl.xsl) then the application will look for it in the default XSLT directory defined on the configuration of import and export.
This is the name of the XSLT file that will be used to transform XML files generated by xTuple to a file of the given document type and system identifier.
Exporting XML is not currently supported by xTuple. At this time the Export XSLT File Name on the XSLT Map window and the tab on the configuration of import and export are placeholders for future development.
The tab lets you enter details of how files are imported.
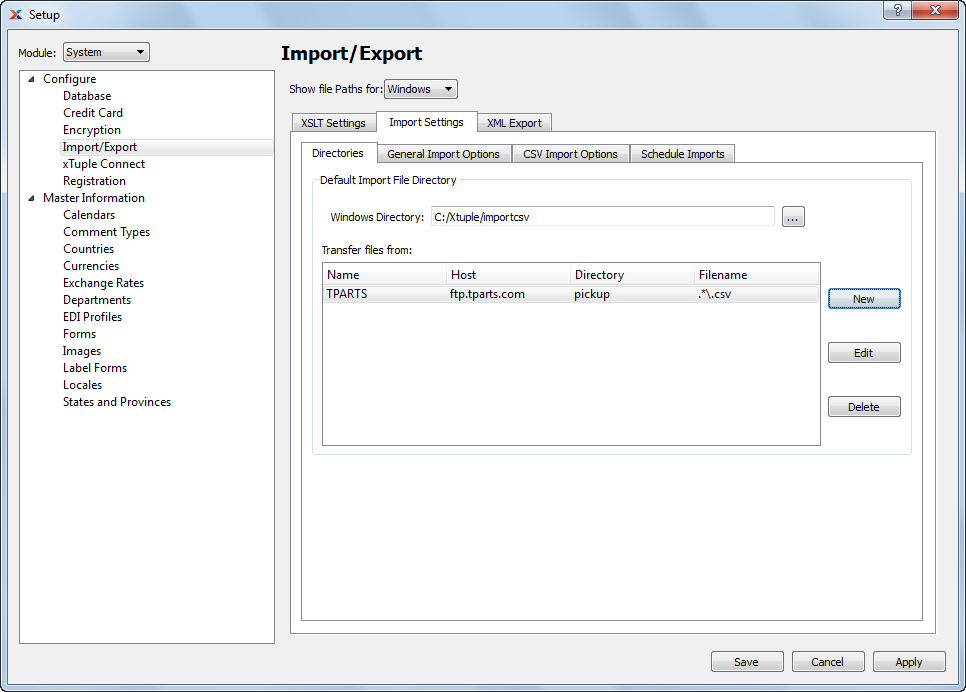
XML Import
When configuring import processing you are presented with the following options on the tab:
This names the directory on the current platform that the xTuple application will search when the user wants to import files. It is used to populate the Import Data window.
The xTuple Connect extension package allows retrieving files from remote FTP servers. This list contains information about the FTP servers that will be checked for files to download.
To set up a new FTP server to check, click the button. You will be presented with the following screen:
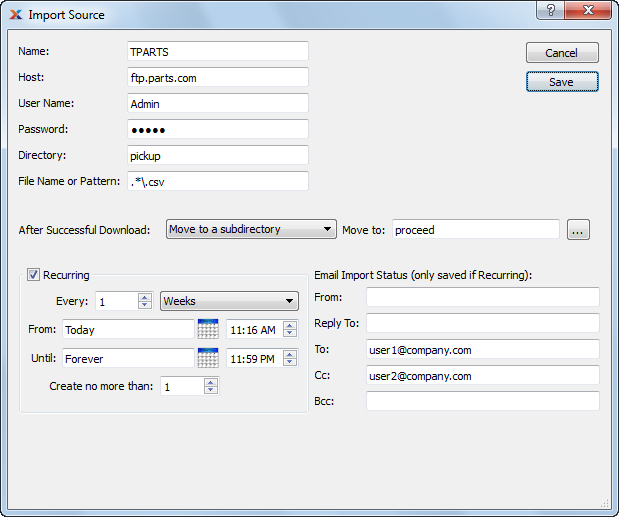
Import Source screen
When setting up an Import Source you are presented with the following options:
Enter a name for this import source.
Enter the host name or IP address of the FTP server.
Enter the user name with which to log in to the FTP server.
Enter the password with which to log in to the FTP server.
Enter the directory in which to look for files to download, if any.
Enter the file name or a regular expression to use to find files to download. For example you can leave this blank if you want to download all files that you find. To download all CSV files that contain "TTOYS" and the current year, you could enter a regular expression like .*TTOYS.*201[0-9].*\.csv$
Select an option from the list of how the xTuple Connect batch manager should handle the file on the FTP server after the file has been downloaded successfully.
When selecting what to do with a file after it has been processed, choose from the following options:
Continue processing and do not touch the file further.
Try to change the name of the file by adding a suffix to it. Type this suffix in the Append field that appears when you select this option. If you want a period ('.') as part of the suffix, include this as part of the suffix.
Try to move the file to the named directory. Typically this is a subdirectory of where the processing originally took place. Type the directory name in the Move to field.
Try to delete the file that was just processed.
Enter a schedule for the xTuple Connect batch manager to connect to the FTP server and try to download files.
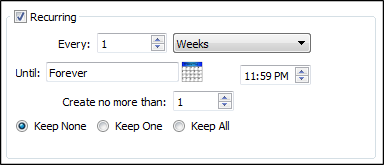
When creating a recurring event, you are presented with the following options:
Check this box if you want the event to repeat itself at regular intervals, using the frequency settings you specify below. Recurring events are generated when you run the Recurring Items utility, which is described in more detail here: Section 10.2, “Create Recurring Items”.
Enter a number and select a unit of time to describe how frequently you want the event to occur. You can choose any regular schedule, ranging from once every 1 minute to once every 99 years.
Enter a date and time at which to start the first event. The default value is the time the screen opened. The From option only appears on some screens.
Enter a date and time after which the event should no longer occur.
Enter the maximum number of future copies of this event you want the system to maintain. Whenever the Create Recurring Items screen is run, it will create up to the number you enter here.
If you delete all copies of a recurring event, the event will stop repeating even if the until date has not yet been reached. xTuple recommends setting this to at least 2 to reduce the likelihood of deleting all copies of the event.
Select to make the next job catch up if work was missed.
Select to create one catch-up job if work was missed.
Select to create any missed jobs.
Use the following fields to specify email notification rules:
This is the email address of the person sending the status of the download processing email.
This is the reply-to address that will be set on the outgoing email message relating to the status of the download processing email.
Enter the email address to be used as the default recipient address for the status of the download processing email.
Enter the email address to be used as the default carbon copy address whenever the status of the download processing emails are sent.
Enter the email address to which copies of the status of the download processing email will be sent.
Importing downloaded files with the xTuple Connect batch manager is a two-step process. The FTP download and the file imports are scheduled separately. The Import Source screen lets you schedule the FTP download step. Use the tab to schedule loading the data into the database.
The tab lets you choose how to handle files after their contents have been imported.

General Import Options
When defining general import options, you are presented with the following options:
Choose how CSV and XML files that have been successfully imported should be handled after the import is complete.
When selecting what to do with a file after it has been processed, choose from the following options:
Continue processing and do not touch the file further.
Try to change the name of the file by adding a suffix to it. Type this suffix in the Append field that appears when you select this option. If you want a period ('.') as part of the suffix, include this as part of the suffix.
Try to move the file to the named directory. Typically this is a subdirectory of where the processing originally took place. Type the directory name in the Move to field.
Try to delete the file that was just processed.
Choose how CSV and XML files that could not be successfully imported should be handled after the import attempt is complete.
When selecting what to do with a file after it has been processed, choose from the following options:
Continue processing and do not touch the file further.
Try to change the name of the file by adding a suffix to it. Type this suffix in the Append field that appears when you select this option. If you want a period ('.') as part of the suffix, include this as part of the suffix.
Try to move the file to the named directory. Typically this is a subdirectory of where the processing originally took place. Type the directory name in the Move to field.
Try to delete the file that was just processed.
Leave this unchecked if you want XML files to be processed in an all-or-none fashion. Check this option if you want those portions of XML files that can be imported to be saved and those portions that cannot be imported successfully to be written out to a separate file.
If this option is checked, a new XML file will be created in the xTuple import format containing those elements that could not be imported. A comment will be added to the XML containing the error message if one is available. If the After error during import option is set to add a suffix or move the file after errors, this setting will be used to name new the error file.
If this option is checked, all XML files imported will handled as though they were successfully imported even if every element failed. The failed elements will be written to a separate error file.
The error file will have the xTuple import format, not the format of the original XML file before the XSLT transformation.
The tab lets you define options specific to importing CSV files.
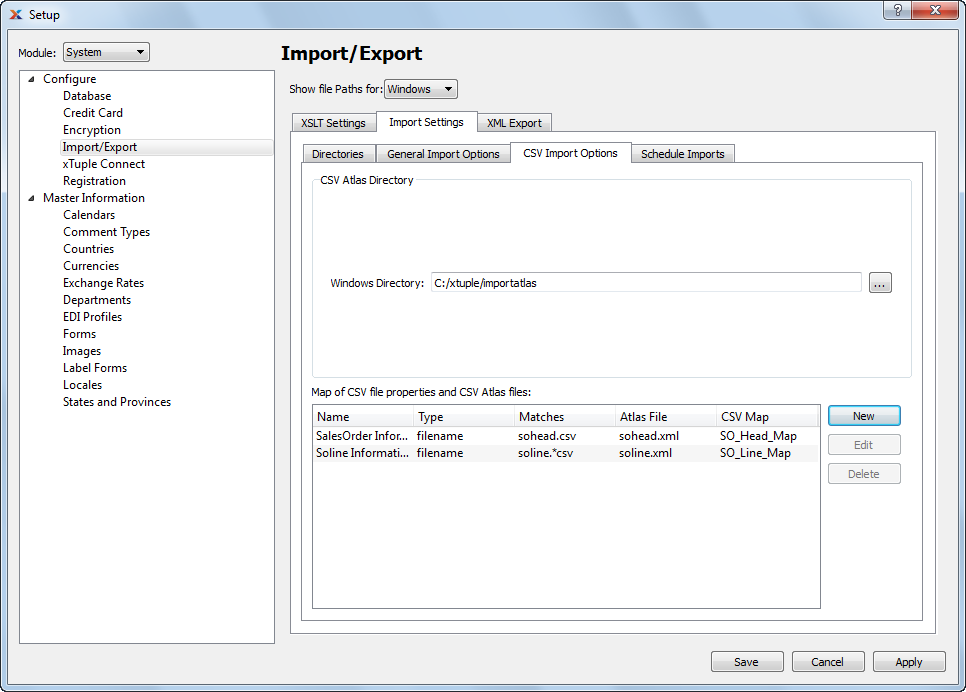
CSV Import Options
When defining options specific to importing CSV files, you are presented with the following options:
This is where the application will look for CSV atlas files when opening them for editing and when importing CSV files.
This lists how CSV atlases are chosen automatically when importing CSV files.
To set up a new mapping between CSV files and the CSV atlases to choose, click the button. The following screen will appear:
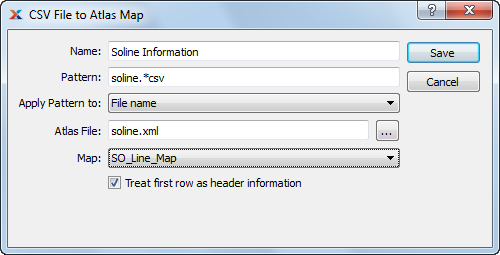
CSV File to Atlas Map
When setting up a CSV atlas map you are presented with the following options:
Enter a name for this mapping between CSV files and the CSV atlas to use
Enter a regular expression that uniquely describes this CSV file format
Choose whether the Pattern should be applied to the name of the CSV file or the first line of the CSV file.
Choose the atlas file that should be applied to files matching the entered Pattern. This file should be placed in the CSV atlas directory or a full path to the file should be entered.
Choose the particular map within the atlas file that should be used for files matching the entered Pattern.
Check this if the first row of the CSV file contains column headers. Uncheck this if the first row of the CSV file contains data to be imported.
The tab lets you define a schedule for importing data with the xTuple Connect batch manager.
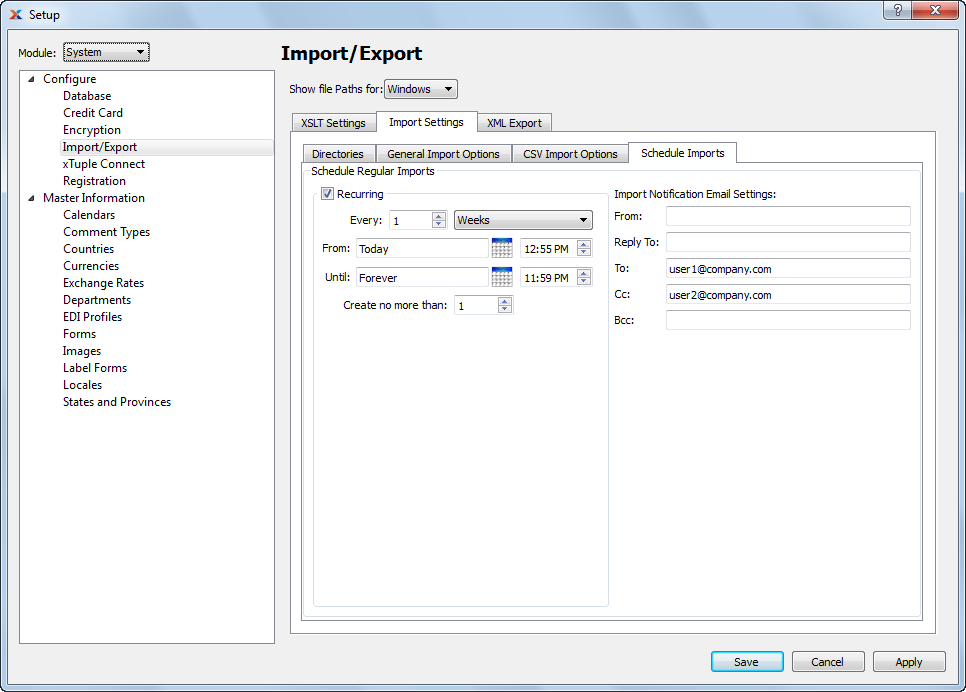
Scheduling options
When setting up an import schedule, you are presented with the following options:
Enter a schedule for the xTuple Connect batch manager to check the import directory and try to import the XML and CSV files found in that directory
When creating a recurring event, you are presented with the following options:
Check this box if you want the event to repeat itself at regular intervals, using the frequency settings you specify below. Recurring events are generated when you run the Recurring Items utility, which is described in more detail here: Section 10.2, “Create Recurring Items”.
Enter a number and select a unit of time to describe how frequently you want the event to occur. You can choose any regular schedule, ranging from once every 1 minute to once every 99 years.
Enter a date and time at which to start the first event. The default value is the time the screen opened. The From option only appears on some screens.
Enter a date and time after which the event should no longer occur.
Enter the maximum number of future copies of this event you want the system to maintain. Whenever the Create Recurring Items screen is run, it will create up to the number you enter here.
If you delete all copies of a recurring event, the event will stop repeating even if the until date has not yet been reached. xTuple recommends setting this to at least 2 to reduce the likelihood of deleting all copies of the event.
Select to make the next job catch up if work was missed.
Select to create one catch-up job if work was missed.
Select to create any missed jobs.
Use the following fields to specify email notification rules:
This is the email address of the person sending the status of the import processing email.
This is the reply-to address that will be set on the outgoing email message relating to the status of the import processing email.
Enter the email address to be used as the default recipient address for the status of the import processing email.
Enter the email address to be used as the default carbon copy address whenever the status of the import processing emails are sent.
Enter the email address to which copies of the status of the import processing email will be sent.
Importing downloaded files with the xTuple Connect batch manager is a two-step process. The FTP download and the file imports are scheduled separately. The Import Source screen lets you schedule the FTP download step. Use the tab to schedule loading the data into the database.
The tab lets you define how the transformations are to be performed.

XML Export
When configuring processing you are presented with the following options:
This names the directory on each platform that the xTuple application will search when the user wants to export XML files. It is used to populate the Export XML window.
| |  | |
| 13.1.3. Encryption |  | 13.1.5. Search Path |