
|
xTuple ERP Reference Guide |
|
|
xTuple ERP Reference Guide |
| 12.1.1. Configure Accounting | ||
|---|---|---|
 | 12.1. Configure |  |
Setting up the default account number structure is one of the primary purposes of the general ledger configuration. The system uses a multi-segment approach to defining general ledger (G/L) accounts. The various segments include the following:
Base account segment
Company segment
Profit center
Subaccount
Depending on the parameters selected, the system will display G/L account numbers in the profit center-account number-subaccount sequence. An example of this sequence would be 001-11111-001.
It is important to realize that the system does not utilize sub-accounts in the same manner that some other packaged software does. It does not roll-up into the base account, but allows you to define related accounts.
To configure the general ledger, go to . The following screen will appear:
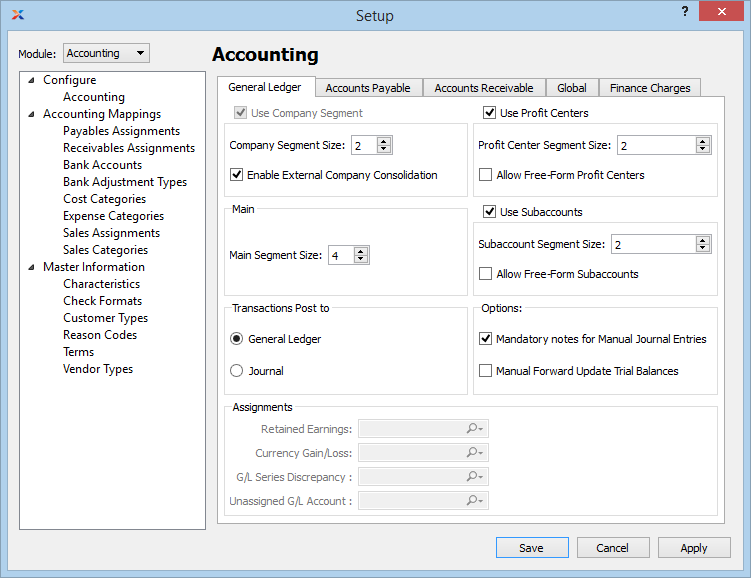
When configuring the general ledger, you are presented with the following options:
Select to utilize a company segment in your G/L account numbers. This is an optional setting to be used if you are tracking account activity for multiple companies. Once transactions have been performed using this segment, the segment may not be disabled. If selected, the account assignments on this screen for retained earnings, G/L series discrepancy, and currency gain/loss will be disabled. You will need to make those account assignments on the Company screen. For more information, please see Section 8.2.1, “Company”. To prevent unbalanced trial balances at the company level, G/L transactions and series postings will not be allowed that cross companies.
If prior to xTuple ERP 3.7.0 you were using the company segment for something other than separate company reporting—and you need to continue that usage—please contact your xTuple support representative.
If a company segment is being utilized, specify a company segment size value between 1 and 10.
Check this setting to enable the ability associate a company to another database that can be used to synchronize trial balance information.
Options related to the main account number segment. Once transactions have been performed using this segment, the segment may not be disabled.
Specify a main segment size value between three and ten. This setting defines how large the base account number portion should be. For example, if you specify "4" here, then your account numbers would probably range from 1000 through 9999. Similarly, if you specify "5" then your account number range would be from 10000 though 99999.
Specify how you want transactional activity to be posted, by selecting one of the following options. You may toggle between these two options, if you wish. However, to go from the Journal option to the General Ledger option, all journal transactions must be posted to the G/L first.
Select if you want all transactions and their full transaction detail to be posted directly to the G/L in real time.
Select if you want all transactions and their full transaction detail to be posted in real time to intermediate journals (sometimes also referred to as day-books). From the journals, transactions are later posted to the G/L—in summary form. In this way, transaction detail remains in the journals, with the summarized version of that detail residing in the G/L. You can post journals to the G/L on a daily, monthly, or weekly basis. It's up to you how you want to implement this feature. Keep in mind that the trial balance and other financial reports are based solely on G/L transactions. This means that journal transactions are not included in financial reports—that is, until they are posted over to the G/L. To learn more about posting journals to the G/L, please see Section 3.3, “Post Journals to Ledger”.
Be sure to give yourself the appropriate privileges to use the journal feature (i.e., PostJournals and ViewJournals). Also be sure to log out/log in to ensure all new menu actions associated with the journals become available.
Select to utilize profit centers by default. This is an optional setting. Once transactions have been performed using this segment, the segment may not be disabled.
If profit centers are being utilized, specify a profit center segment size value between 1 and 10. This segment is placed at the front end of the account number. Profit centers are typically used to identify activity for different sites.
Select to allow free-form profit centers. Free-form means the values may be edited on the Account Number master. In other words, you will not be required to select a predetermined profit center value from the list. Using free-form profit centers can lead to inconsistent account numbers if not handled correctly.
Select to utilize subaccounts by default. This is an optional setting. Once transactions have been performed using this segment, the segment may not be disabled.
If subaccounts are being utilized, specify a subaccount segment size value between 1 and 10. This segment is placed at the back end of the account number. Subaccounts are typically used to identify activity for similar types of accounts where detail is important.
Select to allow free-form subaccounts. Free-form means the values may be edited on the Account Number master. In other words, you will not be required to select a predetermined subaccount value from the list. Using free-form subaccounts can lead to inconsistent account numbers if not handled correctly.
Miscellaneous options related to the G/L configuration.
Select if you want to require users to be required to enter notes when posting simple or series manual journal entries. If this option is not selected, users will not be required to enter notes when posting simple or series manual journal entries.
You should avoid changing your year end equity account if you have already used it to close a fiscal year. If you do change this account after a fiscal year has been closed, be sure to consult your system administrator. The trial balance for the new account will need to be manually updated.
Select if you want to manually configure trial balance forward-updating on an account-by-account basis. To enforce automatic forward-updating (which is the standard approach), then do not select this option. Not selecting this option means forward-updating will be automatic across all accounts and financial reports. In automatic mode, the forward-update check box will be hidden on the Account master records. The forward-update utility in the module menu will also be hidden from view in automatic mode.
Specify the following account assignments for the G/L configuration. These options will be disabled if you elect to use the optional company segment for tracking account activity by company. If you are using the company segment, these account assignments will need to be defined on the Company screen.
Select a valid G/L account. This is an equity account. It will be credited if retained earnings are positive—and debited if retained earnings are negative. The retained earnings calculation occurs when a fiscal year is closed. Total expenses for the year are subtracted from total revenues, and the balance is transferred to the year end equity account. The system then automatically resets the beginning balances for revenue and expense accounts to $0 for the start of the new fiscal year.
Select a valid G/L account. This is an expense account only needed for xTuple ERP databases where multiple currencies are in use. The account will debited for currency gains and credited for currency losses arising from fluctuating exchange rates. Currency gains/losses may be recognized at the following points: 1) When posting a cash receipt applied to an invoice; 2) when posting a payables payment applied to a voucher; 3) when applying a receivable miscellaneous credit memo to an invoice; and 4) when applying a payables miscellaneous credit memo to a voucher. In each case, the gain or loss arises when the exchange rate used for the apply-to document differs from the exchange rate used for the application.
Select a valid G/L account. This is an expense account. It will be debited or credited if rounding errors cause discrepancies when multiple line item (i.e., series) transactions are posted to the G/L. If used, the amounts posted to this account will be minuscule, as rounding errors are fractional by nature.
Select a valid G/L account. This is a liability account. It will be debited or credited when the system cannot determine a ledger (or more typically a receivable/payable) account to distribute funds to. As a rule, there should be nothing in this account besides exceptions. The intention is that accountants should review the account monthly. If they find anything in the account, they should journal the amount out to the correct account(s) and fix the cause of the unassigned accounts.
To configure Accounts Payable options, select the tab. The following screen will appear:
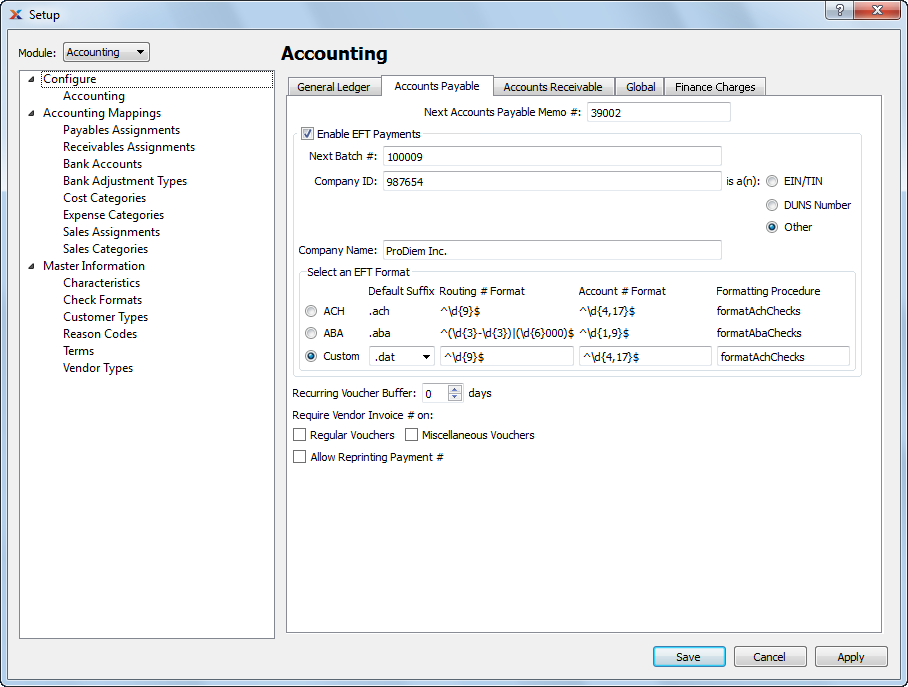
Configure Accounts Payable
When configuring the module, you are presented with the following options:
The next sequentially available accounts payable memo number will display here. You may change the number—creating a new basis for the next payables memo number—by typing the new number into this field.
Select to enable electronic funds transfer (EFT) capability within the module, including on vendor records.
Enter the starting number for the next batch of payments issued. If you try to enter a number that has already been used, a warning message will be raised.
Unique company number used to identify legal business entity. Select an option to specify what type of number is used. The NACHA specification says that there are three standard codes that describe the "company id" field in the output:
1 = Employer Identification Number
3 = DUNS number
9 = Other
The NACHA spec recommends but does not require these values. As a result, some banks expect these fields in the output to have other values. You have the option to configure bank accounts to use the standard 1/3/9 code values or a specific single character regardless of the company id type. Payment files prepared for upload use the setting for that bank when formatting the ACH records.
Employer identification number (EIN) or federal tax identification number (TIN).
Dun & Bradstreet nine digit unique business ID number.
Any other unique identifier.
Legal name of organization.
The following information is shown for each of the possible EFT formats: default suffix, routing number format, account number format, and formatting procedure. The procedure is a stored procedure, which is stored in your xTuple database with the rest of the business logic.
Select if you want your default EFT format to follow automated clearing house (ACH) conventions.
Select if you want your default EFT format to follow Australian Bankers' Association (ABA) conventions.
Select if you want to define a custom EFT format. The system provides several default options for you to choose from. However, you may provide your own information in all four provided fields.
Specify the number of buffer days you want to allow for when automatically processing recurring vouchers. This setting is used by the Create Recurring Items utility, which is described in more detail here Section 10.2, “Create Recurring Items”. Essentially, the buffer days setting tells the utility how far to look ahead. When it runs, the utility will create new vouchers for any recurring vouchers having voucher dates within the look-ahead (i.e., buffer) days. If a voucher date falls outside the buffer period, then no new voucher will be created.
You have the option to specify whether you want users to be required to enter a vendor invoice number when they are creating vouchers.
Select to require a vendor invoice number when creating purchase order vouchers. If not selected, vendor invoice numbers will not be required.
Select to require a vendor invoice number when creating miscellaneous vouchers. If not selected, vendor invoice numbers will not be required.
Select to allow users to reprint the same payment number in a payment run if they say the payment did not print correctly when prompted. This feature is not designed to allow the general reprinting of payments, only the reprinting of payments which were reported as having not been printed correctly.
To configure Accounts Receivable options, select the tab. The following screen will appear:

Configure Accounts Receivable
When configuring Accounts Receivable options, you are presented with the following options:
The next sequentially available accounts receivable memo number will display here. You may change the number—creating a new basis for the next receivables memo number—by typing the new number into this field.
The next sequentially available cash receipt number will display here. You may change the number—creating a new basis for the next cash receipt number—by typing the new number into this field.
Select if you want to hide the button on the Enter Cash Receipt screen. If this option is selected, users will be required to apply cash receipts manually to individual open receivables.
Select to ensure tax payments are credited when processing early payment discounts. This option is selected by default. If not selected, taxes will not be credited when early payment discounts are processed.
Select if you want unapplied cash receipts from customers to be handled by a deferred revenue account. This option impacts both cash receipts entered manually and also credit card payments posted during sales order entry. If selected, the receivables account assignments screen will include a deferred revenue account option. Not selecting this option will hide the deferred revenue account option on the Receivables Account Assignments screen. Also hidden will be Customer Deposit options on the Cash Receipts screen. If the deferred revenue approach is not being used, then unapplied cash receipts will be handled by the asset account for the specified bank account.
Selecting this option will allow you to enter an alternate exchange rate on a cash receipt in which case the gain/loss will be based on the difference between the system level exchange rate and the alternate exchange rate.
The remit-to address is used in multiple report definitions. Specify details to be used for your site's default remit-to address. If a new address is manually entered here, that address will be added automatically to the master list of addresses. For additional documentation related to creating addresses, see Section 8.1, “ New Address”.
Select to globally enable the ability to place customers on credit warning when the due dates on their open receivables become late past the specified grace period. If this option is selected, you will have the ability to run a utility called Update Late Customer Credit Status described here: Section 11.4, “Update Late Customer Credit Status”. When run, this utility will review all late open receivables for all customers. Any customers found to have late items falling outside the grace period will be placed on credit warning. These customers will automatically be taken off credit warning once their late items are paid.
Specify the standard number of days beyond the open receivables due date which will serve as a grace period. As long as receivable due dates are within the grace period, customers will not be put on credit warning when the late status utility is run. Once outside the grace period, they will be placed on credit warning.
Specify the number of buffer days you want to allow for when automatically processing recurring invoices. This setting is used by the Create Recurring Items utility, which is described in more detail here Section 10.2, “Create Recurring Items”. Essentially, the buffer days setting tells the utility how far to look ahead. When it runs, the utility will create new Invoices for any recurring invoices having invoice dates within the look-ahead (i.e., buffer) days. If an invoice date falls outside the buffer period, then no new invoice will be created.
Specifies the default incident category used for incidents associated with accounts receivable.
Select to automatically close incidents tied to open invoices when those invoices are themselves paid in full and closed.
To configure global accounting options, select the tab. The following screen will appear:
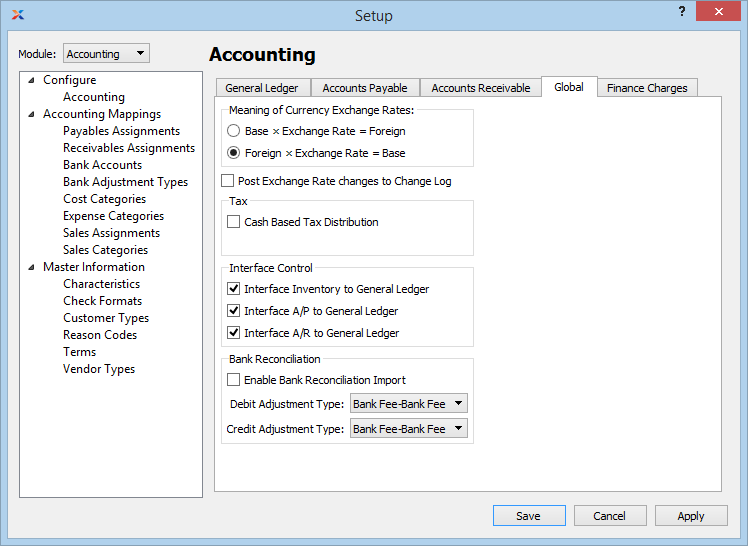
Global Accounting options
When configuring global accounting settings, you are presented with the following options:
Specify how you want exchange rates to be implemented and also displayed on the Exchange Rates master list:
If selected, this equation will be used.
If selected, this equation will be used.
Select if you want changes made to exchange rates to be recorded in the change log on the Currencies screen.
Select this option if you want to use cash based tax distribution. Activating this feature will create both a clearing account and a distribution account for tax codes. When a bank reconciliation is posted, the proportional amount of tax transactions will be moved from the clearing account to the distribution account.
During initial implementations of xTuple ERP (or at other times), it may be desirable to block inventory transactions from hitting the G/L. The following configuration controls this behavior:
If selected, all inventory transactions will be posted to the general ledger. When not selected—and the G/L source is either I/M, P/D, S/R, or W/O—then transactions from those G/L sources will be blocked and not posted to the general ledger.
If selected, all accounts payable transactions will be posted to the general ledger. When not selected—and the G/L source is either I/M, P/D, S/R, or W/O—then transactions from those G/L sources will be blocked and not posted to the general ledger.
If selected, all accounts receivable transactions will be posted to the general ledger. When not selected—and the G/L source is either I/M, P/D, S/R, or W/O—then transactions from those G/L sources will be blocked and not posted to the general ledger.
The bank reconciliation function can be configured to import and use statement files provided by your bank. In this way, you can automate the bank reconciliation process in xTuple.
Select to enable the option to import bank statement files in .CSV format for use in your bank reconciliations. When selected, an button will appear on the Bank Reconciliation screen. If this option is not enabled, the button will be hidden from the Bank Reconciliation screen.
Specify the adjustment type to be used for debit transactions when performing manual overrides of the automated reconciliation.
Specify the adjustment type to be used for credit transactions when performing manual overrides of the automated reconciliation.
To configure Finance Charge options, select the tab. The following screen will appear:
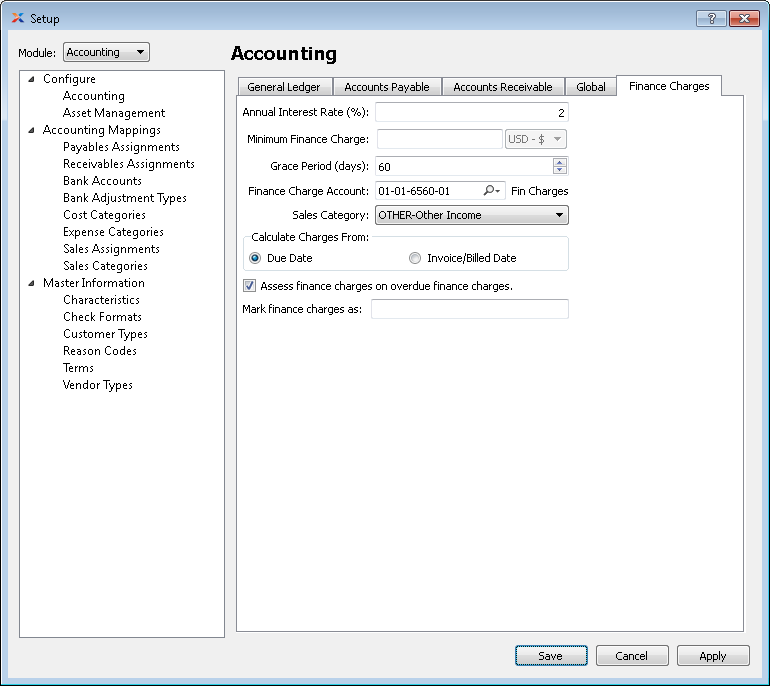
Finance Charges options
When configuring finance charges, you are presented with the following options:
Specify the interest rate as an annual percentage.
The minimum finance charge to be applied for each time finance charges are calculated.
The number of days after the due date during which finance charges will not be applied.
The general ledger income account to which finance charges will post.
The sales category under which finance charges will be categorized.
Specify the date from which finance charges will be calculated.
Select if finance charges should be calculated from the due date.
Select if finance charges should be calculated from the invoice date.
Select this option if finance charges must be calculated on previous finance charges on an overdue invoice.
Enter the text, e.g. Finance Charges, that will be used to associate the finance charges with the accounts receivable entry.
| |  | |
| 12.1. Configure |  | 12.1.2. Asset Management |