
|
xTuple ERP Reference Guide |
|
|
xTuple ERP Reference Guide |
| 5.5. Send Electronic Purchase Order | ||
|---|---|---|
 | 5. Forms |  |
To send a copy of a purchase order electronically, go to .
When sending a document electronically, you may be presented with one of two screens, depending on whether the document will be sent by email or by FTP. If you do not see either screen, that suggests the EDI profile has been set to disable review before sending and will automatically be sent to the xTuple Connect batch manager.
Customers vendors are set up to receive electronic deliveries of information using the tab on the Customer master.
If the document will be sent by email, the following screen will appear. Please note, the document type will vary depending on the context. In this example, an invoice document is being sent:
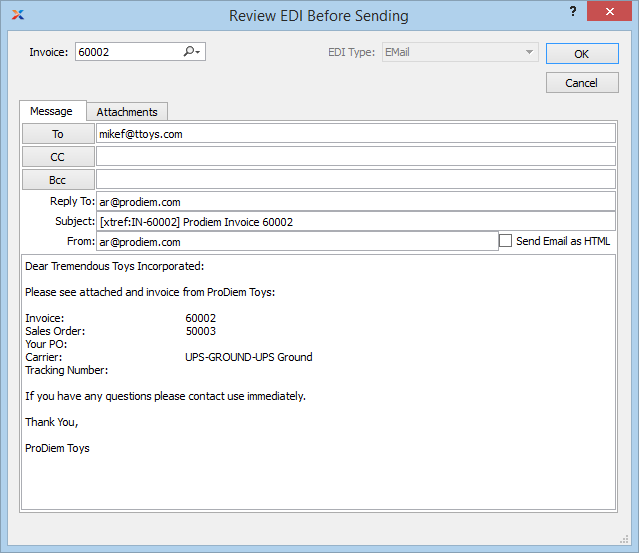
Review EDI Before Sending by email
The fields at the top of the window show basic information about the EDI that will be sent:
The type of document and document number will vary depending on the context. The following document types are supported: quote, sales order, invoice, purchase order.
If documents do not appear in the list, make sure your vendors and/or customers have EDI profiles associated with them.
Displays whether the EDI will be sent by email or FTP.
The information in the following fields will be populated from the EDI profile. If you have the EditEDIBeforeSending privilege, you will be allowed to edit the contents of these fields. You are presented with the following email-specific options:
This is the email address of the primary intended recipient of the email. You can add email addresses from a searchable list of your CRM contacts by clicking on the button.
This is the carbon copy (i.e., Cc:) email address—a copy of the email will be sent to this address. You can add email addresses from a searchable list of your CRM contacts by clicking on the button.
This is the blind carbon copy (i.e., Bcc:) email address—a copy of the email will be sent to this address but none of the recipients will see this address. You can add email addresses from a searchable list of your CRM contacts by clicking on the button.
This is the reply-to address that will be set on the outgoing email message. This controls the email address used when someone replies to the email sent by xTuple ERP.
This is the subject line that will be used for this email.
This is the email address of the person sending the email. It can be set to the address of the user running the application or a generic address (e.g. sales@xtuple.com). If it is left blank on this screen, the xTuple Connect batch manager will fill in the email address of the user running the application at the time the EDI was prepared.
This is the body of the email message that will be sent. This is a scrolling text field with word-wrapping.
Select if you want the body of the email to be sent as HTML. If not selected, the email will be sent as plain text.
Use the attachment options to control the contents and format of the file attached to this email. The following options are available, depending on the settings in the EDI profile:
No file will be attached to the email.
The named report will be run by the batch manager and attached to the email as a .PDF file.
If the document is a sales order or an invoice, the customer form assignment will be used. That report will be run by the batch manager and attached to the email as a .PDF file.
The query set defined in the EDI forms for the EDI profile will be run. The results will be used to build a file with the fields delimited by the character selected in the drop-down list that appears when is selected.
Pre-defined characters include the comma () and . If you need to change the delimiter, select from the drop-down menu, then replace that text with your own single character. Normally, however, this should be left to the value specified in the EDI profile.
The query set defined in the EDI forms for the EDI profile will be run. The results will be used to build an HTML file. Each query will start a new HTML table.
The query set defined in the EDI forms for the EDI profile will be run. The results will be used to build an XML file. Each row of output will be represented by an XML element named for the query that generated it and will contain child elements for the individual fields. Each field of output will be represented by an element with the name of the Query Result column and will contain the value of that field as the text of the element.
The resulting XML can be transformed to another format by selecting from the list of XSLT mappings that appears when XML is selected.
For delimited text, this will insert a line before each query showing the Query Result column names separated by the delimiting character. For HTML, this will insert a row at the beginning of each query's results showing the Query Results column names. This is ignored for .PDF and .XML output.
This is the name that will be given to the email attachment. For forms and reports it should end with a .pdf suffix. For comma-delimited files the output file should end with .csv. Tab-delimited files should have a .tsv suffix.
This brings up a preview window to show what the attachment will look like when generated by the batch manager. It can show either reports or delimited text files.
The following buttons are unique to this screen:
Select to submit the requested action to the batch manager for processing. If the EDI will be sent by email, there must be at least one email address in either the To, Cc, or Bcc fields.
To search for email addresses from within your CRM contacts, select either the , , or buttons. The following screen will appear:

Search for email contacts
When searching for email contacts, you are presented with the following options:
Enter a string of letters or a full name to search for matches in your CRM contacts list. The contacts list will be empty by default until you begin entering letters to search and match for.
Display will be empty at first but will populate with CRM contact records as soon as letters are entered in the Search field.
Highlight a contact and then use the button to choose the contact record. The selected contact's email address (assuming it exists) will be added to the outbound email, in the Address field you specify.
If the document will be sent by FTP, the following screen will appear:

Review EDI Before Sending by FTP
While the FTP attachment options will be the same as for sending email, the transmission options will be different. Get the values for these from the EDI recipient (either your vendor or customer, depending on the document type). See the xTuple Connect product guide for suggestions on how to store these data.
When entering FTP information, you are presented with the following options:
This is the host name or Internet address of the FTP server to send the document to.
This is the user name required to log in to the FTP server.
This is the password required to log in to the FTP server.
This is the directory in which the recipient wants you to put the EDI message on the FTP server.
If both the Login Name and Password fields are empty, the xTuple Connect batch manager will attempt an anonymous FTP, using the name anonymous for the login name and the email address of the user submitting the EDI for the password.
| |  | |
| 5.4. Print Vendor Form |  | 6. Reports |