
|
xTuple ERP Reference Guide |
|
|
xTuple ERP Reference Guide |
| 3. xTuple Connect Console | ||
|---|---|---|
 | Chapter 9. System Module |  |
The xTuple Connect Batch Manager is an application which connects to a database and waits for and then processes scheduled jobs that need to be run. These scheduled jobs are submitted from various places within the xTuple ERP application. Often the type of jobs that can be submitted are jobs that either take long periods of time to run or jobs that you would want to run periodically at a given time. When you submit a job to the batch manager, you specify a time for the job to start running. This job and others like it are stored on the database, waiting for the batch manager to process them. You can see a list of jobs submitted to the batch manager by going to .
For details on installing and setting up the batch manager at your site, please see the xTuple Connect Product Guide available in the documentation area of the xTuple community website.
To access the system interface to the batch manager, go to . The following screen will appear:
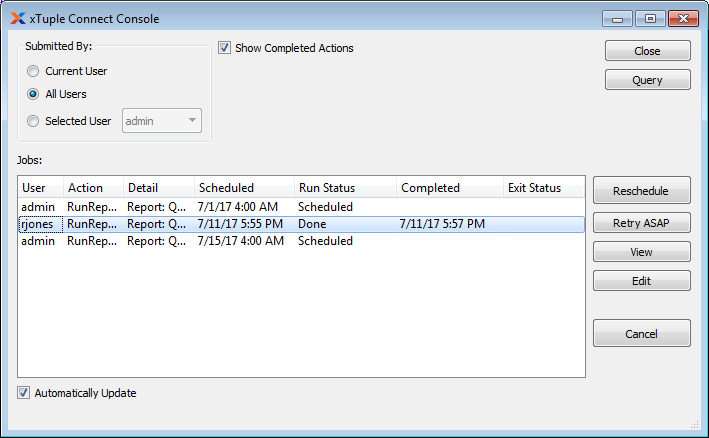
When a report or other job is submitted to the batch manager with a scheduled time of ASAP, the batch manager sets the scheduled time to the current time. However, a job will not necessarily be run immediately if it is scheduled for the current time. Any pre-existing jobs with scheduled times prior to the current time must be completed first. In other words, ASAP jobs will not necessarily be run immediately. Previously scheduled jobs will be run first.
When managing scheduled jobs using the xTuple Connect console, you are presented with the following options:
Specify the user(s) whose batch items you want to display.
Select to display batch items for the current user.
Select to display batch items for all users.
Specify the user whose batch items you want to display
Select to include completed scheduled jobs in the display.
Displays scheduled jobs using the specified parameters. Completed jobs will appear as Done in the Run Status column and a completed timestamp. If the job failed for any reason, the first line of the error message will appear in the Exit Status column. If you allow the cursor to hover over the exit status text, the full version will appear in a Tooltip window.
Read the exit status carefully. Jobs might show error messages for a number of different reasons. For example, a RunMRP job might fail with a database error or with an email error. The database error would mean that the planned orders were not created. The email failure would indicate that the planned orders were created as they should but this successful processing could not be reported properly.
Select to automatically update the display every minute.
The following buttons are unique to this screen:
Highlight a job and then select this button to reschedule the job.
Rerun one or more selected jobs as soon as possible. This is a shortcut for the button. It allows rescheduling multiple jobs with one click. It will not reschedule existing jobs that have not yet completed.
Select to see the details of the job.
Select to edit selected details of the job.
Cancel (or delete) the selected jobs, whether they have been run or not.
If the list of cancelled jobs contains all copies of a recurring job, the recurrence will stop immediately. You will have to create a new copy of the job and re-enter the recurrence schedule.
| |  | |
| 2. Event Manager |  | 3.1. Scheduled Job |