
|
xTuple ERP Reference Guide |
|
|
xTuple ERP Reference Guide |
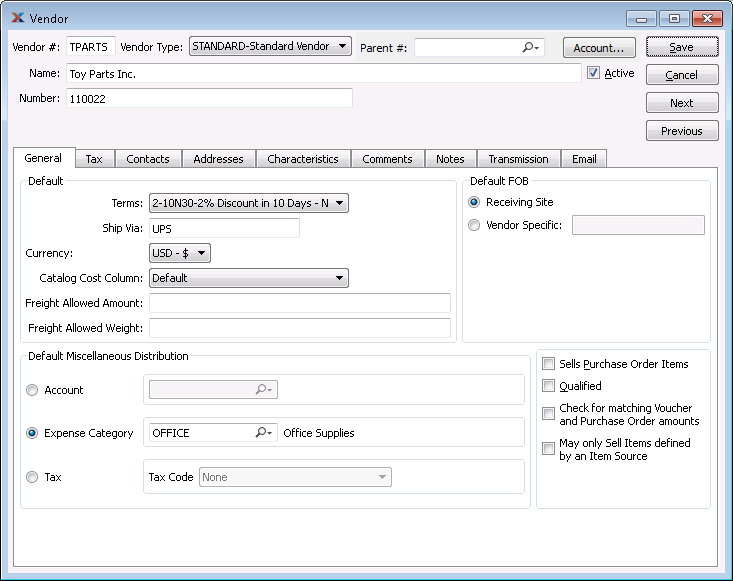
To create a new Vendor, select the "New Vendor" option. The following screen will appear:
Vendors can also be created from the CRM Account screen. Simply enter a new CRM Account, selecting the "Vendor" Relationship option.
When creating a new Vendor, you are presented with the following options:
Enter a number to identify the Vendor.
Specify the Vendor Type of the Vendor.
Enter the name of the Vendor.
Select if you are actively doing business with this Vendor.
Use this field to indicate the Account number the Vendor assigns to your site.
Default settings for Vendor.
Specify the default billing Terms for the Vendor.
Specify default Ship Via for Vendor.
Specify the Currency to be used when conducting business transactions with the Vendor. This option will only be visible in systems configured to use multiple Currencies.
Indicate the default Free on Board (FOB) destination by selecting one of the following options:
Select if receiving site is default FOB destination.
Select if Vendor specifies an FOB destination other than the receiving Site. Enter alternate FOB details in space provided.
Select if Vendor accepts Purchase Orders to render goods. This setting is informational only. It has no impact on the ordering process.
Select this flag to indicate that the Vendor is a trusted Vendor.
Select to perform Voucher matching when entering Voucher Items for the Vendor. If selected, users will be presented with a warning message whenever a Voucher Item amount does not match the corresponding Purchase Order Item amount for the Vendor. This option will not prevent users from proceeding. Instead, the warning message simply alerts users that a mis-match exists.
Select if you want to restrict Items purchased from the Vendor to Items having a defined Item Source. If not selected, you may choose from all purchased Items when entering a Purchase Order Line Item.
You have the option to select a default accounting distribution option to be used when entering Vouchers for the Vendor:
Select a General Ledger Account to use for the distribution.
Select a Project to associate with the transaction. The Project Number will be added as the final segment of the G/L Account Number.
Select an Expense Category to use for the distribution.
Select a Tax Code to use for the distribution.
The following buttons are unique to this screen:
Select to open the Vendor's Account.
Select to open the Vendor master whose Vendor Number immediately follows the current Vendor Number.
Select to open the Vendor master whose Vendor Number immediately precedes the current Vendor Number.
To view or enter Vendor Tax information, select the "Tax" tab. The following screen will appear:
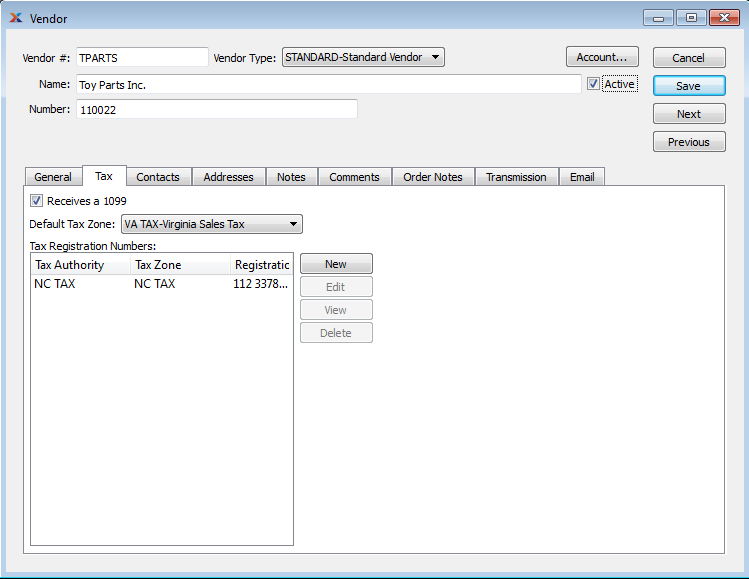
When adding Vendor Tax information, you are presented with the following options:
To add a new Vendor Tax Registration Number, select the NEW button. The following screen will appear:
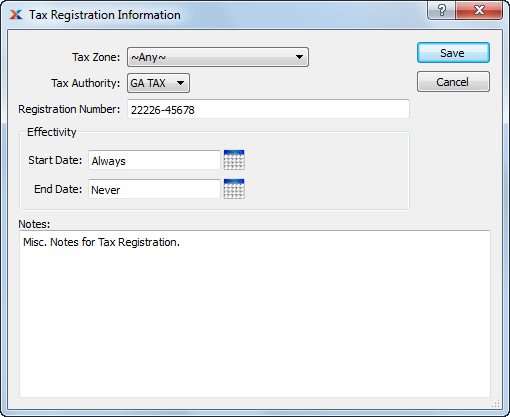
When adding a new Vendor Tax Registration Number, you are presented with the following options:
Specify the Tax Zone associated with the Tax Registration Number.
Specify the Tax Authority associated with the Tax Registration Number.
Enter the Vendor's Tax Registration Number for the specified Tax Authority. The registration number is used by Tax Authorities to identify businesses and/or individuals. An Employer Identification Numbers (EIN) is an example of a Tax Registration Number.
The Vendor's Tax Registration Number is used for identifying the Vendor to relevant Tax Authorities. This information should not be confused with the Tax Registration Numbers, which are used to identify your company to relevant Tax Authorities.
To view or enter Vendor contact information, select the "Contact Information" tab. The following screen will appear:
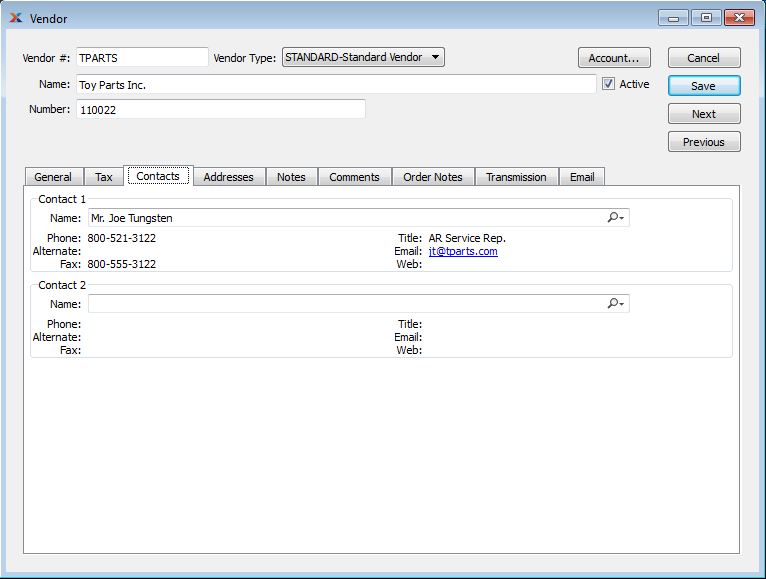
When adding Vendor contact information, you are presented with the following options:
Manually enter Contact information in the fields below—or use the lookup feature to select pre-existing Contact information. If a new Contact is manually entered here, that Contact will be added automatically to the master list of Contacts. For additional documentation related to creating Contacts, see Section 7.1, “New Contact”.
Manually enter Contact information in the fields below—or use the lookup feature to select pre-existing Contact information. If a new Contact is manually entered here, that Contact will be added automatically to the master list of Contacts. For additional documentation related to creating Contacts, see Section 7.1, “New Contact”.
Just as Customers may have multiple Ship-To addresses, Vendors may also maintain multiple Ship-From addresses. A Vendor address is a Ship-From address. To add Vendor Addresses to a Vendor master, select the "Addresses" tab. The following screen will appear:
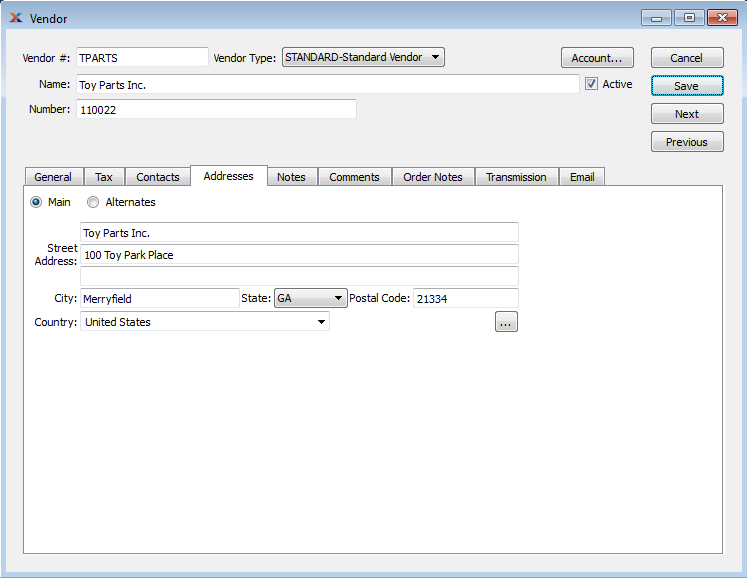
When adding Vendor Addresses, you are presented with the following options:
Select to present primary address used by Vendor. Manually enter Address information in the fields below—or use the lookup feature to select pre-existing Address information. By default, this address will appear as the main address when entering Purchase Orders for the Vendor. If a new Address is manually entered here, that Address will be added automatically to the master list of Addresses. For additional documentation related to creating Addresses, see Section 8.1, “ New Address”.
Select to list various alternate Addresses for Vendor.
To create a new Vendor Address, select the NEW button. The following screen will appear:
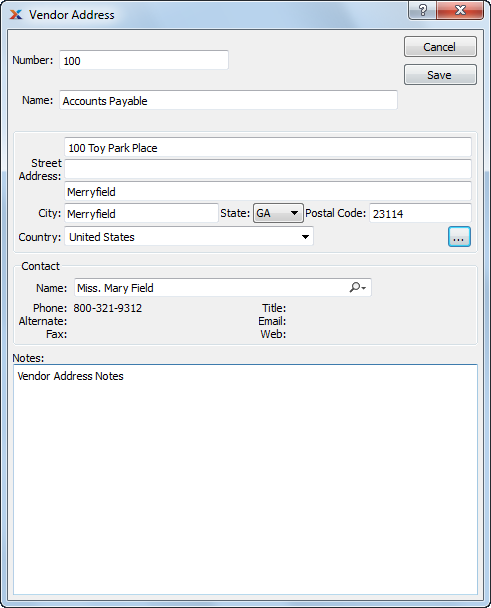
When creating a new Vendor Address, you are presented with the following options:
Enter a number or code to identify the Vendor Address. Using the value "Remit" or "REMIT" or "remit" in this field will cause the specified Address to be used as the default Remit-To Address when printing Checks for the Vendor.
The Remit-To feature is only supported when printing Checks using the APCheck report definition.
Enter the name of the Vendor Address.
Manually enter Address information in the fields below—or use the lookup feature to select pre-existing Address information. By default, this address will appear as the main address when entering Purchase Orders for the Vendor. If a new Address is manually entered here, that Address will be added automatically to the master list of Addresses. For additional documentation related to creating Addresses, see Section 8.1, “ New Address”.
Manually enter Contact information in the fields below—or use the lookup feature to select pre-existing Contact information. If a new Contact is manually entered here, that Contact will be added automatically to the master list of Contacts. For additional documentation related to creating Contacts, see Section 7.1, “New Contact”.
This is a scrolling text field with word-wrapping for entering Comments related to the Vendor Address.
Vendor Characteristics are user-defined definitions which may be used to provide additional layers of description about Vendors. These descriptions are static and not processed by the system, but are useful for informational purposes. To enter Characteristics associated with a Vendor, select the "Characteristics" tab. The following screen will appear:
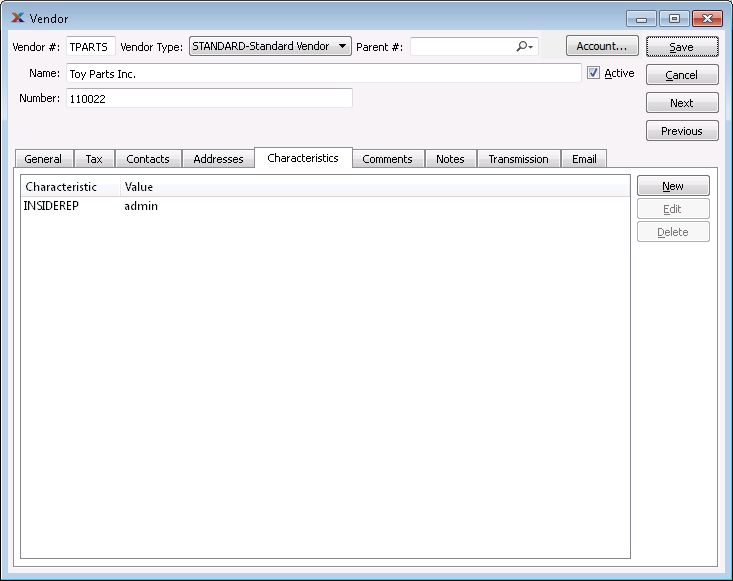
Vendor Characteristics
When creating a new Vendor Characteristic, you are presented with the following options:
Select a Characteristic from the list of Characteristics designated as being available for use as Vendor Characteristics.
Enter a description for the Vendor Characteristic.
To add Notes related to a Vendor, select the "Notes" tab. The following screen will appear:
Any Comments entered elsewhere in the CRM Module related to the Vendor's CRM Account will also be shown here. To add or review Comments related to a Vendor, select the "Comments" tab. The following screen will appear:
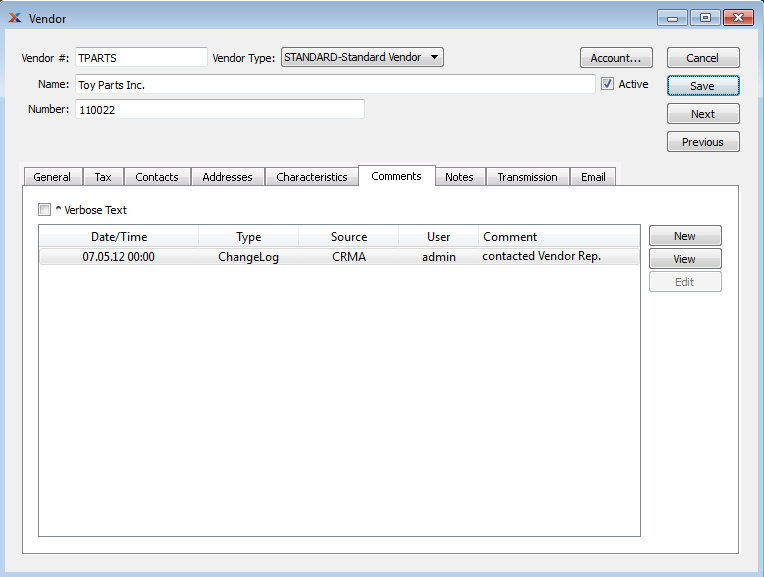
When adding or reviewing Comments, you are presented with the following options:
Select to display all Comments in the list in an expanded view which includes the entire text of each Comment. To edit a Comment, simply select the "Edit" link next to the Comment. That link will not be shown for Changelog Comments, which can't be edited. If the "Verbose Text" option is not selected, the Comment list will display only header level information for each Comment.
Display lists Comments related to the record.
The following buttons are available:
Opens screen for creating a new Comment.
Highlight a Comment and then select this button to reach a read-only view of the "Edit" screen.
Enables you to edit highlighted Comments—as long as the Comments are not "ChangeLog" Comments. ChangeLog Comments are system-generated and may not be edited. The edit screen is the same as that for creating a new Comment—except that when editing, the fields will contain Comment information. Double-clicking on a Comment will also bring you to the editing screen.
To enter a new Comment, select the NEW button. The following screen will appear:
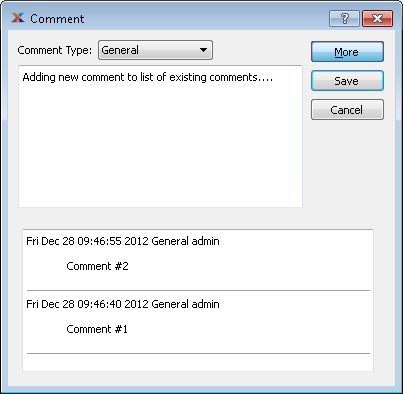
Select a Comment Type from the drop-down list to classify the Comment. This is a required step. Comment Types may be system-defined (i.e., "ChangeLog" and "General") or user-defined, as described in Section 13.2.2, “Comment Types”. Once you have specified a Comment Type, begin typing your Comment in the main text area. The text area features word-wrapping and scroll-bar support for longer Comments.
The following buttons are unique to this screen:
Select to show the complete list (i.e., "thread") of Comments associated with the record. To hide the list, simply select the SHOW MORE button again. The Comment thread will show the most recent Comment first.
To add purchasing Notes related to a Vendor, select the "Order Notes" tab. The following screen will appear:

When adding purchasing Notes related to a Vendor, you are presented with the following options:
Select the "Notes" tab to access this scrolling text field with word-wrapping for entering general Notes related to the Vendor.
This is a scrolling text field with word-wrapping for entering purchasing Notes related to the Vendor. These Notes are for internal use only. Order Notes are drawn from the Vendor master.
The Electronic Data Interchange (EDI) system enables you to exchange information electronically with your Vendors. To set up a Vendor to receive Purchase Orders, select the "Transmission" tab and select the "EDI Profiles" button. The following screen will appear:
Vendor Transmissions
The buttons to set up EDI Profiles are disabled when creating a new Vendor. If you want to set up EDI for a new Vendor, save the Vendor and edit it again.
When associating EDI Profiles with EDI recipients, such as Customers, Ship-To Addresses, and Vendors, you are presented with the following options:
Display lists EDI Profiles associated with this recipient (e.g., current Customer) for a particular document type. It also shows whether EDI will be sent via email or FTP.
The following buttons are unique to this screen:
Connect an existing EDI Profile to this EDI recipient for a particular document type.
Detach the selected EDI Profile from the recipient for the selected document type.
Selecting the EDIT button will open the EDI Profile so you can change it. All EDI recipients who share this EDI Profile will be affected by changes.
To attach an existing EDI Profile to the current recipient, select the ATTACH button. The following screen will appear:
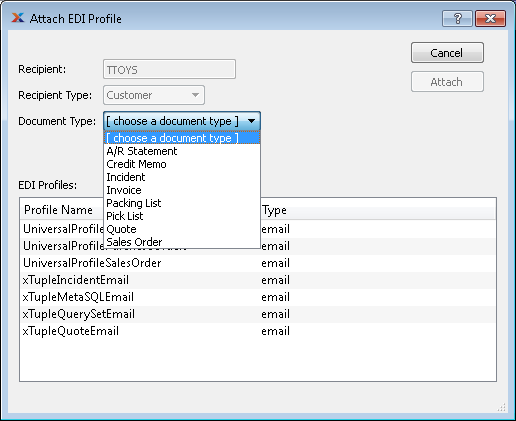
This screen lets you attach an existing EDI Profile to the currently selected Recipient for a particular Document Type. This tells xTuple Connect which documents should be sent by EDI and the EDI Profile to use when sending documents of that type to a particular Recipient. The Recipient and Recipient Type are displayed for your information while attaching the EDI Profile.
This shows the number of the Customer, Vendor, etc. which will receive EDI using the selected EDI Profile.
This shows whether the Recipient is a Customer, Vendor, etc. This reduces confusion in cases where a Customer and Vendor have the same number (i.e., the same CRM Account is both a Customer and Vendor).
Choose from this list the type of document you want to use the EDI Profile for. The list of available Document Types changes depending on the Recipient Type. For example, if the Recipient Type is Vendor, the Document Type list will not contain "Sales Order".
The list of EDI Profiles shows only those EDI Profiles that have an EDI Form for the currently selected Document Type by default. If this box is checked, all EDI Profiles will be listed. You may attach an EDI Profile without an appropriate EDI Form but it will not be used until the right EDI Form is added to the EDI Profile.
Choose from this list the EDI Profile you want to attach for the selected document type.
The following buttons are unique to this screen:
Attaches the EDI Profile to the recipient and closes the screen, returning you to the previous screen.
If there is no existing EDI Profile that suits your needs, you can create a new one by selecting the NEW button. This does the same thing as clicking the NEW button on the EDI Profiles window (see Section 13.2.7, “EDI Profiles”). After you have created the new EDI Profile and saved it, the Attach EDI Profile window will appear with the new EDI Profile selected. Now you can select the Document Type and click ATTACH. If you click CANCEL, the new EDI Profile will still be saved but will not be attached to the recipient.
To enable Electronic Funds Transfer (EFT) payment printing for the Vendor, select the "Payments" option on the "Transmissions" tab. The following screen will appear:
EFT Check Options
When configuring EFT Check settings for the Vendor, you are presented with the following options:
Select to enable online processing or Electronic Funds Transfer (EFT) payment printing.
Enter Bank Account Routing Number.
Enter Bank Account Check Number.
Select type of Bank Account associated with Routing and Account numbers.
Select to use alternative Vendor identification information other than Vendor Number and Name.
Enter alternate Vendor identification number (i.e., tax ID number).
Enter alternate Vendor name (i.e., name of parent company).