
|
xTuple ERP Reference Guide |
Creating a new Sales Order requires a detailed mix of Customer, Sales Representative, and Shipping information. To access the Sales Order area, select the "New Sales Order" option. The following screen will appear:
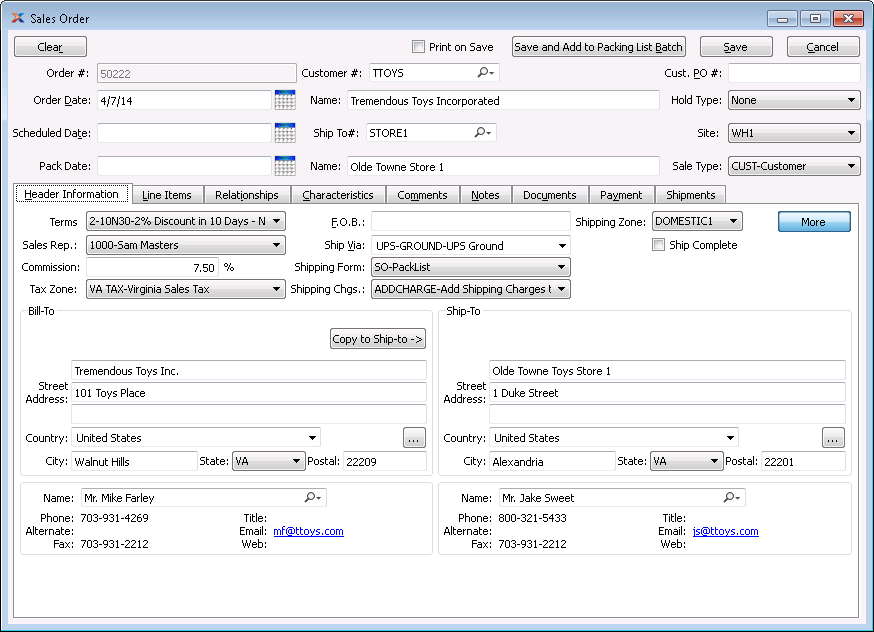
Be sure to close all Sales Order windows before exiting the system. This will prevent the creation of orphaned Sales Order records.
When creating a new Sales Order, you are presented with the following options:
Next available Sales Order Number will automatically display, unless your system requires you to enter Sales Order Numbers manually. Default values and input parameters for Sales Order Numbers are configurable at the system level.
Displays current day's date.
Displays the Order's earliest scheduled date. The scheduled date corresponds to the earliest scheduled date for an included Sales Order Item. If there are no existing Line Items, the date entered here will become the default schedule date for the first one. If Line Items do exist and the date is changed, you will be asked whether you want all editable lines to change. If the change affects pricing, you will be asked whether you want Prices to be updated as well. If hidden, this field can be viewed by selecting the MORE button.
The pack date is the same date as the ship date. Because the field can be edited, you have the ability to change the pack date and make it different from the ship date. This field can be viewed by selecting the MORE button.
Select to automatically print the Sales Order when it is saved.
If the Customer specified on the Sales Order has an EDI Profile attached, you may encounter an EDI processing interface when printing the Sales Order.
Enter the Customer Number of the Customer to be billed for the sale. The lookup feature located to the right of the field leads to a searchable Customers list. You may also access this list using the keyboard shortcut "CTRL + L". Once a Customer Number is entered, the Customer name and billing address will display. Select the "?" or "$" symbol to view Customer information for the specified Customer. If a Customer's credit is "In Good Standing," the button will feature a black question mark ("?") icon. If the icon turns to an orange dollar sign ("$"), the Customer's credit Status is "On Credit Warning." A red dollar sign ("$") indicates the Customer's credit Status is "On Credit Hold." You may also create a new Customer record by selecting the "+" button.
A valid Customer Number must be entered in the "Customer #" field before Line Items can be added to a Sales Order. If no valid Customer Number is entered, you will not be able to add Line Items to the Sales Order. Additionally, Sales Orders may only be entered for active Customers.
Sales Orders may not be entered for Customers whose credit status is either "On Credit Warning" or "On Credit Hold." Only users with special privileges may override these credit settings.
The Customer name is displayed in an editable text field.
Enter the number of the preferred Ship-To Address. Customers may maintain multiple Ship-To Addresses. If the Customer master for the specified Customer indicates that free-form Ship-To's are allowed, then any address may be entered. If free-form Ship-To's are not allowed, then the Ship-To Address must be entered using the browse button located to the right of the field.
The Ship-To name is displayed.
PO #: Enter a Customer Purchase Order Number, as needed.
You will be required to enter a Customer Purchase Order Number for Customers who require them. If required, duplicate numbers will only be allowed if the Customer uses blanket Purchase Orders. All Customer requirements are specified on the Customer master.
Specify a hold type (if any) from the available options:
Indicates no hold is applied, meaning the Order may be processed and shipped.
Indicates the open balance for the Customer has exceeded the credit limit defined on their Customer master record. Users will be prevented from issuing Stock to Shipping with this hold type.
If the Sales Order is paid in full, as in a counter sales scenario for cash-only Customers, the order may be issued to Shipping.
Indicates a Shipping hold has been placed on the Order. Users who attempt to ship an Order on Shipping hold will be prevented from doing so.
Indicates a Packing hold has been placed on the Order. Users who attempt to issue stock to Shipping for an Order on Packing hold will be prevented from doing so.
This hold type is set automatically when a Sales Order is created from a Return Authorization and the disposition requires Inventory to be received before the replacement Order can be shipped.
Specify the shipping Site associated with the Sales Order. The Site selected here acts as the default free on board (FOB) location. A Site may be designated as a shipping Site on the Site master. This field can be viewed upon selecting the MORE button.
Specify the Sales Type. Sales account assignments by Sales Type are available.
For additional Header Information, make sure that the "Header Information" tab is selected.
If the Sales Order setup setting "Display Sales Order Line Items Tab by Default" is checked, the "Line Items" tab will be displayed on the opening window for Sales Order entry.
Specify the billing Terms associated with the Order. By default, the Customer's standard billing Terms will appear in the field.
This field is not available when the Enhanced Commissions package is enabled. When the xWD package is installed, the field is called "Outside Rep."
Specify the Sales Representative associated with the Order. Sales Representatives are linked to a Customer on the Customer master—either by a default setting or through the assignment of Ship-To Addresses. Each Ship-To Address may have a different Sales Representative associated with it. Consequently, the name of the Sales Representative appearing on the Sales Order header will be the same as specified for the Ship-To Address being used.
When creating a new Sales Order, only active Sales Reps will be available for selection. For future changes to an existing Sales Order, all Sales Reps (active and inactive) will be listed to ensure that the original Sales Rep will still appear.
By default, the commission percentage recorded on the Customer master will be automatically entered in this field. If for some reason you select a non-default Sales Representative at Order entry, the commission rate will not change. To adjust the commission rate, you must make the change manually. This field can be viewed by selecting the MORE button.
Specify the Tax Zone associated with the Sales Order. The Tax Zone for the specified Ship-To Address will be entered here by default. Otherwise, the primary Tax Zone for the Customer will be entered. This field can be viewed upon selecting the MORE button.
Enter free on board (FOB) Terms for the Order. By default, FOB. Terms entered on the Shipping Site master will appear in this field. The default Terms may be changed during Order entry—and also at later stages during the billing cycle.
The preferred Ship Via method for the Customer will appear in the field. You may change the default Ship Via using the list. You may also enter a free-form Ship Via simply by typing the name of the Ship Via into the field.
The system supports up-to-date shipment tracking with links to the websites of many leading shipping companies (i.e., "Ship Vias").
Specify the Shipping Form associated with the Order. The preferred Shipping Form for the Customer will appear in the field. This field is optional and can be viewed upon selecting the MORE button.
Shipping defaults specified on the Customer master will transfer to the Sales Order header when a new Sales Order is entered for a Customer.
Specify the Shipping charges associated with the Order. The preferred Shipping Charges Type for the Customer will appear in the field. This field can be viewed upon selecting the MORE button.
Specify the Shipping Zone. Sales account assignments by Shipping Zone are available.
Select to require that all Sales Order Line Item quantities be issued to Shipping before the Order is shipped. This feature is designed to prevent partial shipments. If selected, users will be prevented from shipping the Order unless all Line Item quantities have been issued to Shipping. If not selected, partial shipments for the Order will be allowed.
Specify the Customer billing information below:
Displays the Customer's Bill-To Address. You may manually override the displayed Address information in the fields below—or use the lookup feature to select another Address. If a new Address is manually entered here, that Address will be added automatically to the master list of Addresses. For additional documentation related to creating Addresses, see Section 8.1, “ New Address”.
Displays the Customer's billing Contact. You may manually override the displayed Contact information in the fields below—or use the lookup feature to select another Contact. If a new Contact is manually entered here, that Contact will be added automatically to the master list of Contacts. For additional documentation related to creating Addresses, see Section 7.1, “New Contact”.
Select to copy contents of billing address into Ship-To address field. This option is enabled if the Customer master for the specified Customer indicates that free-form Ship-To's are allowed.
Specify shipping details below:
Displays the specified Ship-To Address. You may manually override the displayed Address information in the fields below—or use the lookup feature to select another Address. If a new Address is manually entered here, that Address will be added automatically to the master list of Addresses. For additional documentation related to creating Addresses, see Section 7.1, “New Contact”.
Displays the shipping Contact for the Ship-To Address. You may manually override the displayed Contact information in the fields below—or use the lookup feature to select another Contact. If a new Contact is manually entered here, that Contact will be added automatically to the master list of Contacts. For additional documentation related to creating Addresses, see Section 7.1, “New Contact”.
The following buttons are unique to this screen:
If the Customer specified on the Sales Order has an EDI Profile attached, you may encounter an EDI processing interface when printing the Sales Order.
Select to clear the current Sales Order screen without closing the screen.
Creates the Sales Order, saves it, and adds it to the list of Orders available for printing on the Packing List Batch.
Select to display extra information related to the Sales Order. To hide the extra information, simply select the MORE button again.
To create or modify Sales Order Line Items, select the "Line Items" tab at on the "Sales Order" screen. The following will be displayed:
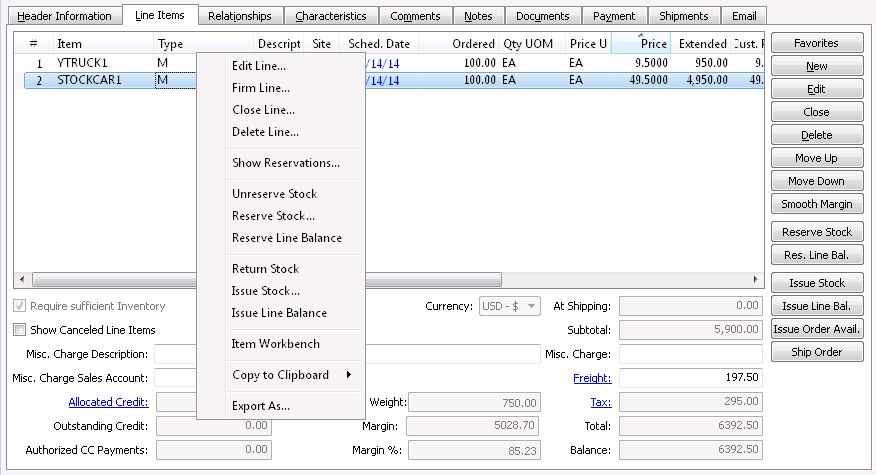
When creating or modifying Sales Order Line Items, you are presented with the following options:
Display lists Line Items for this Sales Order. A valid Customer Number must be entered in the "Customer #" field before Line Items can be added to the Order. The Shipping-related columns will not be visible if the system is configured to hide Shipping options at Sales Order entry. However, if the Shipping options are enabled, the Line Items may display in different colors, depending on their scheduling. If the Scheduled Date for an unshipped Line Item is in the future, the date will display in green text. If the Scheduled Date for an unshipped Line Item is not in the future, the date will display in red text. Once shipped, all Line Items revert to black text. For Kit Items, the Kit components will be given sub line numbers which will be displayed in an indented view. If a Line Item is firmed, that means it cannot be edited. Firmed Line Items must be softened before they can be edited.
Sales Order Line Items may exist in any of the following statuses:
"O" = Open
"C" = Closed
"X" = Cancelled
"R" = Ready for Shipment (i.e., quantity available)
"I" = Invoiced
"P" = Partially-invoiced
"H" = On credit hold
Select to ensure you have enough Quantity on Hand of a Line Item prior to issuing Stock to Shipping. If selected, this option will prevent you from issuing Line Item quantity to Shipping if doing so would force Quantity on Hand for the Item Site to fall below zero. Not selecting this option means issuing Stock to Shipping may drive Item Site Quantity on Hand negative. This option will not be visible if the system is configured to hide Shipping options at Sales Order entry.
Select to include in the Line Items display Sales Order Line Items which have been specifically canceled. Displaying canceled Line Items can provide useful Customer and Order history information.
Enter a description to identify the miscellaneous charge.
Enter a Sales Account to assign the miscellaneous charge to.
Displays the monetary value of any Credit Memos and/or Credit Card charges which have been specifically allocated to the Sales Order. If your system is configured to automatically allocate open Credit Memo balances to new Sales Orders, then the monetary value of these allocated Credit Memos—plus any Credit Card charges applied to the Order—will display here. You can also select the "Allocated Credit" link to manually allocate Credit Memos to the Sales Order.
The automatic allocation of available Credit Memos occurs only once—when a Sales Order is saved for the first time. After that first save, any additional allocations will need to be applied manually.
Displays the total monetary value of all unallocated Credit Memos for the Customer.
Displays the monetary value of any credit card pre-authorizations for the Order. Credit Card charges may be pre-authorized using the options found under the "Payment" tab. When a Credit Card charge is pre-authorized, the authorization is stored and may later be posted as a completed charge using the Receivables Workbench.
Displays the combined weight of all Sales Order Line Items. Freight weight represents the sum of an Item's product weight and packaging weight, both of which are defined on the Item master. The per unit freight weight multiplied by the quantity per gives you the Line Item freight weight. The sum of all Line Item freight weights is the combined weight for the Order.
Displays the total profit margin for the Order. The profit margin is based on the following formula:
Order Subtotal - Total Standard Costs for all Line Items
Displays the profit margin percentage for the Order.
Displays the monetary value of Sales Order Line Items at Shipping. The shipment value represents the total of the extended prices for all Items included in the Shipment. The amount does not include freight or Tax. This displayed information will not be visible if the system is configured to hide Shipping options at Sales Order entry.
Displays the subtotal for the Sales Order Line Items.
Enter the amount of any miscellaneous charge. Examples of miscellaneous charges include palletization costs, co-op refund, etc. Before entering a miscellaneous charge amount, you must first assign the charge to a Sales Account and also enter a description of the charge.
If you do not use Miscellaneous Charges at your site, you can hide these fields so they are not visible when entering Sales Orders. To do so, simply select the "Hide Misc. Charges" option in the system-level configuration.
Manually enter the amount of freight charges to be added to the specified Order, unless the freight amount is automatically calculated. The freight amount displayed here represents the total for all Line Items. To get a detailed view of the freight calculation, click on the Freight link using your mouse. Freight charges may be entered during the creation or modification of a Sales Order—or at the time of shipment. The system can be configured to automatically calculate freight amounts per quantity and Shipment. To learn more about freight configuration, see Freight Pricing.
If you are manually entering freight, all freight charges will be added to the initial Shipment for an Order. Any subsequent backorder Shipments will not include freight.
Displays the total amount of Tax to be charged on the Sales Order. Sales Tax is calculated at the Sales Order Line Item level. The Tax amount displayed here represents the total for all Line Item Tax amounts. To get a detailed view of the Tax calculation, click on the Tax link using your mouse.
Displays the total amount of the Sales Order.
If the Sales Order is paid in full, the order can be shipped even though the Customer may be on credit hold. This is to accommodate cash Customers who do not typically have a credit limit.
Displays the projected total due for the Sales Order. The outstanding balance represents the amount the Customer would owe if all allocated and outstanding Credit Memos and Credit Card pre-authorizations were applied to the Order.
When processing Sales Orders or Invoices, you have the option to allocate open A/R Credit Memos to the document. To allocate open Credit Memos, select the "Allocate" link on the Line Items tab. The following screen will appear:
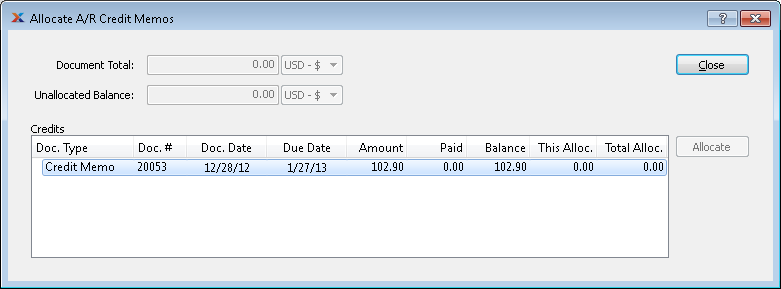
When allocating Credit Memos, you are presented with the following options:
Displays the total amount of the document being applied to.
Displays the open balance of the document being applied to. When Credit Memos are allocated to the document, the open balance will go down by the amount of the allocations. The balance will go back up if those allocations are cleared.
Display lists the Customer's open Credit Memos. When a Credit Memo is applied to the document, the list will indicate the relationship between the two. If the allocation is cleared, the list will update to remove the relationship.
The following buttons are unique to this screen:
Highlight a Credit Memo and then select this button to allocate the Credit Memo to the document. Partial Credit Memo amounts may be allocated if the document's open balance is less than the full Credit Memo amount.
Highlight a Credit Memo and then select this button to clear the Credit Memo allocation.
The following buttons are unique to this screen:
Select to clear the contents of the current Sales Order and open a fresh, new Sales Order for Order entry. The Order Number of the Order being cleared will display next to the CLEAR button.
Selecting the CLEAR button on the Sales Order header does not delete any information which has been saved previously.
Highlight a Sales Order Line Item and then select this button to close the Sales Order Line Item. If the highlighted Line Item is already closed, this button will revert to an OPEN button, which may be used to open the closed Line Item. Closing the Sales Order Line Item will remove all existing reservations.
Highlight a Sales Order Line Item and then select this button to reserve Inventory quantity for the Line Item.
In order to manually reserve or unreserve stock for a Line Item, the Sales Configuration option "Allow Manual Reservations" must be selected.
Highlight a Sales Order Line Item and then select this button to reserve Inventory quantity for the remaining Line Item balance.
Highlight a Sales Order Line Item and then select this button to issue quantity to Shipping. This button will not be visible if the system is configured to hide Shipping options at Sales Order entry.
You may select multiple Line Items for issuing to Shipping by highlighting them using your mouse—or a combination of your mouse and either the SHIFT or CTRL keys.
Highlight a Sales Order Line Item and then select this button to issue the balance of the Line Item quantity to Shipping. This button will not be visible if the system is configured to hide Shipping options at Sales Order entry.
The Shipping-related options will not be visible if the system is configured to hide Shipping options at Sales Order entry.
To define or maintain relationships for Sales Orders, select the "Relationships" tab. The following will be displayed:
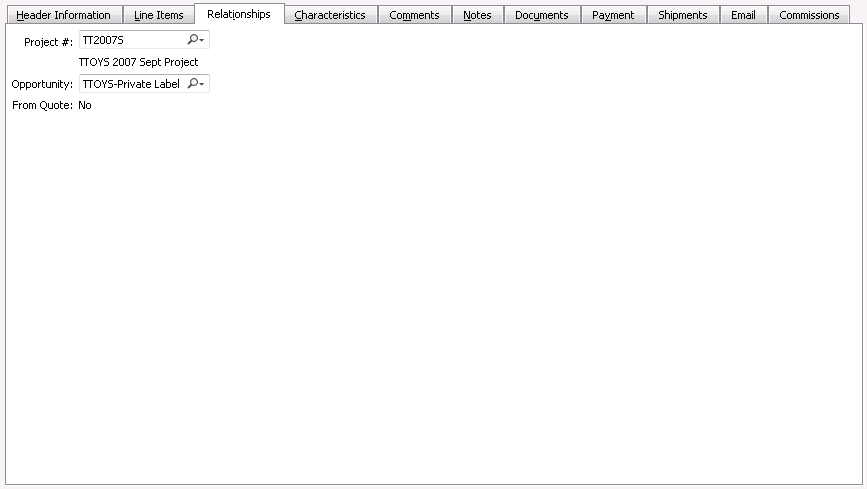
When defining relationships for Sales Orders, you are presented with the following options:
If your system is configured to use Projects, select a Project Number to associate with the Sales Order. If a Sales Order is created from a converted Quote—and the Quote had a Project Number associated with it—then the Project Number from the originating Quote will automatically be entered here. Once a Project Number is associated with a Sales Order, any Work Orders or Purchase Orders created by the Sales Order demand will automatically be linked to the same Project Number as the Sales Order. In this way, Sales Orders, Work Orders, and Purchase Orders may be linked to the same Project.
When you have the xTuple Project Accounting package installed—and you link a Project to the Sales Order—transactions related to the Sales Order will include the Project Number as the final segment of affected G/L Account Numbers. Account Numbers related to the following transactions will include the Project Number as the final segment: Issue to Shipping, Return Stock, Ship Shipment, Recall Shipment, and Post Invoice.
If your site is configured to create Projects automatically whenever new Sales Orders or Quotes are entered, the Projects generated in this way will assume the number of the Sales Order or Quote which caused their creation.
Select an Opportunity to associate with the Sales Order, using the lookup feature located to the right of the field.
If a Sales Order was converted from a Quote, the originating Quote Number will display here.
If the Sales Order was generated from a Return Authorization, the Return Authorization Number will display here.
Sales Order Characteristics are user-defined definitions which may be used to provide additional layers of description about Sales Orders. These descriptions are static and not processed by the system, but are useful for informational purposes. To enter Characteristics associated with a ales Order, select the "Characteristics" tab. The following will be displayed:
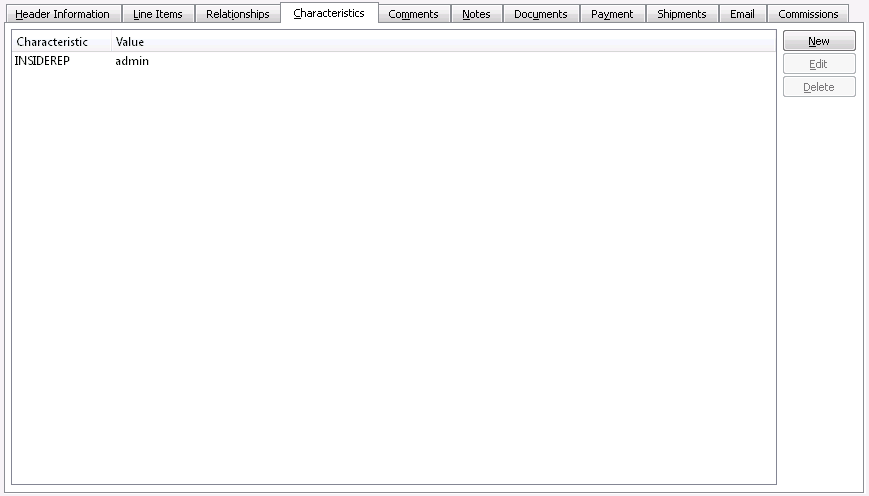
Sales Order Characteristics
When creating new Sales Order Characteristic, you are presented with the following options:
Select a Characteristic from the list of Characteristics designated as being available for use as Sales Order Characteristics.
Enter a description for the Sales Order Characteristic.
To add Comments related to a Sales Order, select the "Comments" tab. The following will be displayed:
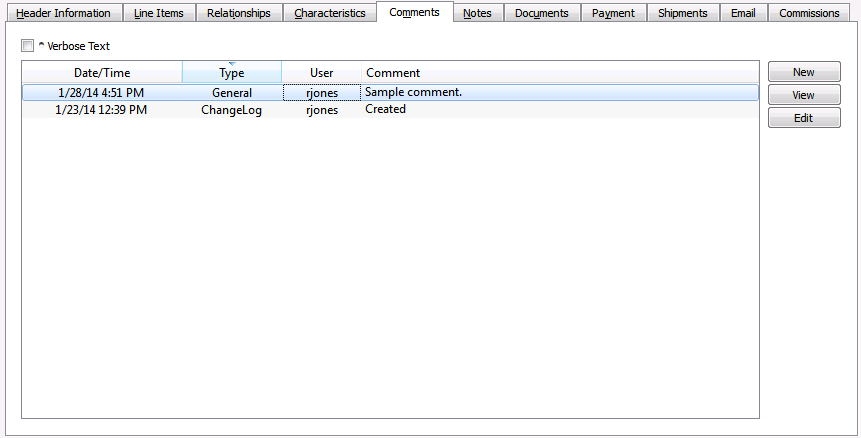
When adding or reviewing Comments, you are presented with the following options:
Select to display all Comments in the list in an expanded view which includes the entire text of each Comment. To edit a Comment, simply select the "Edit" link next to the Comment. That link will not be shown for Changelog Comments, which can't be edited. If the "Verbose Text" option is not selected, the Comment list will display only header level information for each Comment.
Display lists Comments related to the record.
The following buttons are available:
Opens screen for creating a new Comment.
Highlight a Comment and then select this button to reach a read-only view of the "Edit" screen.
Enables you to edit highlighted Comments—as long as the Comments are not "ChangeLog" Comments. ChangeLog Comments are system-generated and may not be edited. The edit screen is the same as that for creating a new Comment—except that when editing, the fields will contain Comment information. Double-clicking on a Comment will also bring you to the editing screen.
To enter a new Comment, select the NEW button. The following screen will appear:

Select a Comment Type from the drop-down list to classify the Comment. This is a required step. Comment Types may be system-defined (i.e., "ChangeLog" and "General") or user-defined, as described in Section 13.2.2, “Comment Types”. Once you have specified a Comment Type, begin typing your Comment in the main text area. The text area features word-wrapping and scroll-bar support for longer Comments.
The following buttons are unique to this screen:
Select to show the complete list (i.e., "thread") of Comments associated with the record. To hide the list, simply select the SHOW MORE button again. The Comment thread will show the most recent Comment first.
Order Notes added to a Sales Order are used for internal purposes only. If an Invoice results from the Sales Order, these Notes will be transferred to the Invoice. To add Notes to a Sales Order, select the "Order Notes" tab on the "Sales Order" screen. The following will be displayed:
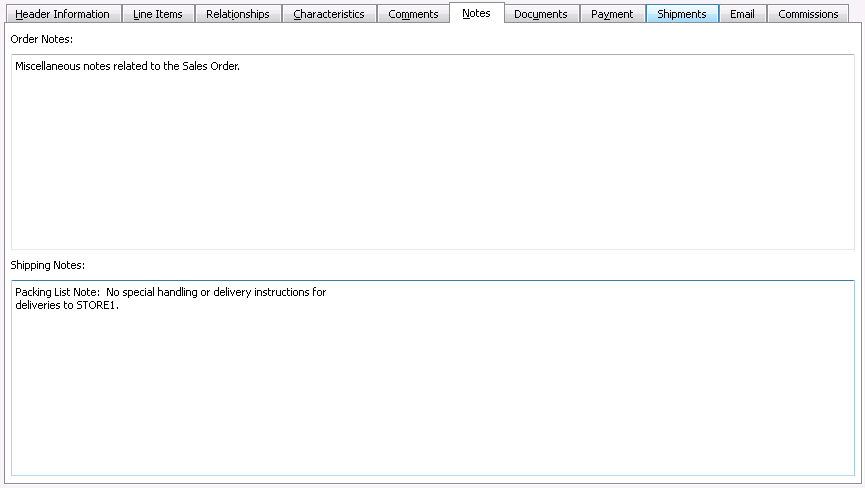
When adding Notes to a Sales Order, you are presented with the following options:
This is a scrolling text field with word-wrapping for entering general Notes related to the Sales Order. These Notes are for internal use only.
Shipping Notes are drawn from the Customer master—specifically from the "Shipping Notes" tab on the Ship-To Address master. The Notes may vary depending on the Ship-To Address specified for the Order. These Notes provide a mechanism for transferring shipping information from the Customer master to the Sales Order. Ultimately, Shipping Notes may be printed on shipping paperwork. While Shipping Notes content may originate from the Customer master, you can edit the Notes to fit the requirements of an Order. Shipping Notes may be printed on shipping paperwork.
To associate documents with a Sales Order, select the "Documents" tab. The following will be displayed:
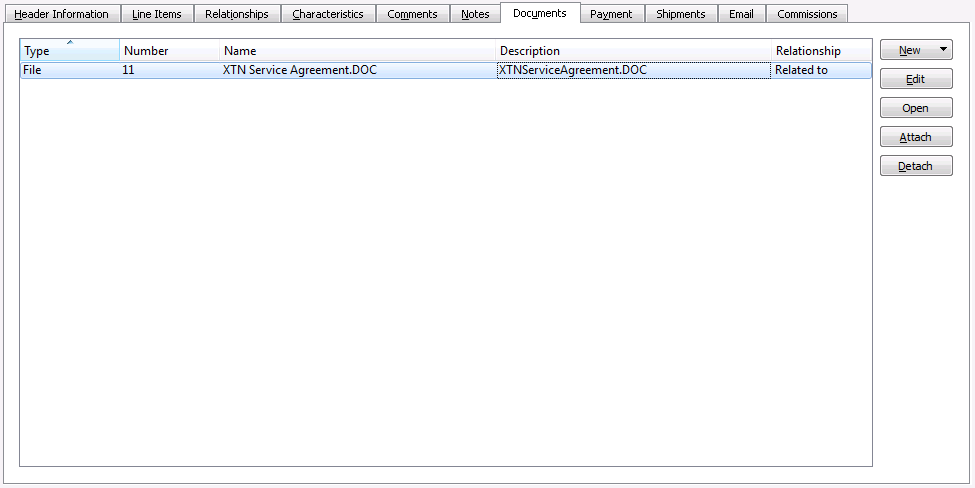
When associating documents, you are presented with the following options:
Select to create a new document and associate it with the current record. You may create the following document types:
Select to create a new Image association.
Select to create a new Incident and associate it.
Select to create a new To-Do and associate it.
Select to create a new Opportunity and associate it.
Select to create a new Project and associate it.
Enables you to edit associated documents. The edit screen is the same as that for creating a new document—except that when editing, the fields will contain document information. Double-clicking on a document will also bring you to the editing screen.
Highlight a document and then select this button to reach a read-only view of the "Edit" screen
Select to associate already-existing documents. The following document types may be attached: Contact, Account, Customer, Employee, File, Image, Incident, Item, Opportunity, Project, Purchase Order, Sales Order, Vendor, Web Site, Work Order.
Highlight a document and then select this button to remove the association.
To associate already-existing documents, select the ATTACH button. The following screen will appear:
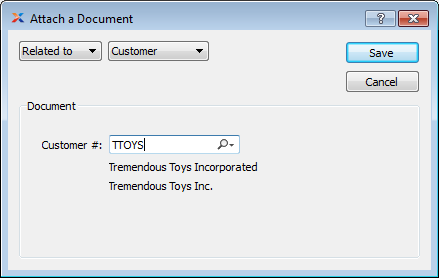
When associating already-existing documents, you are presented with the following options:
Indicate how the document is related to the current record. The following relationship options are available: Related to, Parent of, Child of, Duplicate of.
Specify the kind of document you want to associate. The following document types may be attached: Contact, Account, Customer, Employee, File, Image, Incident, Item, Opportunity, Project, Purchase Order, Sales Order, Vendor, Web Site, Work Order. When associating Files, you will also be given the option to save the File to the database.
There is no file size restriction when saving Files to the database. However, excessively large files could cause storage and performance issues.
Use the lookup field to identify the specific document you want to attach. The data entry options will vary depending on the document type you select.
To receive payments for the Sales Order, select the "Payment" tab at the top of the "Sales Order" screen. To authorize or charge Customer Credit Cards, select the "Credit Card" tab in the window. The following screen will appear:
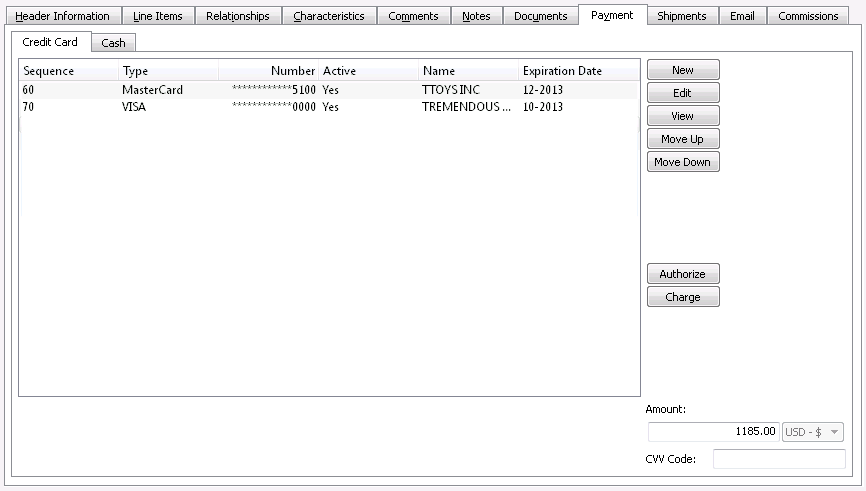
When authorizing or charging Customer Credit Cards, you are presented with the following options:
Display lists Credit Card information for the specified Customer.
The following buttons are unique to this screen:
Highlight a Credit Card and then select this button to move the Credit Card up in the sequence of Credit Cards. Sequence numbers are automatically adjusted to reflect the change in position.
Highlight a Credit Card and then select this button to move the Credit Card down the sequence of Credit Cards. Sequence numbers are automatically adjusted to reflect the change in position.
After entering an amount below, highlight an active Credit Card and then select this button to pre-authorize the Credit Card charge for the amount specified. Pre-authorized Credit Card charges will be displayed in the "Authorized CC Payments" field on the "Line Items" tab. After a Credit Card charge has been pre-authorized, the charge may then be post-authorized using the Receivables Workbench—thereby completing the Credit Card transaction.
After entering an amount below, highlight an active Credit Card and then select this button to charge the Credit Card for the amount specified. When a Credit Card is charged, both a Credit Memo and a Cash Receipt are posted for the charge amount. The total due from the Customer will be automatically adjusted on the Invoice to reflect the amount of any Credit Card charges. If, by chance, you charge a Customer's Credit Card but fail to save the Sales Order, the link between the Order and the charge will be broken; however, the transactions resulting from the charge will remain in the system.
Enter the amount of the Credit Card pre-authorization or charge. By default, the outstanding balance due will be displayed here. However, you may edit the default amount.
Enter the Card Verification Value (CVV) Code found on the back of the specified Credit Card. This may be an optional feature at your site. Contact your Systems Administrator for details.
To post a cash payment, select the "Cash" tab in the "Payments" window. The following screen will be displayed:
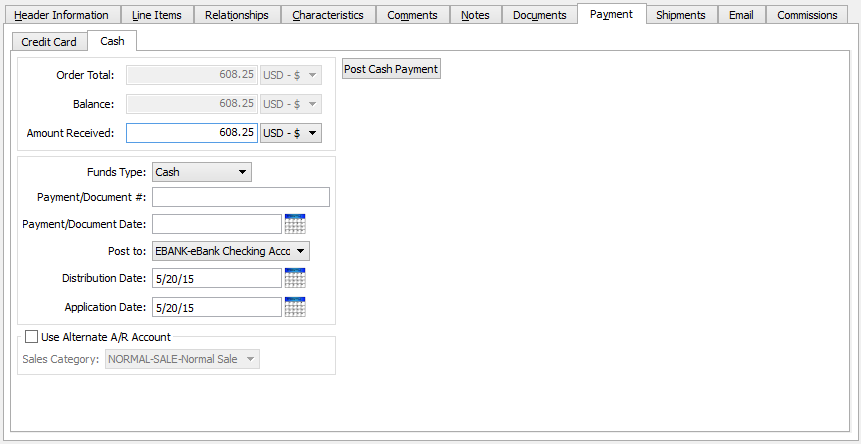
Customer Cash Payment
When posting cash to the Sales Order, you are presented with the following options:
Displays the Sales Order total.
Displays the amount of Cash that has been applied to the specified Customer's Invoice(s).
Displays the difference between the Sales Order total and any payments that have been applied.
Enter the cash payment amount that should be applied to the Sales Order.
Specify the type of the Cash Receipt. Choose from following Funds Types: Check, Certified Check, Cash, Wire Transfer, and Other.
You can use the Funds Type "Other" for entering Credit Card information if you are not using xTuple's Credit Card processing functionality at your site.
Use this field to enter the Customer's Check Number, transaction number, Credit Card number, or any other Document Number associated with the Cash Receipt.
Use this field to specify the date on the Check you received. This is the Document date used when running the Receivables aging report.
Select the Bank Account you want to post the Cash Receipt to. The Asset Account used for the selected Bank Account is specified on the Bank Account master.
If your site uses a unique Bank Account for receiving Credit Card payments, make sure to select the appropriate Bank Account when entering payments from a Credit Card.
Specify the date of the cash distribution. This is the date the Cash Receipt will hit the General Ledger (G/L). By default, the current day's date will appear. If the distribution date precedes the application date, the label "Apply Balance As" will change to "Record Receipt as" to clarify that the cash will be recorded as a Credit Memo or Customer Deposit until the application date arrives. On the application date, the Credit Memo or Customer Deposit will automatically be applied to its specified receivable document(s).
Specify the date you want the cash to be applied to the selected receivables. By default, the current day's date will appear. To prevent Receivable aging and G/L balance mismatches, you may not enter an application date prior to the earliest document date of receivables the cash is being applied to.
Select one of the following optional Receivables Accounts:
Specify a Sales Category whose Receivables Account option you want to use instead of the default Receivables Account.
If an alternate Receivables Account is not specified, the system will use the default Receivables Account specified for the Customer Type under Receivables Account Assignments.
To view Shipments associated with the order, select the "Shipments" tab. The following will be displayed:
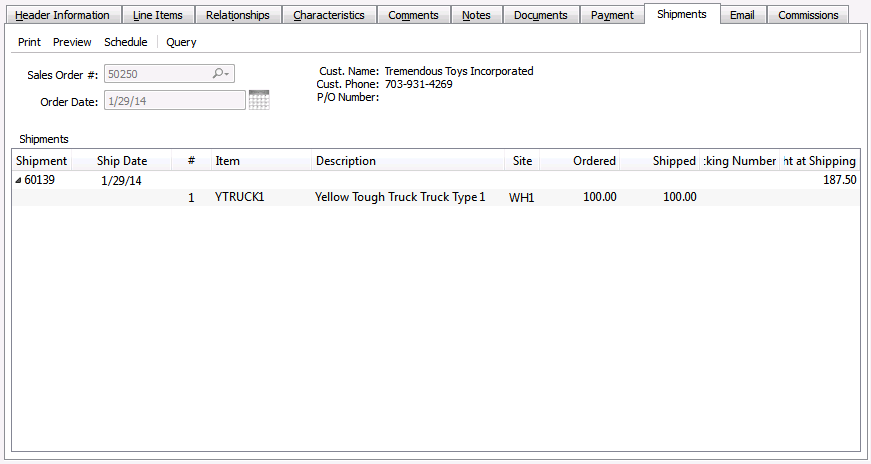
Sales Order Shipments
When viewing Shipments associated with the order, you are presented with the following options:
Displays the Sales Order Number of the current Sales Order.
Displays the Order Date of the current Sales Order.
Displays the Customer Name associated with the specified Sales Order.
Displays the Customer's phone number.
Displays the Purchase Order Number associated with the specified Sales Order.
Display lists Shipments for the Sales Order.