|
xTuple ERP Reference Guide |
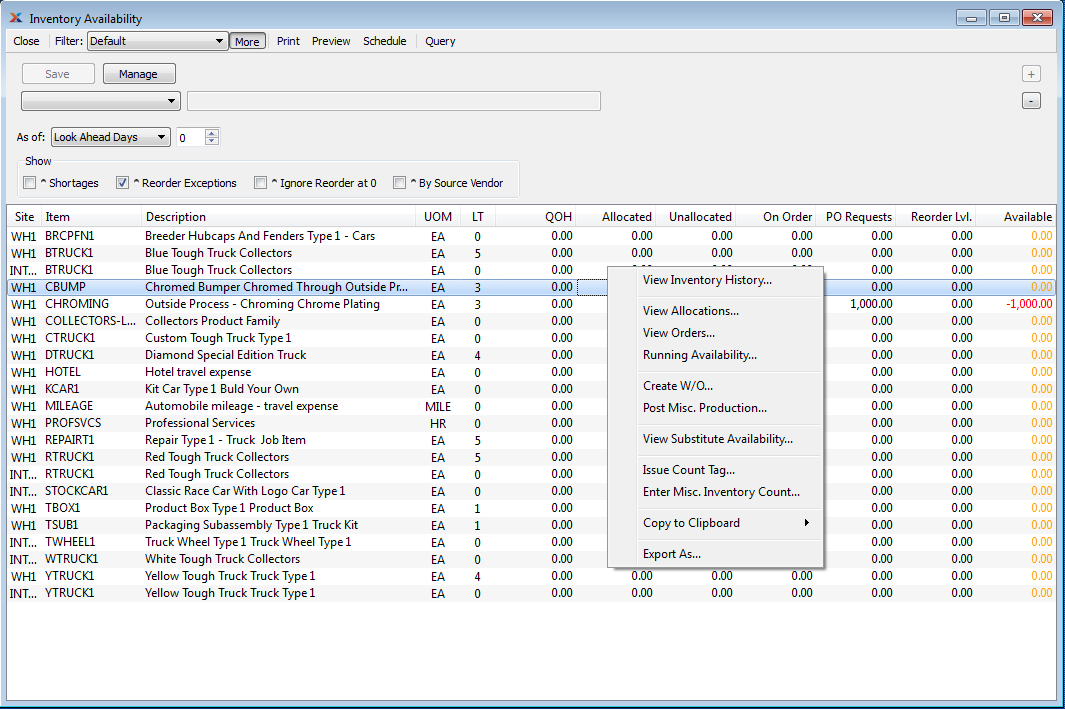
The "Inventory Availability" screen is a valuable tool for Inventory managers and production planners—particularly when used in conjunction with the planning and scheduling features found in the commercial editions of xTuple ERP. From this screen you can get a quick overview of the current availability for all of your Inventory Items. And with the right-click menu you can easily drill down to research the specific details underlying the summary information shown here.
Here are some tips for using this screen:
If you don't see the orders or other information you are looking for, make sure to check your "As of" date setting. If orders or activity don't fall within the specified "As of" time frame, then you won't see this information displayed on the screen.
When Planned Availability displays in the color orange, this means the actual or projected Quantity on Hand is at or below the Reorder Level. When the color is red, the current or projected Quantity on Hand is below 0.
When quantity appears in the "On Order" column, this refers to quantity that is on order through either a Work Order or Purchase Order. In the case of Purchase Orders, the quantity will always be represented in the Inventory Unit of Measure (UOM)—regardless of the Vendor UOM used on the Purchase Order.
The right-click menu is context-sensitive within each row of information. If a right-click option is unavailable, that means there is no detailed information to view for that column during the specified time frame.
Reserved Item quantity will be displayed here, for commercial edition users with Item Reservations enabled.
View ABC Class information by enabling the ABC Class column header.
The following screenshot shows the "Inventory Availability" screen:

The following options on this screen are a supplement to the choices available under the search filter:
Show Availability using one of the following criteria:
Select to show projected Availability based on the Lead Time specified in the Item Site master.
Select a number using the arrow buttons, or manually enter a value up to a maximum of 1000. Future Availability for the specified Item will be displayed based on the value entered here.
Display will show projected Inventory Availability as of date entered up to a maximum of 1000 days.
Display will show projected Inventory Availability for the date range entered. When this option is used, the Quantity on Hand (QOH) values will be grayed out, indicating that all past and future supplies and demands have not been included in the calculation.
Select from the following optional choices:
Select to only show Inventory shortages in display. Shortages are always shown in the report, if they exist. However, using this option simply separates shortages out so you can see only them. A shortage exists if Availability is less than zero, as in
QOH - Allocated + Ordered < 0
Select to show Reorder Exceptions in the display. Reorder Exceptions are an indication that an Item Site's projected Availability will drop below the Reorder Level for the Item Site—or to zero or below if no Reorder Level exists. Reorder Exceptions are a type of Event.
Select if you want the report to ignore Reorder Exceptions when the projected availability for an Item Site is zero.
Select to sort the results by the Vendors linked to Item Sources.
The default filter on the "Inventory Availability" screen shows availability for all Items based on their Item Site lead times. You can build your own search criteria using the following options:
Select a filter from the list of available filters, then select the QUERY button to generate search results. Only saved filters will appear in this list.
Select this button to show the parameters underlying the saved filter. To hide the parameters, click the MORE button a second time.
When building a custom query, you have the following options:
Select to add a new parameter to the query.
Select to remove a parameter from the query. This option is disabled for default parameters.
Select to save your filter for future use. Saved filters will appear in the list of available filters.
Select to manage your saved filters. To learn more about managing filters, please see Section 2.1.2, “Search Filters”.