|
xTuple ERP Reference Guide |
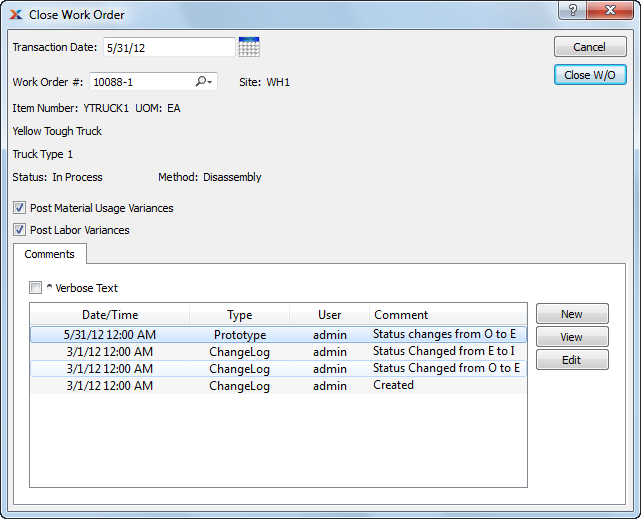
A Work Order can be closed at any point. To close a Work Order, select the "Close Work Order" option. The following screen will appear:

Work Order Materials and Operations history is saved in the database after a Work Order is closed. Reports can be written to retrieve this information.
When closing a Work Order, you are presented with the following options:
Specify the date when you want the Work Order closing to be posted. The default is the current date.
Enter the Work Order Number of the Work Order you want to close.
Displays Site code automatically when Work Order Number is entered into "Work Order #" field.
Displays Item Number automatically when Work Order Number is entered into "Work Order #" field.
Inventory Unit of Measure.
Displays Work Order Status automatically when Work Order Number is entered into "Work Order #" field.
Indicates Work Order method is either assembly or disassembly.
Material Usage Variances: Select to post material usage variances resulting from the Work Order. Variance information can be found in the Work Order reports.
Select to post labor variances resulting from the Work Order. Variance information can be found in the Work Order reports.
When adding or reviewing Comments, you are presented with the following options:
Select to display all Comments in the list in an expanded view which includes the entire text of each Comment. To edit a Comment, simply select the "Edit" link next to the Comment. That link will not be shown for Changelog Comments, which can't be edited. If the "Verbose Text" option is not selected, the Comment list will display only header level information for each Comment.
Display lists Comments related to the record.
The following buttons are available:
Opens screen for creating a new Comment.
Highlight a Comment and then select this button to reach a read-only view of the "Edit" screen.
Enables you to edit highlighted Comments—as long as the Comments are not "ChangeLog" Comments. ChangeLog Comments are system-generated and may not be edited. The edit screen is the same as that for creating a new Comment—except that when editing, the fields will contain Comment information. Double-clicking on a Comment will also bring you to the editing screen.
To enter a new Comment, select the NEW button. The following screen will appear:

Select a Comment Type from the drop-down list to classify the Comment. This is a required step. Comment Types may be system-defined (i.e., "ChangeLog" and "General") or user-defined, as described in Section 13.2.2, “Comment Types”. Once you have specified a Comment Type, begin typing your Comment in the main text area. The text area features word-wrapping and scroll-bar support for longer Comments.
The following buttons are unique to this screen:
Select to show the complete list (i.e., "thread") of Comments associated with the record. To hide the list, simply select the SHOW MORE button again. The Comment thread will show the most recent Comment first.
The following buttons are unique to this screen:
Closes the selected Work Order.
Any tooling Items issued to a Work Order must be returned before the Work Order can be closed.