The xTuple Connect Batch Manager should be left to run continuously—like a service. However, the xTuple Connect Batch Manager is not a service. It is a graphical application—and so you will need to employ various techniques to ensure the xTuple Connect Batch Manager keeps running continuously. In other words, if the computer the xTuple Connect Batch Manager is running on goes down, the xTuple Connect Batch Manager must also be restarted when the computer is brought back up again.
In this section we explore some of the techniques you might use to avoid having to restart the xTuple Connect Batch Manager manually whenever the computer it is running on is restarted. Please do not consider the suggestions offered here as complete solutions. Certain issues, such as security, are not taken into account.
Tip
In the previous section we learned how to pass arguments to the xTuple Connect Batch Manager client at runtime. These arguments can also be used in a startup script that executes when a computer reboots and a user is logged on.
Windows enables you to define a user that logs onto the computer automatically when the computer starts. In this case, the user would be the xTuple Connect Batch Manager admin user we have been referring to. This auto log on capability, along with a shortcut to a .BAT script you create, will cause the xTuple Connect Batch Manager to automatically start and connect. Again, this will ensure that if the computer the xTuple Connect Batch Manager is running on is restarted, the xTuple Connect Batch Manager will restart also.
The first step is to configure the computer the xTuple Connect Batch Manager is running on to log on a specified user when it starts. This step requires you to manually store relevant user information in the Windows registry. We will not cover the details of this step in this document. However, you can learn more about how to turn on automatic log on in Windows XP by visiting the Microsoft help and support website: http://support.microsoft.com/kb/315231. There is a similar article for Windows Vista: http://windows.microsoft.com/en-us/windows-vista/Turn-on-automatic-logon.
Once the xTuple Connect Batch Manager admin user has been set up to be automatically logged on, the next step is to create a batch (.BAT) script file. This .BAT file, when executed, will run the xTuple Connect Batch Manager and connect it to your xTuple ERP database. Below is a sample script which incorporates what we learned in Section 6, “Runtime Options”:
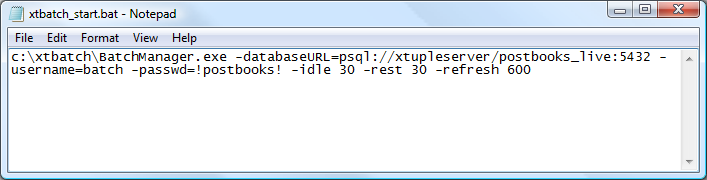
The .BAT file example shown in the screenshot will perform the following tasks:
Start the
BatchManager.execlient located inC:\xtbatchConnect the xTuple Connect Batch Manager to the server
xtupleserver(you could use the IP address), databasepostbooks_live, on port5432Log on the xTuple Connect Batch Manager as user
batchusing password!postbooks!Set an idle interval of
30seconds, rest interval of30seconds, and a refresh interval of600seconds
Finally, you will need to create a shortcut for your .BAT file and place it in the "Startup" folder for the user who is configured to log on automatically. To accomplish this, follow these steps:
Log on to the computer as the xTuple Connect Batch Manager admin user
Right-click on the Windows START button
Select the "Explore" option
This will land you in the "Start Menu" directory
Within the "Start Menu" directory, open the "Programs" folder
Within the "Programs" directory, open the "Startup" folder
Drag the .BAT shortcut into the "Startup" folder
Once you have completed the steps above, the setup for this technique is complete. The xTuple Connect Batch Manager admin user will be automatically logged on when the computer reboots and the xTuple Connect Batch Manager .BAT script will be executed.
Tip
You may also want to set the screen saver for the auto log on user to "On resume, display Welcome screen". You might also want to set a wait time of one minute. By doing so, you lock out unauthorized usage of this computer within one minute of log on.
There are several ways to start the xTuple Connect Batch Manager automatically on OSX when the machine it is running on is rebooted. In this section we will cover one of those strategies—to give you some ideas for how this can be accomplished. The method we will describe comes with the following two requirements:
The xTuple Connect Batch Manager admin user must be configured for automatic login
A shell script must be created and installed.
We will show you how to satisfy both requirements in this section.
Copy and save the shell script below in your xTuple Connect Batch Manager admin user's home directory as startbm.command. This is the shell script that will be launched when the admin user is automatically logged in.
Note
You will need to edit the first six parameters to match your environment.
#!/bin/bash
# Autostart of BatchManager for OSX
# Name this file 'startbm.command' and should be located under your users home directory
# To start the BatchManager in OSX upon Login, create a Login Item for a user that will
# login upon system startup.
# Navigate to System -> Accounts -> Login Items, and add 'startbm.command' to the list.

###################################################
## EDIT NEXT SIX LINES TO MATCH YOUR ENVIRONMENT ##
###################################################

BM_PATH='/Applications/BatchManager.app/Contents/MacOS/'
DB_SERVER='192.168.0.100'
DB_NAME='mydemodb'
DB_PORT='5432'
DB_USERNAME='myuser'
DB_PASSWD='mypassword'

#################################
## DO NOT EDIT BELOW THIS LINE ##
#################################

DB_URL=psql://$DB_SERVER/$DB_NAME:$DB_PORT
$BM_PATH/BatchManager -databaseURL=$DB_URL -username=$DB_USERNAME -passwd=$DB_PASSWD &
exit
Once the shell script has been modified and saved to the correct location, your next step is to attach the script to the admin user's login items. To attach the script to the admin user's login items, follow these steps:
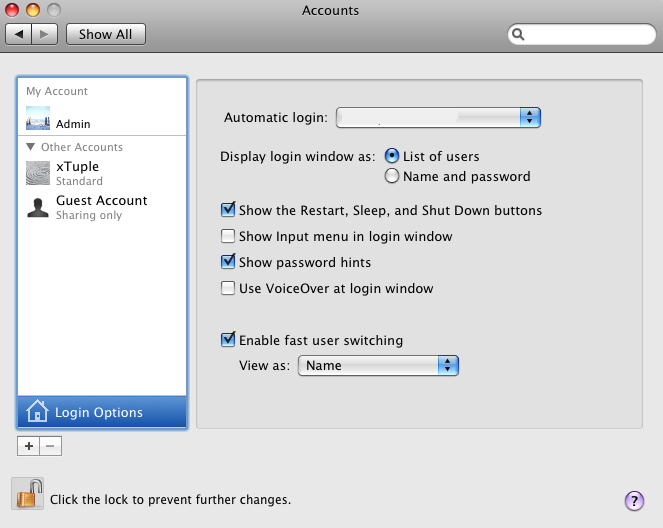
Select the "System Preferences" icon
Select the "Accounts" option under the System section
Then, set up the user for automatic login, as shown in the following screen:
Finally, follow these last steps:
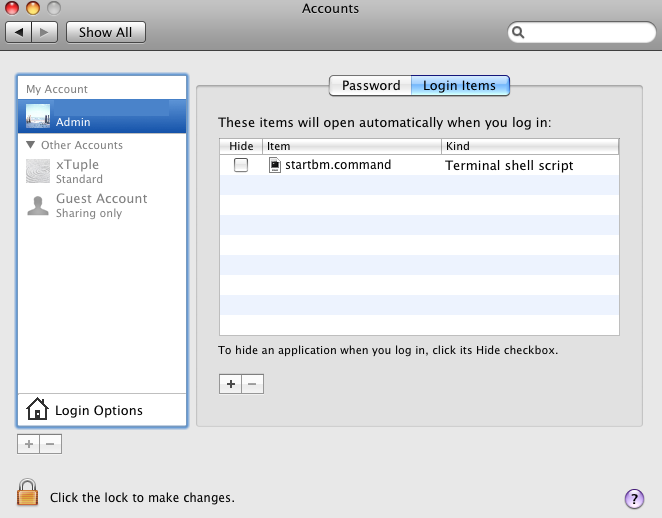
Highlight the user in the "My Account" column
Select the "Login Items" tab
Select the "+" symbol
Then browse to locate and then add the
startbm.commandfile from the user's home directoryThe following screen illustrates this process:
Once you have completed these steps, you are done! The xTuple Connect Batch Manager will now restart automatically whenever the machine it is running on is rebooted.
To run the xTuple Connect Batch Manager as if it were a service on Linux, you will need to use the VNC server from RealVNC. An open source version of the VNC server is freely available. With the vnc-server rpm or vnc4server package installed on your Linux server, you will have all the necessary tools installed to implement this solution. The first thing you need to do is install the xTuple Connect Batch Manager and make sure it is set up and working correctly for the chosen user. We recommend that you set up an additional, separate user for the xTuple Connect Batch Manager to run as. Once the xTuple Connect Batch Manager is installed, you will next need to set up the VNC server for the same user you want to run the xTuple Connect Batch Manager as. The easiest method for doing this is to log in as the user and run the following command:
vncserver :1
In this case we specified :1 which specifies the terminal to use. As you will see, this detail will become important later. Typically :1 will be sufficient; however, if you have other VNC server sessions set up, you may need to use a different number. For the rest of this document we will assume only one VNC server session is installed. When the vncserver :1 command runs, it will create a directory in the user's home called .vnc and ask for a password. Once the VNC server is running, you can log in with a VNC viewer and check to see what it looks like before continuing. Once done, you should shut down the server with the following command:
vncserver -kill :1
Next, you should edit the xstartup file in the .vnc directory. This file is run by the VNC server program when VNC is started. It allows you to run other applications at startup. In most cases, the last line of the xstartup file reads as follows:
twm &
Add the call to the xTuple Connect Batch Manager immediately after this. The command is very similar to the one you would use to run the xTuple Connect Batch Manager from the command line normally. In the command, you should include the options to specify the database, username, and password so that the xTuple Connect Batch Manager will start up without prompting for a login. You might also want to add the '-geometry' option to specify the size and location of the active window. To guard against unforeseen circumstances and the inevitable user who always exits from applications, you might want to wrap the xTuple Connect Batch Manager startup command in a loop. The following example incorporates all of these elements:
while true ; do # loop forever
    BatchManager -geometry 300x320+10+10 -databaseURL=psql://localhost/mydb:5432 -username=admin -password=@xtconnect1 -noAuth
    sleep 600   # wait 10 minutes before restarting the BatchManager if it exits
    done        # to guard against eating machine time if the BatchManager fails repeatedly
Finally, save and exit the xstartup file.
Now update the /etc/sysconfig/vncserver configuration file. If your system does not have one, then you will have to find or create one. Note that some versions of Linux store these service startup files in other directories, such as /etc/rc.d or /etc/initd.d. In this file there is a line which looks like the following:
VNCSERVERS="1:myusername"
This line may or may not be commented out with a # symbol. If it is, uncomment it by removing that symbol and any additional spaces at the front of the line. This line tells the VNC server service which servers to start up for which user at boot up. The example above references the same server number we used earlier, along with the username separated by a colon. On your system, change the server number and user name to the correct values. Then save and exit the configuration file. Now make sure that the VNC server service is started when the system is booted. The easiest way to do this on your Linux server is by using the chkconfig command. Logged in as the administrator of the server, issue the following command:
chkconfig –add vncserver
At this point, the only thing left to do is start the service and make sure it is working correctly. To start the service, you issue another administrator command:
service vncserver start
You should see a message indicating that the service was started successfully. Now log into the VNC session and check to make sure the xTuple Connect Batch Manager is running correctly. If it is, you have successfully completed the set up. If it is not running, you will need to determine what caused it to fail and correct the problem.