To get started using xTuple Connect to process xTuple ERP jobs, you will first have to complete some configuration steps within the xTuple ERP client:
Enable xTuple Connect
Grant privileges
This is enough to use the simpler features of xTuple Connect, such as submitting reports to be run and emailed or printed. The set up of other features, such as sending Invoices via email or importing XML files, is more complex and will be discussed in later chapters.
To get started using the xTuple Connect Batch Manager to process xTuple ERP jobs, you will first have to complete some configuration steps within the xTuple ERP client. Using your xTuple ERP client, log in to the database you just applied the xtConnect extension package to. Then follow this path to reach our first configuration screen: . Once you get there, follow these steps:
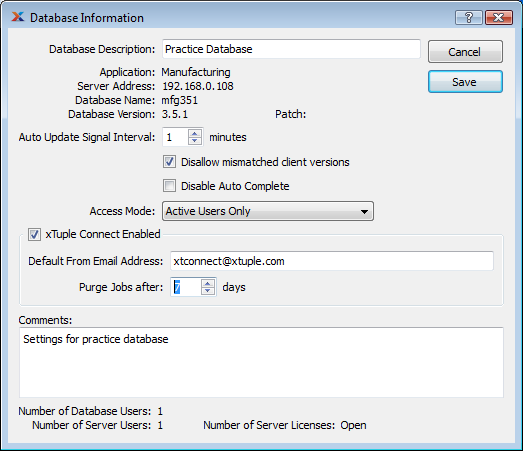
Enable the package by selecting the "xTuple Connect Enabled" check box
Note
If the "xTuple Connect Enabled" option is not selected, you will not be able to submit jobs to the xTuple Connect Batch Manager. In fact, none of the xTuple Connect features will be enabled in xTuple ERP until this option is selected.
Assign a default "From Email Address" to an appropriate email address. The xTuple Connect Batch Manager will use this address if a job is submitted by a user with no email address defined in their xTuple ERP user record or a job is submitted without a from email address.
Specify the number of days you want to save completed xTuple Connect Batch Manager jobs before they are automatically deleted
Click the SAVE button
Quit xTuple ERP and restart it
All the xTuple Connect features—including —will now be visible throughout the xTuple ERP client
The following screen shows the Database Information window with the xTuple Connect information already added:
The next step is to assign the xTuple Connect privileges to your administrative user. To do so, navigate to the following path: or . On the User List (or Group List) screen, follow these steps:
Highlight your administrative user (or administrators' group)
Select the EDIT button
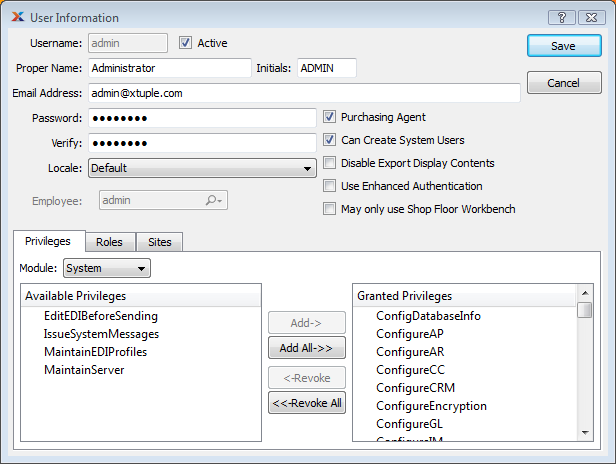
On the "Privileges" tab, select the System Module
The screen will look as follows:
Note
You may want to create a user just for running the xTuple Connect Batch Manager. If you do so, run the previous steps for your xTuple Connect Batch Manager user as well as administrative user. This xTuple Connect Batch Manager user should be a database super user (Can Create System Users is checked on the Maintain User screen) if you plan to run periodic System Maintenance.
As you can see in the screenshot, the System Module contains the following privileges related to xTuple Connect features:
- EditEDIBeforeSending
Users will need this privilege to modify Electronic Data Interchange (EDI) messages before they are sent. Users who have this privilege may edit the message recipients, subject, and body of email messages sent through the xTuple Connect Batch Manager; edit the destination of messages sent via File Transport Protocol (FTP); and change the report that will be run to create PDF files or change the file format for text files that will be attached to the message. Users without this privilege will be able to see these characteristics but not change them before sending a job to the xTuple Connect Batch Manager.
- IssueSystemMessages
All users will need this privilege to issue a system message. This can also result in an email sent through the xTuple Connect Batch Manager.
- MaintainEDIProfiles
Users will need this privilege to set up EDI Profiles. EDI Profiles contain standard email or FTP instructions that can be linked to Customers and Vendors.
- MaintainServer
Users will need this privilege to schedule through the xTuple Connect Batch Manager. See Section 4, “Scheduling System Maintenance” for details.
To assign these privileges to your administrative user(s), follow these steps:
Select the ADD ALL button
This will move all the privileges to the "Granted Privileges" column.
Tip
To move one privilege at a time, simply highlight the privilege, then select the ADD button.
Select the SAVE button
Finally, follow this path to complete the process:
You may also exit and re-log in to xTuple ERP instead of running Rescan Privileges
Note
If you have not given the user you are logged in with the MaintainServer privilege, then the Schedule Server Maintenance option under the System Module menu will not be available.