The following are the basic steps involved in the installation and configuration of xTuple Connect Email Integration:
Install or upgrade xTuple to version 3.6.1 or greater
Install or upgrade to xTuple Connect 3.6.0 or greater
Copy Trojita files to any local machine where a user wants to perform mail synchronization
Launch the Trojita Email client from xTuple and configure
Start the synchronization processor
When you uncompress the xtConnect folder downloaded from xTuple, you will find a sub folder called "trojita". Copy this sub folder so that it is in the same directory where the xTuple application resides. If you used the xTuple installer to install xTuple you should find the xTuple application in one of the following locations:
- Windows
C:\Program Files\xTuple\Client\- Macintosh
\Applications\xTuple\Client- Linux
\opt\xTuple\ClientNote
Linux users must rename this folder to be called "
xtconnect".
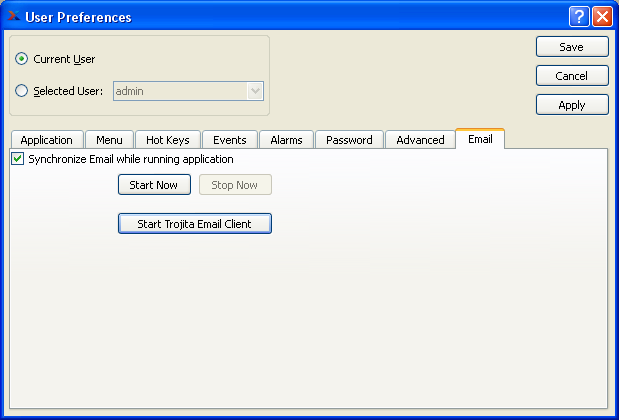
Start xTuple and navigate to User Preferences. The Trojita Email client can be launched from the Email tab by clicking on the "Start Trojita Mail Client" button.

Starting Trojita from xTuple ERP
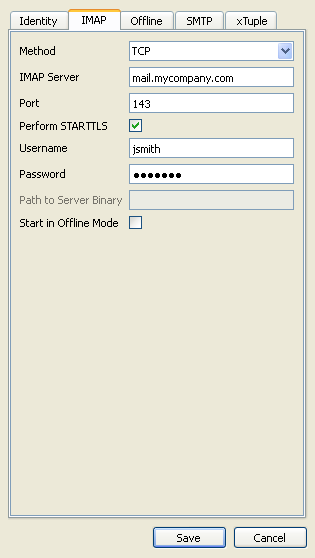
Once Trojita opens, click on "Settings" and select the "IMAP" tab. Enter your credentials for your IMAP mail server. Click SAVE.

Entering IMAP Server Details
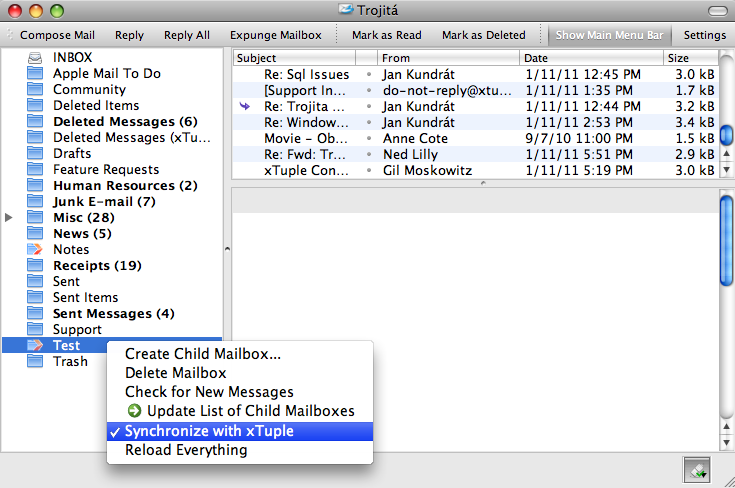
You should see your IMAP mailbox folders appear in Trojita. Right click on the folder(s) you wish to import and select "Synchronize with xTuple". The folder should then change to have an orange arrow on it indicating it is a synchronized folder.

Synchronizing Email Folders
When you are finished, close the Trojita Client.
Tip
Import set up can be as simple as synchronizing both your Inbox and Sent items. However, most people will not be comfortable with ALL their mail going into xTuple. A more controlled solution would be to create folders called "xTuple Inbox" and "xTuple Sent," then set up a rule in your mail client software to automatically move any messages with "xtref" in the subject to those respective folders. All mail launched from the xTuple client should have this in the subject line.
Once the Trojita configuration is complete, check the "Synchronize Email while running application" checkbox. This will make synchronization start when you start xTuple. You can click "Start Now" to start the process without having to restart xTuple. Click SAVE and you are done with set up. You should be able to go to a Contact in xTuple for which there was mail traffic in the folder you synchronized, and see mail history for that Contact.
Note
You will need to stop and restart the synchronization processor any time you change folder settings for the new settings to take affect.
This section offers a few tips and tricks related to several popular Email programs. You can learn more about these Email programs on their respective websites.
The following information will be helpful for anyone using mail programs from Microsoft:
- Outlook
Mail messages opened from xTuple are processed as .eml files. If you are using Outlook 2003 or Outlook 2007, then you must apply the latest updates and certain registry changes so that Outlook will recognize .eml files. Outlook 2010 supports .eml files natively. More information is available here: http://www.msoutlook.info/question/354.
- Exchange
Exchange 2010 has IMAP services disabled by default. Read your installation instructions on Exchange to enable IMAP service. You can also start with online resources published by Microsoft here: http://technet.microsoft.com/en-us/library/bb124022.aspx.
You may want to enhance your Macintosh Mail application to allow you to set up rules on outbound mail. You may purchase a utility for this called "Act-On" that may be downloaded for a 30-day trial here: http://www.macupdate.com/app/mac/17808/mail-act-on.
You may want to enhance your Thunderbird client to allow you to set up message filters on outbound mail. There is a free plug-in for this called "Send Filter" that is available here: https://addons.mozilla.org/en-US/thunderbird/addon/send-filter.