
|
Fixed Assets Product Guide |
|
|
Fixed Assets Product Guide |
| 3.1. New Assets | ||
|---|---|---|
 | 3. Creating New Assets |  |
To create a new fixed asset, go to the following menu: .
This brings up the new asset screen and allows you to enter the details for a particular asset. This method is used by the base Fixed Asset package to create new assets but does not create any asset transactions.
Using the new Asset screen does not update the general ledger.
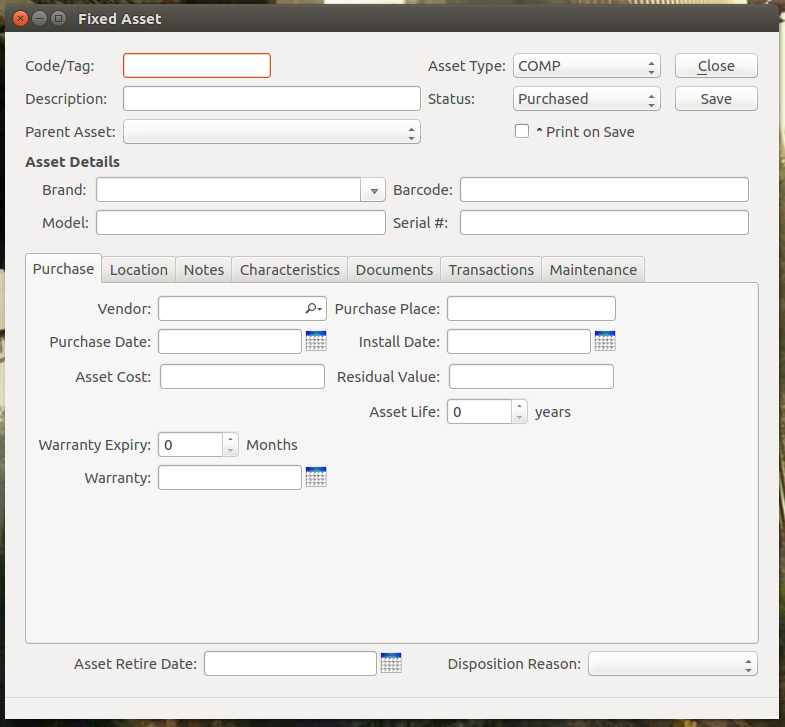
To create a new asset you must enter an asset code and description. You must also define the asset type and define the appropriate asset status. In addition you can optionally enter detailed information about various aspects of the fixed asset.
Some fields become mandatory if you wish to calculate and apply depreciation.
The following fields need to be filled in at the header level of the fixed asset:
This allows you to define this asset as a sub-asset and view the asset/sub-asset relationship in the list assets screen. As of version 1.2.0, fixed assets have a multi-level hierarchy which can be visualized in the Asset list screen.
You can enter the brand of the asset. Previously entered brands are available via the dropdown.
Enter the model of the asset, if appropriate.
If appropriate you can enter the barcode and/or the serial number of the asset.
On the tab, the following options are available:
Who you sourced or purchased the asset from.
Where you sourced the asset from.
What date you purchased the asset.
The asset begins depreciating once it is installed. You can purchase an asset and not begin using it for a period of time. If this is the case you will need to come back to the asset to enter the installation date.
The purchase or initial value of the asset. If you purchase the asset the purchase price will be automatically entered here.
If a residual value is entered, the value will be factored into depreciation calculations. The book value of the asset will not drop below this value.
Asset life is used in the depreciation calculation for straight line method where no depreciation percentage has been entered.
Once depreciation has been posted for this asset many of the fields on the tab are disabled and can no longer be edited. This feature ensures consistency across the life of the asset.
The tab section allows you to better record the physical location of an asset even if that is external (at a customer site). This information is especially useful for planned maintenance to allow a service technician to locate the exact position of an asset. You can enter an internal location or a CRM account. The address field can be overridden and an address entered when you choose an internal location. The following options are available:
This dropdown identifies the internal location of the fixed asset.
This identifies which customer (or other type of CRM account) currently holds the fixed asset.
Identifies the external address of the asset. The address is populated automatically if you select an account (that has a valid address).
On the tab, the following options are available:
Enter any detailed notes or comments about the asset (optional). Select either the notes option to record free text, or the comments option to record xTuple comments and view automatically generated comments and change notes.
On the tab, the following options are available:
In this section you can assign any fixed asset characteristics you might have created in the setup section of xTuple. Depending on characteristic settings you can use these characteristics to further filter assets in the lists and reports.
On the tab, the following options are available:
In this tab you can attach and links or documents to the fixed asset.
On the tab, the following options are available:
This field allows you to record the last time the asset was serviced. If the Fixed Asset Maintenance package is installed, this tab is replaced by a more detailed maintenance history section for the selected asset.
On the tab, the following options are available:
When fixed asset depreciation is installed, this tab displays information about the financial and depreciation transactions that have been posted against this asset. You can also initialize asset book value or apply ad-hoc depreciation.
On the tab, the following options are available:
This allows you to enter the time in months that a manufacturers warranty will be valid. When you update this field the warranty expiry date is also updated.
The date the warranty expires.
The date the asset was retired. When you mark the asset as retired (by changing the status to retired), the retire date becomes mandatory.
The reason for disposing/retiring of the asset. Mandatory once the asset is retired.
If you press the Print on Save checkbox, an asset report will be printed when you save the asset.
Finally, you must save the asset.
| |  | |
| 3. Creating New Assets |  | 3.2. List of Fixed Assets |