
|
xTuple for Service Businesses Demo Guide |
|
|
xTuple for Service Businesses Demo Guide |
| 4. Time Buffer Scenario | ||
|---|---|---|
 | Chapter 4. Constraint Management |  |
Next we will look at a time buffer scenario. Please note that time buffers are calculated only for make-to-order items. In xTuple ERP terms, a make-to-order item is an item whose item site record leaves the Stocked at this Site flag unchecked. Work orders for make-to-order items are generated automatically during sales order entry to meet demand.
The item site lead time determines the initial buffer size for make-to-order work orders. That lead time should include a Murphy factor—that is, time for things that might go wrong. Orders with short lead times will increase in status faster than those with long lead times. This helps to ease the problem where operators concentrate just on work order start/finish dates, when the total amount of work involved (and corresponding time allotment) has a lot to do with what should be worked on first.
The steps required for entering a sales order and creating new line items are covered in detail in Chapter 1, Manufacturing Process Flow.
To perform the setup for this time buffer scenario, you will need to follow these steps:
Enter a sales order for customer TTOYS.
Create a new line item for item YTRUCK1.
Specify a quantity of 1,000.
Specify a scheduled date "+5" days from today.
Make sure the Create Work Order option is checked.
Save the line item.
Once you have completed your sales order setup—and the resulting work order has been automatically created—we are ready to run the constraint management system to collect information about our work order's time buffer. To run constraint management by planner code, follow these steps:
Pull down the module menu.
Select the submenu.
Select the submenu.
Choose the option.
Check All Planner Codes and All Sites.
Click the button.
Now that constraint management has been run, we can display the results. Again, it is important to note that the results displayed for this scenario assume you have completed all the work orders created in the previous sections of this demo guide. If you have not already completed those work orders, then your results will differ from those shown here. To display the results of our current buffer status run, follow these steps:
Pull down the module menu.
Select the submenu.
Select the submenu.
Choose the by Class Code option.
Click the button.
The following screen will appear:
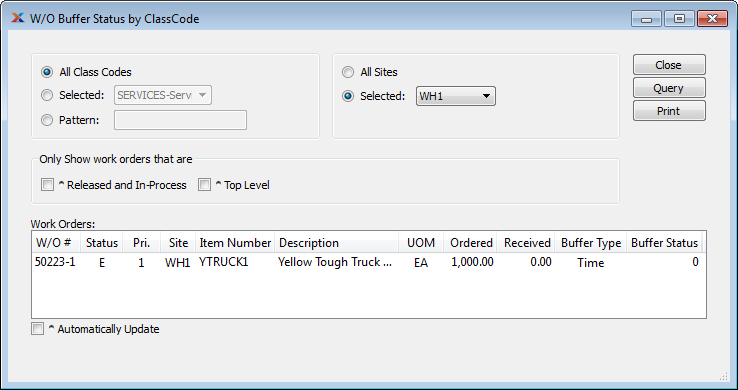
As you can see in the example, the next-to last column, Buffer Type, shows that xTuple ERP has calculated a time buffer for our work order. The value of this time buffer is shown in the Buffer Status column. Because the buffer status for the work order = "0", there is no need to take immediate action. Remember, the magic number for the constraint management system is 66. As long as the buffer status of a work order is less than 66, then the system does not consider the order to be in a critical state.
Your results may vary from those displayed above since there is no way to predict what day of the week you may run this scenario. To learn which days the WH1 site is open, select the option from the module's section.
A time buffer is the lead time, measured in working days, of a supply order for an item that is not stocked. By working days we mean the days that the shop is available to work, which may exclude weekends or holidays. For example: If a shop typically has a three-week lead time, but does not work weekends, then the time buffer for that shop would typically be 15 working days. The xTuple ERP constraint management system looks at the start and finish dates of a discrete purchase order or work order, removes non-working days for the order's site, and then calculates the time buffer.
If you want to, you can simulate the passage of time to see the impact on our work order's buffer status. To simulate the passage of time, follow these steps:
Open the W/O Buffer Status by Class Code display.
Right-click on the work order.
Select the option.
Enter a Start Date "-2" days from today.
Enter a Due Date "+1" days from today.
Click the button.
Re-run buffer status by planner code, as described above.
Re-open the W/O Buffer Status by Class Code display.
Click .
The following screen will appear:
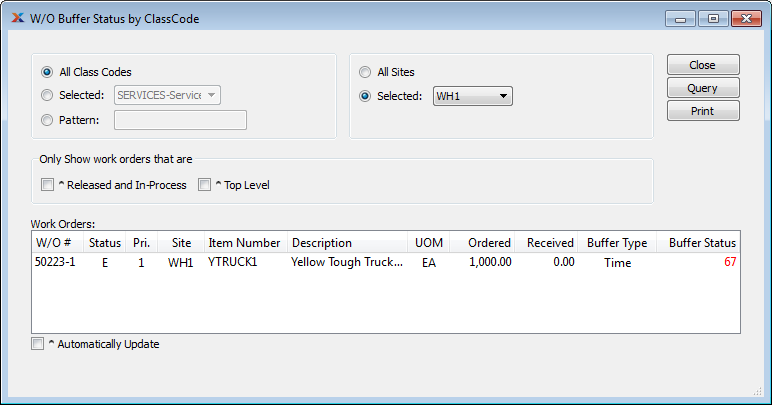
Note that the order's buffer status has now changed. The more time that passes from the start date of a work order to the due date of the order, the more the order's time buffer is consumed. Keep in mind that your results will vary depending on the current day of the week. The constraint management system uses a site's work week defined in the module's section. The Site Week functionality enables you to define the days of the week your plant is open. Closed days, such as weekends in the demo database, are factored into the constraint management time buffer calculation.
Here are some helpful benchmarks:
* < 40 and color = black: Not yet critical.
* >= 66 and color = red: Critical and requires immediate attention to ensure the order is in process and will be delivered on time.
* =100 and color = red: Order is due today.
* >100 and color = red: Order is late.
Monitoring time buffers helps us avoid falling into the First In First Out (FIFO) trap that many shops get stuck in. The start time of a work order is irrelevant. It is its completion on its due date which enables us to achieve a high degree of customer satisfaction for on-time delivery. Constraint management shows us the orders for which we risk missing the delivery date because we have already used up 66% of their time buffer.
| |  | |
| 3. Stock Buffer Scenario |  | 5. Capacity Buffer Scenario |