|
xTuple Connect Product Guide |
|
|
xTuple Connect Product Guide |
| 3.2. Create a Simple EDI Profile | ||
|---|---|---|
 | 3. Configuring xTuple Connect to Send Electronic Invoices |  |
EDI Profiles are the master records which describe what mechanism to use to send data electronically and the basic structure of what will be sent. Our simple example will hold just enough information to send a PDF copy of an Invoice by email to the Accounting department at our Customer.
To create an EDI Profile, start from the System menu:
Follow this path:
Click the NEW button
Type "Tremendous Toys Incorporated-IN" in the "Name" field
In the "EDI Profile" window that appears, select "Email" from the list of EDI Types
Click the "Review Before Sending" box
In the "To" field, enter the email address to which you want to send the Invoice: accounting@ttoys.com
You may enter multiple email addresses by separating each address with a comma (",").
In the "Cc" or "Bcc" field, specify addresses you want to receive a copy of the email
If you want replies automatically sent to a particular address, put that in the "Reply To" field
In the "Subject" field, specify a subject: Prodiem </doctypefull> </docnumber>
In the "Message Body" section, enter a detailed message to the Customer to be used whenever Invoices are emailed to the Customer
Make certain the content of your message appears legitimate so that spam filters will not reject it.

Click the NEW button on the "Forms" tab
If you get a dialog asking if you want to save the EDI Profile to the database, click OK
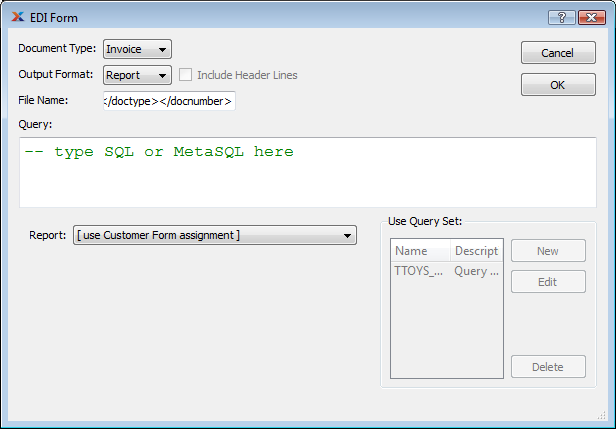
In the window that appears, select "Invoice" from the "Document Type" list
Make sure the File Name field is set. This is the name that will be given to the email attachment. </doctype></docnumber> is usually the best choice
Make sure the "Output Format" is set to "Report" and that the "Report" is set to "[ use Customer Form assignment ]"
Click OK
Click SAVE on the EDI Profile screen
The following fields on the EDI Profile screen deserve special mention:
The EDI Profile in our example is specific to sending Invoices to the Customer TTOYS. The name reflects this.
This setting controls whether or not the user will see the Review EDI Before Sending screen. If this field is checked then all users will see this screen and be able to accept or cancel sending the EDI. If it is not checked, the EDI will be sent automatically; the user will not have a chance to review the information, change it if necessary and allowed, and accept or cancel sending the message.
This EDI Profile sets the destination email address specifically to "accounting@ttoys.com" and mentions "Tremendous Toys" in the message body. This is part of what makes this EDI Profile specific to this particular Customer. However, also notice the use of </doctypefull> and </docnumber> in the Subject. These are examples of special tokens that get replaced with the actual Document Type and document number when the EDI message gets built. See Chapter 5, Advanced EDI for ways to create more generic EDI Profiles.
This EDI Profile only has one EDI Form: IN. That means this EDI Profile can only be used to send Invoices. This EDI Form is described in Section 3.2.2, “EDI Forms”.
| |  | |
| 3.1. Review Customer Form Assignments |  | 3.2.1. EDI Tokens |