|
xTuple Connect Product Guide |
When you create an EDI Form as a part of an EDI Profile, you can select CSV as the "Output Format". When the EDI message for the selected Document Type is created, the message will contain the results of running one or more queries, with the data for the various columns separated by commas. This lets you customize the output for your needs. The main restrictions are simple:
All of the data will go into the same output file, regardless of how many queries you run
You must be able to build each individual query using either the basic EDI tokens or tokens you define in the EDI Form's "Query" field
EDI files are built one document at a time, so be careful to write your queries to retrieve information about just the one document
As an example, let's say one of your Customers has requested Invoices in CSV format instead of PDF. You can either edit the EDI Profile you have been using for this Customer and change the EDI Form for Invoices or create a new EDI Profile.
Keep in mind that EDI Profiles can be shared. If you choose to edit an existing EDI Profile, all Customers attached to this EDI Profile will receive Invoices as CSV files.
We will change an existing EDI Profile to use the xTuple API Views to collect information about the Invoice. The API Views provide a simple way to see meaningful information without delving into the internal structure of the xTuple ERP database. Here are the steps to change an existing EDI Form for Invoices from sending PDF files to CSV files:
Follow this path:
Select the EDI Profile you want to change
Click the EDIT button
Select the "Invoice" line from the Forms list
Click the EDIT button
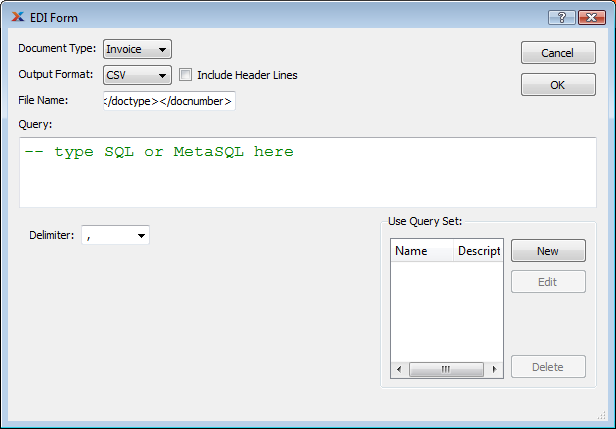
Change the "Output Format" to "CSV"
The screen should now look like this:

EDI Form for Invoice in CSV Format
Create a query set to describe the Invoice. This will have two queries in it, one for the invoice header and one for each line item:
Click the NEW button next to the query set list
Enter a Name and Description for this query set
Click the NEW button
If you get a dialog asking whether or not to save the Query Set, click YES
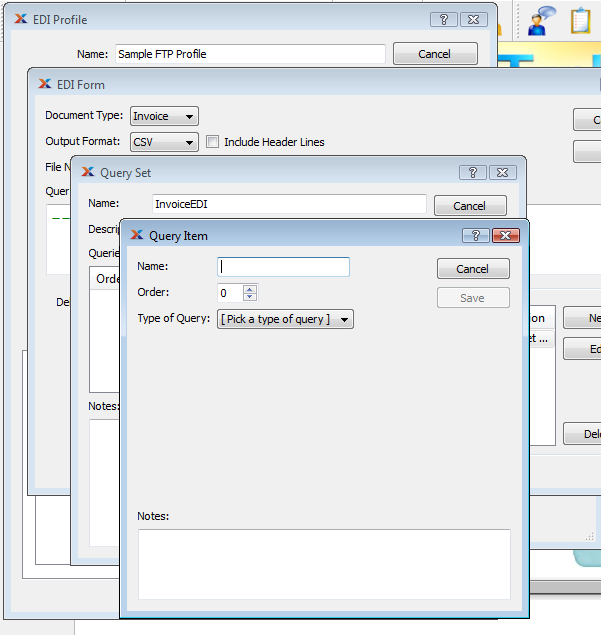
You should see the following screen:

Defining the First Item in a Query Set
Enter a Name, such as header, to help you distinguish this query from others in the Query Set
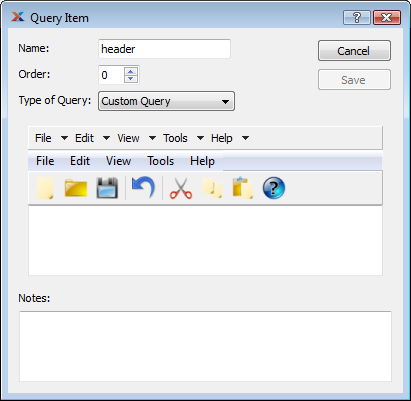
For Type of Query, select "Custom" and the center of the Query Item screen will change to show the MetaSQL editor, as shown in the following screenshot:

The MetaSQL Editor on the Query Item Screen
You need to select basic information about the Invoice, such as the Invoice number, the Sales Order that is the basis for this Invoice, the billing and shipping addresses, etc. Type the following query in the MetaSQL editor:
SELECT invoice_number, order_number, invoice_date, ship_date,
       terms, customer_number, billto_name, billto_address1,
       billto_address2, billto_address3, billto_city,
       billto_state, billto_postal_code, billto_country,
       shipto_name, shipto_address1, shipto_address2,
       shipto_address3, shipto_city, shipto_state,
       shipto_postal_code, shipto_country,
       po_number, ship_via, misc_charge_description,
       misc_charge, freight, currency, payment
  FROM api.invoice
 WHERE invoice_number=<? value('docnumber') ?>;
Click SAVE
On the Query Set screen, click NEW again to enter the line item query
Enter a Name, such as lineitems
Change the "Order" to 1
Select "Custom" for the Type of Query
Now you need to get the information about the individual line items in the Invoice. Type the following query in the MetaSQL editor:
SELECT *
  FROM api.invoiceline
 WHERE invoice_number=<? value('docnumber') ?>;
Click SAVE in the Query Item screen
Click SAVE in the Query Set screen
Now that you have defined a Query Set for sending Invoice information, select that Query Set on the EDI Form window.
Click OK on the EDI Form window
With this done, any time you send an Invoice using this EDI Profile, a CSV file will be created. For example, test Invoice # 60095 with three line items generated these contents:
60095,,2010-06-17,2010-06-17,2-10N30,TTOYS,Tremendous Toys Incorporated,Tremendous Toys Inc.,101 Toys Place,,Walnut Hills,VA,22209,United States,Olde Towne Store 1,Olde Towne Toys Store 1,1 Duke Street,,Alexandria,VA,22201,United States,,UPS-GROUND-UPS Ground,one-time discount,-112.04,0,USD,0
60095,1,BTRUCK1,,WH1,,,,15,15,9.891,Taxable,EA,EA,
60095,2,CTRUCK1,,WH1,,,,25,25,27,Taxable,EA,EA,
60095,3,DTRUCK1,,WH1,,,,5,5,49.5,None,EA,EA,
You can modify the CSV output in two ways:
You can use other delimiters besides commas between fields.
To use a TAB character, edit the EDI Form and select "{tab}" from the list in the Delimiter field. If you choose to use a TAB character, the file suffix .tsv will be appended if necessary instead of .csv.
If you want to use some other character, such as an asterisk ("*"), select the comma from the list in the "Delimiter" field. Then click in the field, backspace over the comma, and type the character you want.
You can also add a header line as part of the CSV output. Click in the "Include Header Lines" field next to the "Output Format" field on the EDI Form screen. When you do this, the column names for each query in the query set will be written to the CSV file right before the data generated by the query.
Here is the same Invoice as above, but with the Delimiter changed to an asterisk and with header lines:
invoice_number*order_number*invoice_date*ship_date*terms*customer_number*billto_name*billto_address1*billto_address2*billto_address3*billto_city*billto_state*billto_postal_code*billto_country*shipto_name*shipto_address1*shipto_address2*shipto_address3*shipto_city*shipto_state*shipto_postal_code*shipto_country*po_number*ship_via*misc_charge_description*misc_charge*freight*currency*payment
60095**2010-06-17*2010-06-17*2-10N30*TTOYS*Tremendous Toys Incorporated*Tremendous Toys Inc.*101 Toys Place**Walnut Hills*VA*22209*United States*Olde Towne Store 1*Olde Towne Toys Store 1*1 Duke Street**Alexandria*VA*22201*United States**UPS-GROUND-UPS Ground*one-time discount*-112.04*0*USD*0
invoice_number*line_number*item_number*misc_item_number*site*misc_item_description*sales_category*customer_part_number*qty_ordered*qty_billed*net_unit_price*tax_type*qty_uom*price_uom*notes
60095*1*BTRUCK1**WH1****15*15*9.891*Taxable*EA*EA*
60095*2*CTRUCK1**WH1****25*25*27*Taxable*EA*EA*
60095*3*DTRUCK1**WH1****5*5*49.5*None*EA*EA*