The xTuple report writer enables you to customize report definitions that produce standard sized labels for shipments and generate them from the xTuple client. It also enables you to define unique report definitions, called forms, for packing lists and bills of lading that can be linked to one or more customers. There are three steps necessary to define and generate a label or form:
- Step 1 - Report Definition
Define the label or form's report definition with the xTuple report writer
- Step 2 - Report Definition Link
Link the label or form to the report definition. For forms, link the form to one or more customers
- Step 3 - Generate Labels or Forms
Generate labels or forms from the xTuple client using options on menu
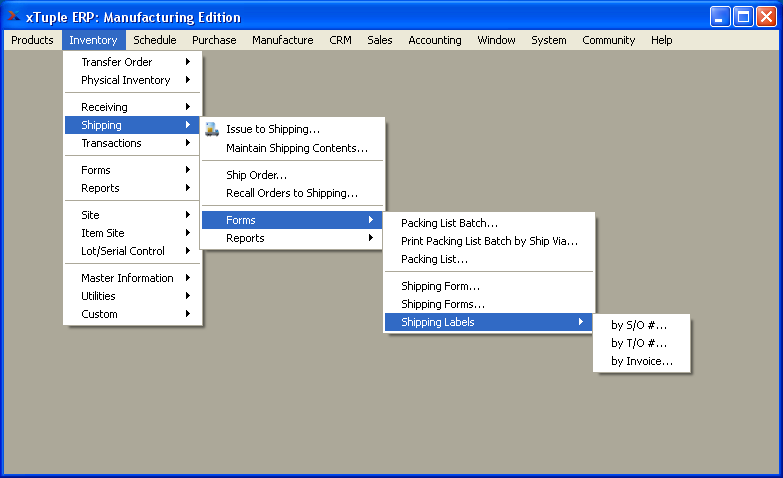
There are six sessions that generate labels of forms and they are accessed through the menu: They are:
Print Packing List
Print Shipping Form
Print Shipping Forms
Print Shipping Labels by S/O #
Print Shipping Labels by Invoice
Print Receiving Labels by P/O #
Though several of these forms and labels can be generated from other places within xTuple, the menu is a single menu from which all can be generated:
In the next few sections we will examine the setup for producing custom labels and forms. Remember, forms are named report definitions that are linked to a customer. Labels are report definitions that are linked to a unique name but not a specific customer. However, you could create a report definition for a label and assign it a name that references a customer. This is appropriate when a customer has a unique label requirement and you want the name of the report definition to reflect this.
The cross referencing capability in xTuple is a very powerful feature that makes if possible to, for example, to define report definitions that are unique to a customer or types of customers.
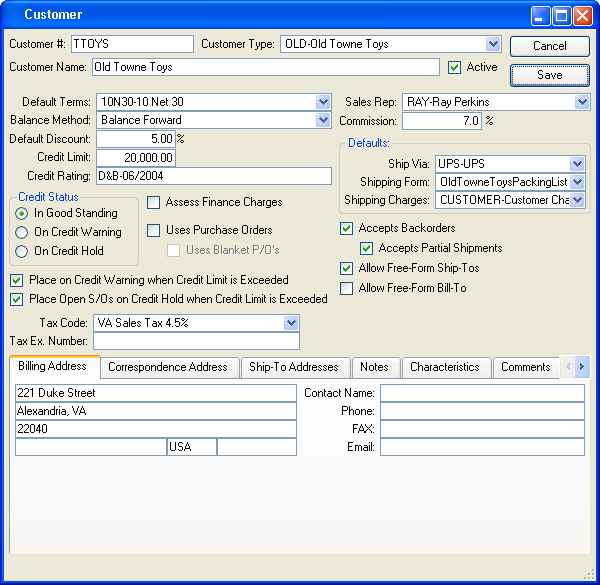
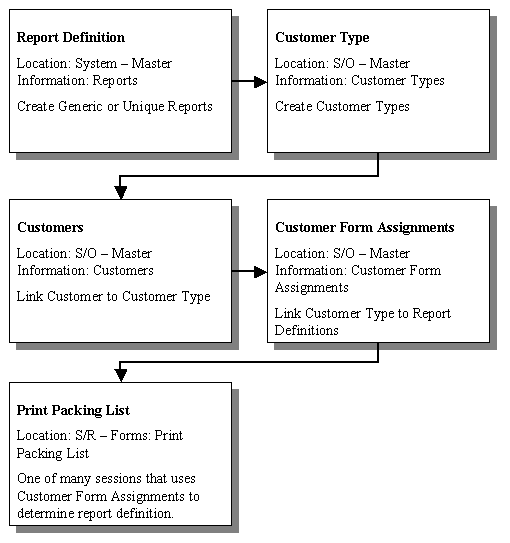
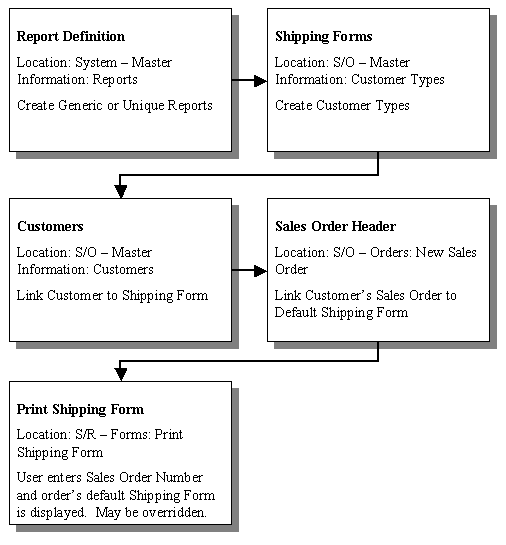
When you define a Customer (see below) you will assign the customer a Customer Type and a preferred Shipping Form:
The entries that display in the Shipping Form choice field are first defined using the session Shipping Forms located on the menu:
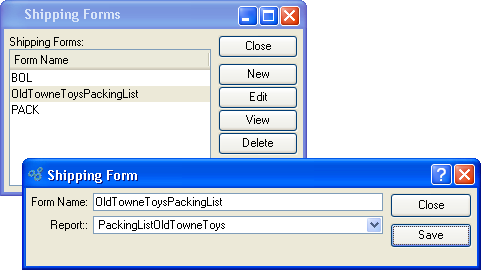
This session enables the creation of a unique form name that is linked to an xTuple report definition. Running the session Print Shipping Form from the menu causes xTuple to display the customer’s preferred shipping form in the field Shipping Form.
This technique makes it possible to create logical form names that are tied to specific report definitions and to one or more customers.
Referring back to the Customer master you will also note the Customer Type field. This also controls the printing of forms. The following session enables you to define, by Customer Type, the report definition that is used to generate the specific documents listed:
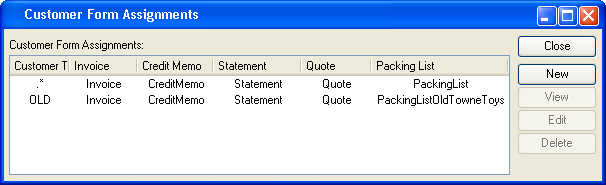
The following diagrams recap the setup just described for Customer Form Assignments:
We have also looked at the screens that link a customer to a shipping form. The following diagram recaps this setup:
Later in this section we will look at the parameters values that are passed to the report definition when Print Shipping Form and Print Packing List are run from the menu. But first, let’s look at how xTuple enables you to define unique label definitions.
The last three options on the menu are:
Print Shipping Labels by S/O #
Print Shipping Labels by Invoice
Print Receiving Labels by P/O #
The cross-reference to the report definition for these three is a little simpler. On the System menu's Master Information a sub-menu is the Label Forms option:
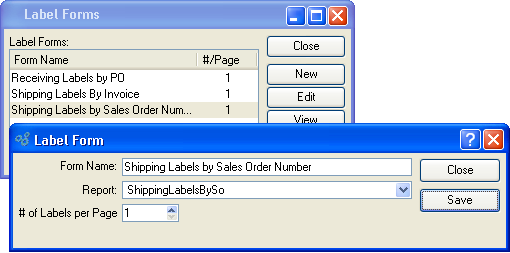
When one of the three options label options on the S/R - Forms menu (listed in the table below) is run, the user is presented with a drop down choice field called Report Name in which is displayed the form name linked to a report definition using the session Label Form.
System - Master Information: Label Forms: Enables the creation of a unique form name that is linked to an xTuple report definition. The report name displays in the Report Name field on the following label reports:
Print Shipping Labels by S/O #
Print Shipping Labels by Invoice
Print Receiving Labels by P/O #
When a user runs generates a form or a label from an option on menu, the xTuple client passes parameter values to the selected form's definition (more on this shortly) based on the user’s entries. These parameter values can be used by the report’s SQL to retrieve information from the database.
The tables below identify fields on the sessions that are available on the menu. The parameters column provides the name of the parameter that corresponds to the field if it is in fact a parameter (not all are). Also provided, in the Table Reference column is the name of a table that the author of the report may choose to query to locate information in the database based on the parameter value provided by the user.
It is important to note that some fields are not parameters and some parameters do not correspond to tables. For example the parameters labelTo and labelFrom pass parameter values that can be used in the report definition to control the number of labels that print. These parameters do not correspond to a table.
The option Print Packing List, located on the S/R - Forms menu, enables you to generate a packing list by entering a sales order number (see the section Linking a Form Name to a Report Definition and Customer to see how this is setup). At run-time, the order's internal reference number is passed to the report definition as the value for the parameter sohead_id. This parameter can be employed in a query that derives information from a join on the tables cohead and shipto to retrieve information pertinent to shipping labels.
Table 5.1. Parameters passed to the Packing List report
| Field | Parameter | Table Reference |
| Sales Order # | sohead_id | cohead |
The option Print Shipping Forms, located on the S/R - Forms menu, enables you to see a customer’s default Shipping Form by entering a sales order number (see the section Linking a Form Name to a Report Definition and Customer to see how this is setup) and override it if you chose.
At run-time, the order's internal reference number is passed to the report definition in the value of the parameter cosmisc_id. This parameter can be employed in a query that derives information from a join on the tables cosmisc and shipto to retrieve information pertinent to shipping labels.
The table below shows these and other parameters that are passed to the report definition and may be used to query other tables (if applicable) or display their value on the report. For example, the user’s input for Watermark is passed in the parameter watermark and may be referenced in a report’s Properties and displayed as a dynamic watermark.
Table 5.2. Parameters passed to the Shipping Forms reports
| Field | Parameter | Table Reference |
| Sales Order # | cosmisc_id | cosmisc |
| Shipping Form | not a parameter | n/a |
| Shipping Charges | shipchrg_id | shipchrg |
| # of Copies | not a parameter | n/a |
| Watermark | watermark | n/a |
| Show Prices | showcosts | n/a |
The session Print Shipping Forms prints all orders that are at shipping and have not yet had shipping forms printed or for which a shipping change has been recorded. You can see orders at shipping and the status of their shipping forms by going to the session Maintain Shipping Contents on the menu S/R - Shipping. The column Prnt'ed indicates the status of shipping forms.
Using Print Shipping Forms an order's shipping forms may only be printed once unless the shipment has been changed and then the field Print Shipping Forms for Changed Shipments must be checked. Note, the session Print Shipping Form (the second option on the S/R - Forms menu) will always enable you to print a specific sales order's shipping form.
The table below identifies fields, parameters, and a table reference to assist you in printing Shipping Forms:
Table 5.3. Field descriptions for Printing Shipping Forms
| Field | Parameter | Table Reference |
| Print Shipping Forms for New Shipments | not a parameter | n/a |
| Print Shipping Forms for Changed Shipments | not a parameter | n/a |
| # of Copies | not a parameter | n/a |
| Watermark | watermark | n/a |
| Show Prices | showcosts | n/a |
The Print Shipping Labels by SO # session is found on the S/R - Forms menu. The is user prompted to enter a Sales Order number, select a label form (remember that these were defined in the System - Master Information: Label Forms session) in the Report Name field, and enter a range in the Labels: from and to fields to control the number of labels printed. This approach enables you to pre-define a variety of label formats.
The table below identifies screen literals, parameters, and a table reference to assist you in creating your report definitions for labels. Note that address information for orders that are destined for customer ship-to addresses is contained the table shipto and can be accused with a join to information in the table cohead using the value passed by the parameter sohead_id.
The table below identifies screen literals, parameters, and a table reference to assist you in creating your report definitions for Sales Order labels:
Table 5.4. Screen Literals for Printing Sales Order Labels
| Screen Literal | Parameter | Table Reference |
| Sales Order # | sohead_id | cohead |
| Report Name | not a parameter | n/a |
| Label from | labelFrom | n/a |
| Labels to | labelTo | n/a |
The Print Shipping Labels by Invoice session is found on the menu. The user is prompted to enter an Invoice Number, select a label form (remember that these were defined in the session) in the Report Name field, and enter a range in the Labels: from and to fields to control the number of labels printed. This approach enables you to pre-define a variety of label formats.
The table below identifies screen literals, parameters, and a table reference to assist you in creating your report definitions for Invoice labels:
Table 5.5. Screen Literals for Printing Invoice Labels
| Screen Literal | Parameter | Table Reference |
| Invoice # | invchead_id | invchead |
| Report Name | n/a | n/a |
| Label from | labelFrom | n/a |
| Labels to | labelTo | n/a |
The Print Receiving Labels by PO # session is found on the menu. The user is prompted to enter an Purchase Order number, select a label form (remember that these were defined in the screen) in the Report Name field, and enter a range in the Labels: from and to fields to control the number of labels printed. This approach enables you to pre-define a variety of label formats.
The table below identifies screen literals, parameters, and a table reference to assist you in creating your report definitions for labels. Note that receiving line item information is contained in the table porecv and can be accessed with a join to information in the table pohead using the value passed by the parameter pohead_id. In this way, receiving labels that contain item, description, quantity and other information pertinent to receiving and putaway can be generated.
The table below identifies screen literals, parameters, and a table reference to assist you in creating your report definitions for Receiving labels:
Table 5.6. Screen Literals for Printing Receiving Labels
| Screen Literal | Parameter | Table Reference |
| P/O # | pohead_id | pohead |
| Report Name | n/a | n/a |
| Label from | labelFrom | n/a |
| Labels to | labelTo | n/a |
To begin you must define a label's report definition using the xTuple report writer. Previous sections of this guide have provided detailed explanations on the mechanics of creating report definitions. Below are areas of interest that are specific to a label definition in general and the sample label shown.
Before we begin, let’s see how the custom label was printed and what it looks like. The customer label was printed through the Print Labels by Sales Order option found on the S/R, Forms menu:
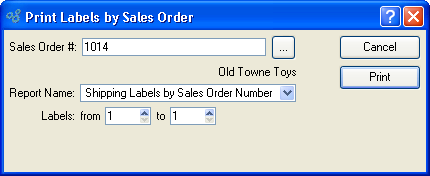
Note that the user enters the Sales Order for which the labels are to be generated, selects a Report Name, and enters a value for Labels From and To - this controls the number of labels printed.
The Sales Order number is passed to the report definition as a parameter called sohead_id which can be used in an SQL query to look up additional information about the order in the table cohead.
Likewise the values entered for Label From and Label To are passed as the parameters labelFrom and labelTo. These parameters do not correspond to a specific table, but later we will learn how to use them in conjunction with the sequence table to create multiple labels.
The Report Name choice field lists all of the Reports Names that have been linked to a report definition using the session Forms found on the System, Master Information menu. Only Report Names linked to report definitions using the Forms session will display in this choice field.
The report definition we will look at generates the following labels:
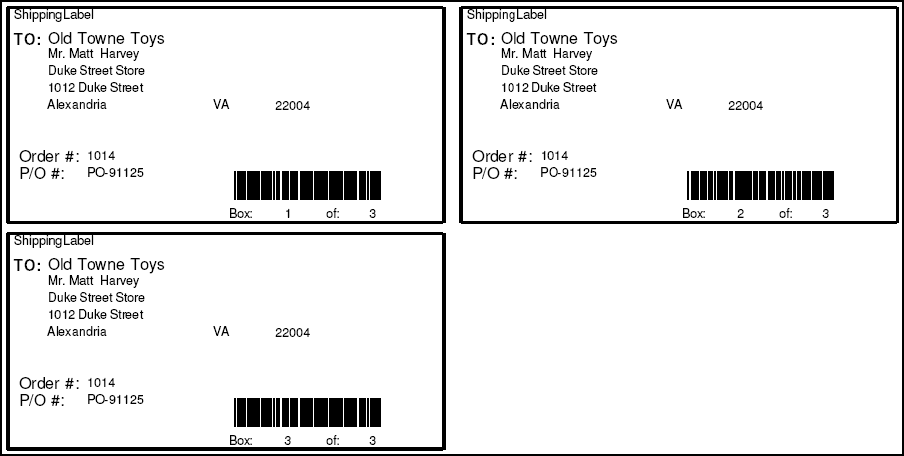
Note that three labels were generated based on a user entry for Label From of 1 and Label To of 3.
Let’s take a look at the report definition that generated these labels.

As noted earlier, the xTuple report writer supports several standard label sizes. This report uses an Avery 5263 label size. The Page Setup session is used to select a label size.
Note
The report writer supports Avery Standard Labels. It also supports portrait or landscape, Letter, Legal, and A4 documents.
To open the Page Setup session, in the report writer:
Pull down the Document menu
Click on the “Page Setup” option
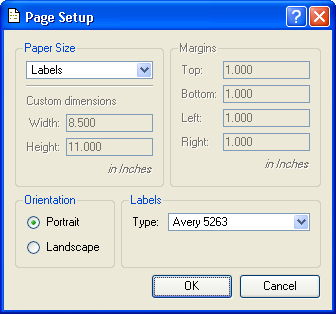
Labels use a Paper Size type of "Labels." The following pre-defined Label Types are supported:
Avery 5263
Avery 5264
Avery 8460
CILS ALPI-9200-1
This controls the size of the Detail section of the report which is the only portion of the report definition that should be used for a label report definition.
We noted earlier that one of the parameters passed to the report definition at run-time was labelTo. You may have noticed that the labels show the value of the user’s input for this parameter in the lower right corner of each label. This was accomplished by creating a special Properties field that references “Parameter Query” in the query source field and the name of the parameter labelTo in the Column field.

The other values for fields on this report definition were retrieved from the database through and SQL query.
The query in the report definition is sophisticated and yet fairly straight forward. It is shown below:
SELECT sequence_value, cohead.cohead_number, cohead.cohead_shipto_id,
       cohead.cohead_custponumber, shipto.shipto_name, shipto.shipto_address1,
       shipto.shipto_address2, shipto.shipto_address3, shipto.shipto_city,
       shipto.shipto_state, shipto.shipto_zipcode
FROM public.cohead cohead, public.shipto shipto, public.sequence
WHERE cohead.cohead_shipto_id = shipto.shipto_id
  AND ((cohead.cohead_id=<? value("sohead_id") ?>)
  AND (sequence.sequence_value BETWEEN <? value("labelFrom") ?> AND <? value("labelTo") ?>));
Let’s take a look at each section of this query:
- SELECT Section
This portion of the SQL retrieves column values from three tables:
sequence,cohead, andshipto. The values retrieved are used to define the Columns in the Property (Fields) session which controls what and how dynamic information is displayed on the label. The descriptions of these fields are self explanatory.- FROM Section
This portion of the SQL specifies the tables from which the query retrieves the data:
Table 5.7. Tables Used in FROM Section
coheadThis table contains Header information for Sales Orders shiptoThis table contains customer shipping addresses sequenceThis table contains a sequence of numbers from 1 to 1000 and facilitates the execution of the SQL multiple times in order to generate multiple labels - WHERE Section
The
WHEREsection of the SQL does the following:Retrieves the row in the table
coheadwhere the columncohead_idequals the value for the parameter passed from the user (the user enters the order number but the program passes the order's system generatedcohead_id).Joins the tables
coheadandshiptoon the columnscohead_shipto_idandshipto_id.Causes the SQL to “fire” multiple times to print multiple labels. The table
sequencecontains a sequential list of integers from 1 to 1000 and is used by the query such that it repeats for the number of times contained in the range defined by thelabelFromandlabelToparameters. The information returned is the same each time but by design the report writer generates one label each time the SQL returns a row of information.
The table shipto contains the specific the shipping address information that appears on the label. Also note that parameters are contained inside the MetaSQL tags <? and ?>.
Note
Finally, for the sake of simplicity, this sample label's SQL only generates labels for orders in which the shipping address is selected from the list of Ship-To's by customer. In this case this scenario the shipping address is contained in the table shipto. For orders where the ship to address is merely copied using the COPY TO SHIP-TO -> button, the address information is contained in the table cohead. A more sophisticated query, leveraging MetaSQL could test for this condition (the value of column cohead_shipto_id = -1 in table cohead) and retrieve the shipping information directly from cohead. If you decide to re-create this label, make certain to test it against a Sales Order that uses an address from the list of pre-defined customer Ship-To's.
Once the report definition is created, it is time to link it to a user defined Form Name:
Pull down the xTuple System menu
Click on the Master Information menu
Select the option “Forms”
Click the NEW button
The Form Name field is a user friendly description of the label displayed to the user when the user is selecting a label type to print. It could, for instance, link to a special report definition in the Report field that is unique to a specific customer. The # of Labels per Page field is not used.
To print your labels, first create a Sales Order that uses a pre-defined customer ship-to address. Then:
Pull down the xTuple Inventory menu
Click on the Forms menu
Select the option Print Shipping Labels by SO #
In the field Sales Order #, enter the order number sales order you just created
In the choice field Report Name, select the name of the label you just liked to your report definition using the Forms session
Set the Label from field to 1 and the To field to 3
Click the PRINT button
xTuple will print 3 labels, based on the unique report definition you linked to the Report Name selected, that contain information for the customer’s ship-to address tied to the order you entered.