RPTRender is a report rendering tool that enables users to open an OpenRPT report’s XML definition, select or edit parameter values, and then generate the report’s output.
The Report Renderer connection to the database through your ODBC connection works similarly to the connection you established with the MetaSQL Editor earlier in this chapter:

To connect, simply click on the OPTIONS button, select ODBC under Driver, and then enter the name of the connection in the Database field. Click SAVE and then LOGIN. All other fields may be left blank.
From the Report Renderer main screen, select the “Open” option from the “File” menu to load the XML report definition:
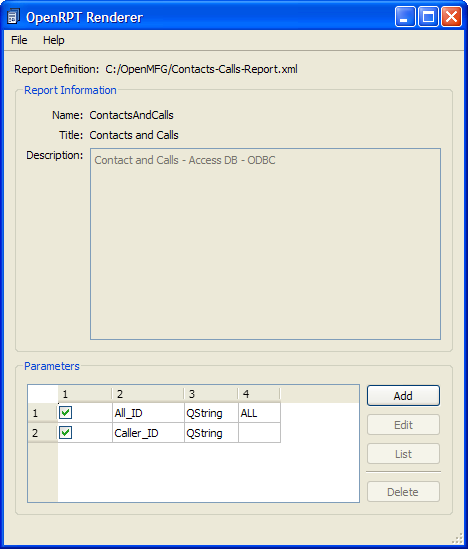
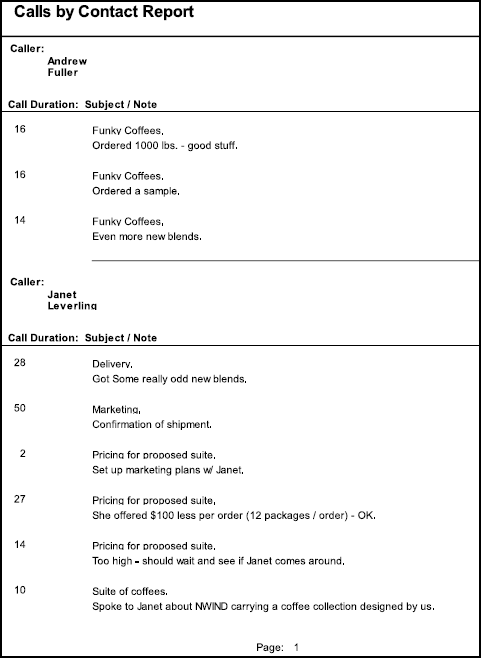
If we are satisfied with the parameter settings—which in this example means printing call detail for all callers—we can simply select the “Print” option from the “File” menu to generate the following report:
In the next section, we will see how it is possible to change the parameters and generate the report again.
The MetaSQL for our report generates rows for all callers if the All_ID parameter exists. Its value is not a factor. In our next example, we want to generate a report for a single caller—not all callers. This means that at run time we will want to delete the All_ID parameter. To do this we must first click on it and then use the DELETE button.
Note
Deleting a parameter at run time only deletes it temporarily—for the one time the report is being rendered. The parameter will still be present in the report’s XML definition the next time you open it.
Once the All_ID parameter has been temporarily removed, we will use the LIST button to select a specific caller for whom we want to generate the report.
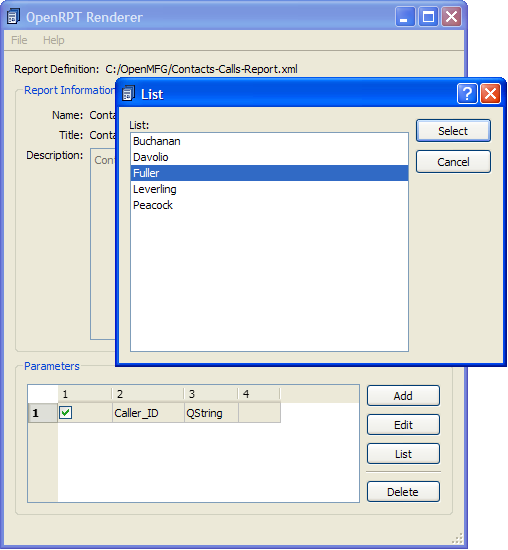
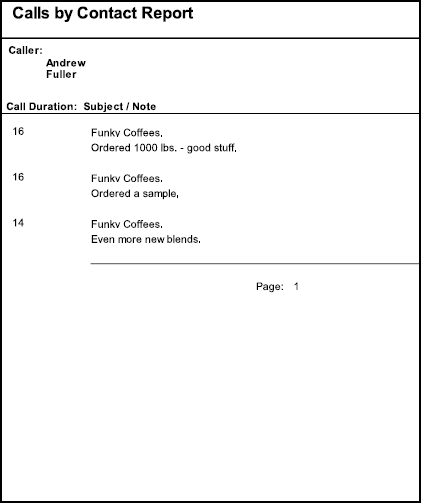
As you can see, we have indicated we want to run a report on the caller named “Fuller.” We are now ready to print the report. The following shows the results we get:
To generate this report we first created a connection to an ODBC data source, in this case an Access database. Then we used the OpenRPT MetaSQL editor to create the SQL Query source with MetaSQL parameters that enabled the user to specify all callers or a specific caller. We then used OpenRPT to create the report’s definition, in which we specified a group in the detail section to organize calls together by caller. We saved the definition to an XML definition file. Finally, we opened the XML report definition with the Report Renderer, set the embedded parameter values, and generated two versions of the report. This is the normal development cycle for an OpenRPT report.
The Report Renderer supports switches that enable values to be passed to it at run time. These switches and a description of their use are provided below:
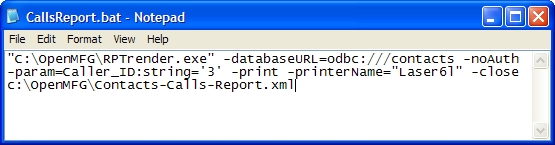
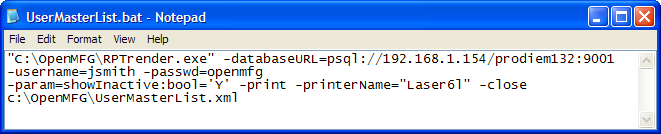
- -databaseURL=
Establishes the connection to the database
- -databaseURL=odbc:///
Contacts connects to the database through the ODBC connection called “contacts”
- -noAuth
Indicates that no username and password are required as is typically the case when this information is defined in the ODBC connection
- -username=
The database username
- -passwd=
The database user’s password
- -param=
Establishes a parameter, its type and its value. For example
-param=Caller_ID:string='3'establishes a parameter calledCaller_IDof typestringwith a value of3. This example,-param=show_inactive:bool='Y'establishes a parameter calledshowInactiveof typebooleanwith a value ofY.The presence of this switch simply opens the operating system’s print dialogue immediately upon opening the Report Renderer
- -printerName=
The value of this switch is the name of the printer that is selected automatically when the operating system’s print dialogue is opened. This example, -printerName="Laser6l" will automatically select the client computer’s printer with the name Laser6l.
- -close
The presence of this switch simply closes the Report Renderer after the user prints or cancels printing.
Tip
When saving parameters to a report definition, the last position should contain the location and name of the OpenRPT report definition file. For example, on Windows this would look like this: c:\xTuple\Contacts-Calls-Report.xml
Below are two examples of scripts that call the Report Renderer, passing to it switch settings for a specified report definition.
The switches that the Report Renderer enables make it possible for you to store OpenRPT XML report definition files on a shared drive and script end user access to them for ad hoc reporting capability.