Now that we have a working query for our report, we will create the report’s definition. Again, you learned how to do this in previous chapters of this user guide.
Note
The report definition we will be building introduces the Group section concept, which was not covered in depth in previous chapters.
We will begin by running OpenRPT. Note that OpenRPT opens automatically. It does not require authentication to a database. Unless your report definition resides in a PostgreSQL database (such as xTuple), you will save the reports locally as XML definition files.
First let’s define our report’s Properties. Then we will create our query source with the SQL we validated using the MetaSQL editor. Next we will use the section editor to create our report’s sections. Then we will define the report’s parameters (we will use the ones tested with the MetaSQL editor and embedded in our query). And finally we will save our report to the XML definition file.
Start a new report by selecting the “New” option from the “File” menu. Then, define the report’s Name, Title, and Description using the “Properties” option under the “Document” menus, as shown below:
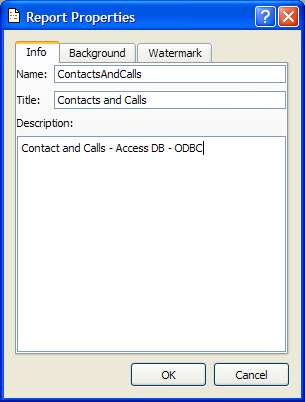
Click OK after defining the report’s Properties.
Before proceeding to the next step, open the query you created in the last section using the MetaSQL Editor. Select the query and Copy it to the copy buffer. Then, in OpenRPT, use the “Document” drop down menu and select the “Query Sources” option. Click the ADD button and place your cursor in the Query portion of the screen. Right-click and paste your query here. In the Name field enter “detail”. When you are done the screen should look as follows:
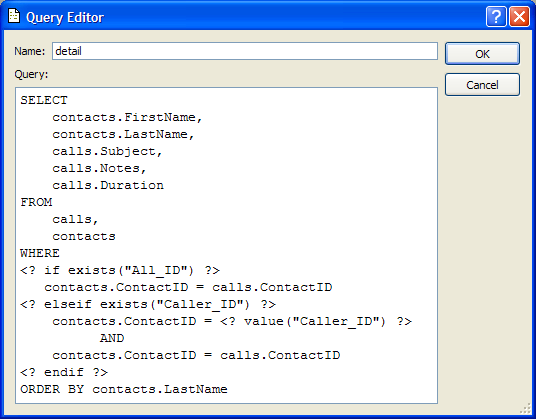
Click the OK button and CLOSE the Query List screen.
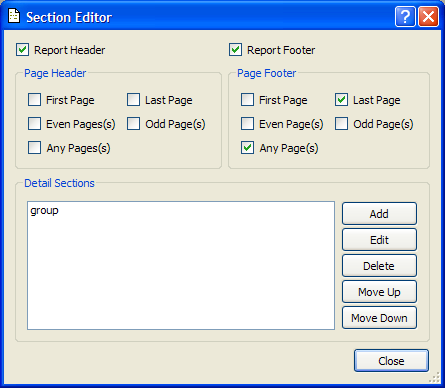
Earlier in the user guide you learned about report sections. Next we will activate our report’s sections. From the “Document” menu, select the “Section Editor” option. The following screen will appear:
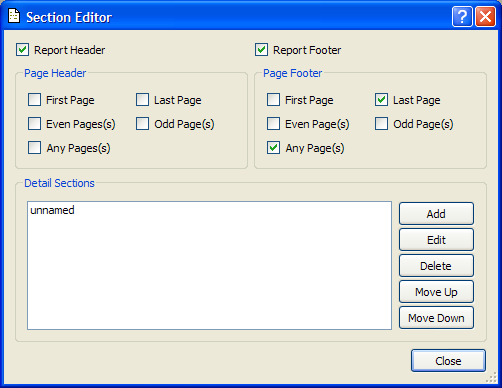
Select the following options using your mouse:
Report Header
Report Footer
PageFooter, Any Page(s)
Page Footer, Last Page
You’ll see later that we will leave the contents of the Page Footer, Last Page blank, as this will suppress the printing of the Page Footer, Any Page(s) so that only the Report Footer will print at the end of the report and we will not have a redundant section. This technique also applies to report headers, but not in this case as this report will contain only a Report Header and a Group Header, which we are about to define:
From the Detail Sections display, select the “unnamed” Detail Section and click the EDIT button. Set the following:
- Section Name
Change to “group”.
- Query Source
Select the one you just entered called “detail”.
- Insert Page Break At End of Last Section
Leave unchecked. We will only have one section and will chose not to set a page break.
- Group Sections
Click the ADD button to add a new group.
You will now see a Group Section Editor screen that you will fill in with the following values as shown below:
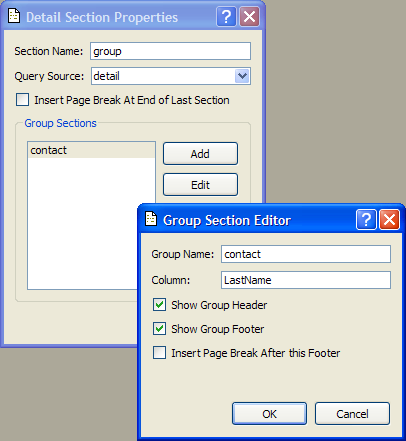
A Group Section enables you to identify a column in the query by which we will organize the display of the information. In this example we have call reports filed by several people. By grouping on the LastName column, we will have a report that organizes calls by caller. The options available to us include the following:
- Show Group Header
Creates a Group Header section. Frequently used to display the column by which the report is grouped (in this case the caller’s last name) and report column descriptions.
- Show Group Footer
Creates a Group Footer section in which footer information, such as sub-total and total query results, may be displayed.
- Insert Page Break After the Footer
When selected, a page break is inserted between the end of one set of groups and the beginning of the next.
Upon clicking OK on the Group Section Editor and then the Detail Section Properties screens, you will find that your Section Editor screen now has a Detail Section called “group”, as shown below:
Closing the Section Editor now returns you to the report’s layout. This will now include space for all of the sections you have created, as shown below:
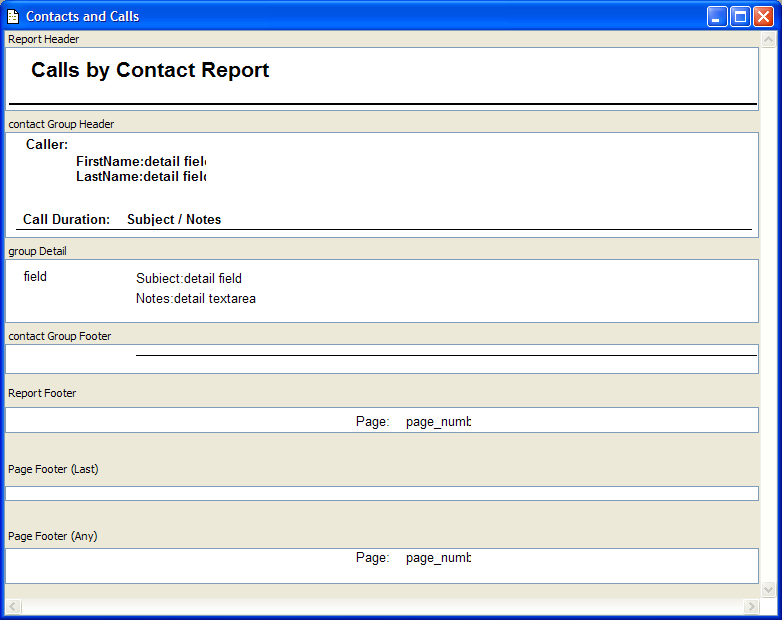
The example shown above has been populated with the following information defined by section:
- Report Header
The report’s title and a line. This appears on the first page only.
- contact Group Header
This is the header for the group you just created called “contact”. It will display the caller’s first and last names from the query. Note that while the query may return many rows for a caller, the caller’s first and last name will be displayed only from the first row for each group. It will also display the column headers above each set of calls grouped by caller.
- group Detail
This section displays the rows returned for each caller. In the group header we display the caller’s name. Here we display the details for one or more calls made by this caller.
- contact Group Footer
The contents of this section display at the end of each set of calls for each caller.
- Report Footer
The Context Query called “page_number” is used here to display a page number on the bottom the last page of the report.
- Page Footer (Last)
The next section is a Page Footer (any) which will put a page number on every page, including the Report Footer—which would be redundant if we take no action. A blank Page Footer (Last) serves to override the Page Footer (Any) with a blank footer on the last page so that the only page number displayed on this page is the one from the Report Footer.
- Page Footer (any)
This places a page number on every page of the report. We suppress this on the last page of the report with a blank Page Footer (Last) so that only the Report Footer is used.
Next we will define the parameters that will be used at run time when the report is generated with the Report Renderer.
For our example we will create two parameters. One of them, if present, will cause the report to display call information for all callers. The other enables the user to select a specific caller for whom to display information. We already identified these parameters when we created the report’s query using the MetaSQL Editor.
To define parameters click on the “Document” menu and select the “Defined Parameters” option. Then click the ADD button to add a parameter called All_ID. Below is an example of the All_ID parameter:
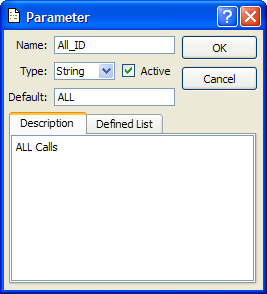
The information we entered for the All_ID parameter is explained below:
- Name
The name of the MetaSQL parameter as it appears in the report’s query.
- Type
The format of the parameter. The following formats are possible:
String,Integer,Double, andBoolean.- Active
Specifies whether the parameter is active by default at run time in the Report Renderer.
- Default
The default value for the parameter at run time.
- Description
A description of the parameter for use internally.
- Defined List
A static or dynamic list of options which the user
The next parameter, Caller_ID, uses the dynamic option for the Defined List capability:
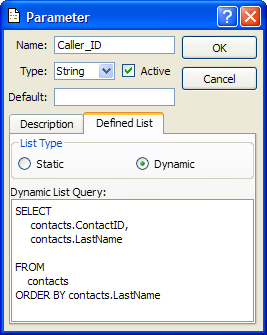
Note
A static Defined List enables you to define a discrete list of options which the user may chose from at run time. A dynamic Defined List utilizes a SQL query that is executed at run time so that the user can see a dynamic list of options.
In the example shown, you can see the query we have entered will return the key value (i.e., ContactID) in the first column and the Last Name in the second column. Ultimately, the user will not see the ContactID. It is the second column that is the label the user can click on at run time to determine the value of the parameter sent to the report definition when the report output is generated.
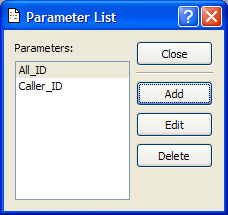
So, our Parameter List now includes two Parameters, as shown below:
It is now time to save the report definition.
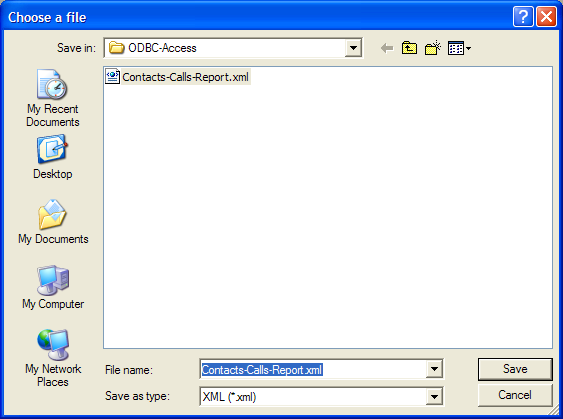
To save a report definition for use with the Report Renderer, select the “Save As” option from the “File” menu. This will enable you to save the report definition in XML, which is the standard file format for OpenRPT report definitions.
Tip
By saving to a shared drive you can easily make your reports available to others who have access to the Report Renderer.
Now that we have saved our report definition, we can close OpenRPT and use the Report Renderer to generate the report’s output.