
|
xTuple ERP Reference Guide |
|
|
xTuple ERP Reference Guide |
| 3.1. Enter Receipt | ||
|---|---|---|
 | 3. Receiving |  |
To receive orders into inventory, go to . The following screen will appear:
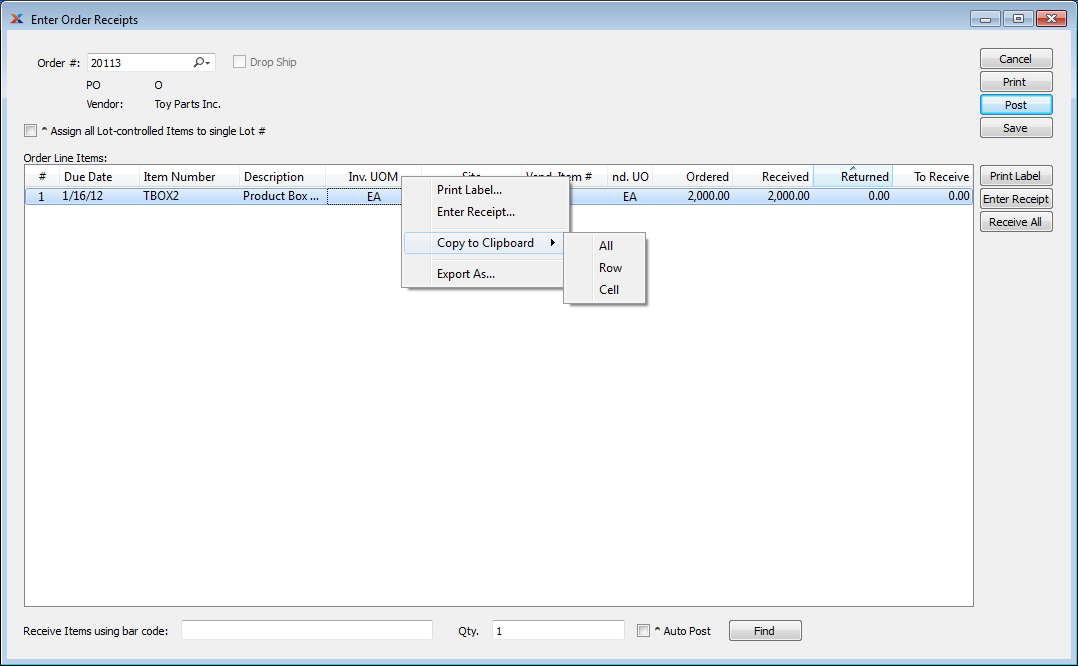
When receiving an order, you are presented with the following options:
Enter the order number of the purchase order, transfer order or return authorization whose line item(s) you want to receive into inventory. The lookup feature located to the right of the field leads to a searchable list of purchase orders available for receiving. This option will be disabled if a transfer order is specified.
If your system is configured to use drop shipping, this informational, read-only field will be displayed. It will be selected if the purchase order entered is a drop ship order. When receipts for drop ship items are posted, the linked sales order items will be automatically shipped.
Select if you want all the lot-controlled items in a receiving session to be assigned the same lot number. Lot numbers are assigned when receipt(s) are posted. This option applies to lot-controlled items only. There is no impact on received items which are not lot-controlled. For perishable items, you will also be given the opportunity to enter an expiration date. Expiration dates apply only to item sites marked as perishable.
Display lists order line items available for receipt confirmation.
Before a purchase order can be received successfully, payables account assignments for the specified vendor must be in place.
This is an optional field which allows you to receive inventory using a bar code scanner. Enter a bar code for a purchase order line item using a bar code scanner—or manually enter the bar code. The bar code for an item is stored on the Item master. Once the code is entered, specify a quantity and then select the button to receive the inventory quantity. You may also hit the key on your keyboard to select the button.
Most scanners allow you to change a setting that automatically sends the command after a scan. This allows keyboard-free entry.
Specify the quantity of line items to be received using a bar code. To receive the line item quantity, select the button—or hit the key on your keyboard to select the button.
Select to post line items automatically as they are entered into the system. This provides the opportunity to skip the additional step of posting once the receipt is complete.
The following buttons are unique to this screen:
When posting receipts for lot/serial controlled items on a return authorization, you will be prompted to assign lot/serial numbers for tracking purposes.
Highlight a line item, then select this button to print a receiving label for the specified line item.
Highlight a line item, then select this button to reach the Enter Item Receipt screen. Double-clicking on a line item will also bring you to the Enter Item Receipt screen. This option will be disabled if a transfer order is specified.
Select to receive all line items simultaneously.
Compares the bar code entered in the Receive Items using bar code field with the bar codes for the listed purchase order line items, then receives the quantity specified in the Qty. field. The button may be selected using your mouse—or by hitting the key, which corresponds to the button. Because the button corresponds to the key, you can scan in a bar code and then hit to receive a quantity of one. If you prefer, you can scan in a bar code and then specify a different quantity before hitting .
| |  | |
| 3. Receiving |  | 3.1.1. Enter Receipt Item |