
|
xTuple ERP Reference Guide |
|
|
xTuple ERP Reference Guide |
| 11.1.1. Configure CRM | ||
|---|---|---|
 | 11.1. Configure |  |
To configure the module, go to . The following screen will appear:
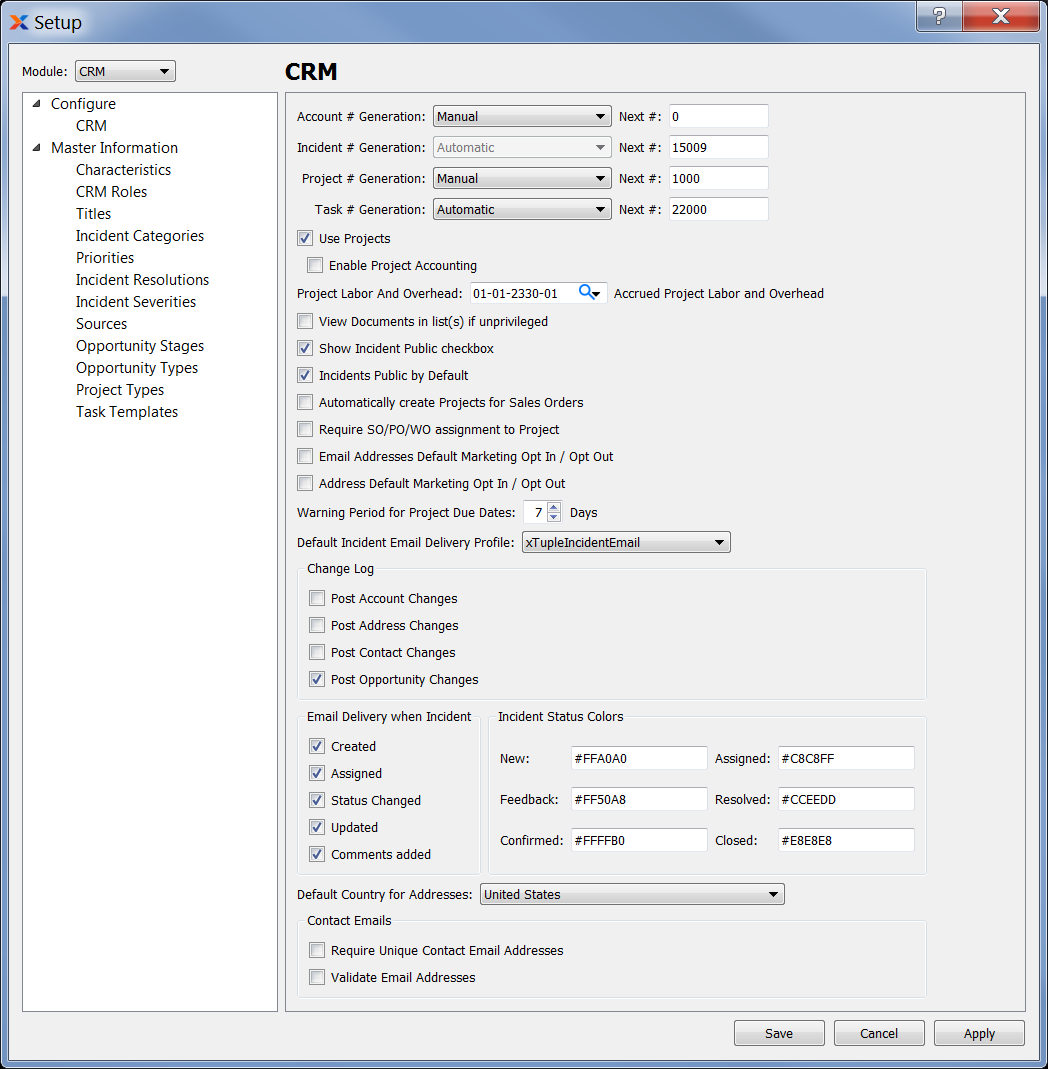
When configuring the module, you are presented with the following options:
Select one of the available CRM account number generation methods:
CRM account numbers must be entered manually whenever you create a new CRM account.
CRM account numbers will be automatically incremented by 1 each time a new CRM account is created. These automatically-generated numbers may not be edited. They are read-only.
CRM account numbers will be automatically generated and incremented, as under the Automatic option described above. However, this option also allows you to manually override the CRM account number at the time of CRM account creation.
Specify the next available CRM account number. The next CRM account created will use the number specified here. Leave this field blank if you will be creating CRM account numbers manually.
By default, incident numbers are generated automatically. However, you have the ability to specify the next available number.
Specify the next available incident number. The next incident created will use the number specified here.
Project numbers must be entered manually whenever you create a new project.
Project numbers will be automatically incremented by 1 each time a new project is created. These automatically-generated numbers may not be edited. They are read-only.
Project numbers will be automatically generated and incremented, as under the Automatic option described above. However, this option also allows you to manually override the project number at the time of project creation.
Specify the next available project number. The next project created will use the number specified here. Leave this field blank if you will be creating project numbers manually.
Task numbers must be entered manually whenever you create a new task.
Task numbers will be automatically incremented by 1 each time a new task is created. These automatically-generated numbers may not be edited. They are read-only.
Task numbers will be automatically generated and incremented, as under the Automatic option described above. However, this option also allows you to manually override the task number at the time of task creation.
Specify the next available task number. The next task created will use the number specified here. Leave this field blank if you will be creating task numbers manually.
Select to enable project functionality. This option must be enabled for project accounting to be enabled.
Select to enable the features related to the project accounting package. When project accounting is enabled, all G/L accounts are eligible to have transactions performed against them—and to have an extra dynamic segment for the project number appended to the G/L account number. Project accounts are created on the fly as transactions are performed against them, eliminating the need for users having to create G/L accounts for every possible G/L account and project combination. Financial statement and transaction reporting will display project-specific transactions just as though the project number were the last segment of the G/L account. Various reports can be filtered by project transaction.
Enter a G/L account to be used when approving time sheets for employees who record time against projects. For this account to be used, the employee must have a rate defined on their employee record—and they must also not be a contractor.
Select to create a project for every sales order when a new sales order is created.
Select this option for users to be able to see the documents in lists regardless of privileges.
Select if you want to show the Public checkbox option on the Incidents screen. In not selected, the Public checkbox will not be shown. This option applies primarily to sites where the xTuple Web Portal has been implemented. With the web portal, xTuple incidents may be viewed by customers, vendors, and others on your website. Depending on your website rules, private incidents may be hidden from most website users.
If you are showing the Public checkbox on incidents, select this option to make incidents publicly viewable by default. Incidents will be private by default if this option is not selected. Regardless of the setting you make here, the Public flag can be overridden on the Incident screen.
Require unique email addresses across contacts, meaning that no contact will share the same email address. Your system will check your contacts for unique email addresses upon activating this option.
Select to create a project for every sales order when a new sales order is created.
If selected, you will be required to link a project before saving sales orders, purchase orders, or work orders. If not selected, the project association won't be required at order entry.
When email addresses are added, this option will allow for the default opt in/opt out setting to be enabled on them for marketing purposes.
When adding addresses, default the opt in/opt out setting for that address (check yes to opt in).
Specify how far in advance you want to be notified of a project's approaching due date. The warning consists of a color-coded alert on the order activity by project report.
Specify the default EDI email delivery profile you want to use when emailing incidents.
Select from the following change log options
Select to post to the change log any changes made to accounts.
Select to post to the change log any changes made to addresses.
Select to post to the change log any changes made to contacts.
Select to post to the change log any changes made to opportunities.
Select the options below to trigger email notifications when incident events occur.
When incident is created, email notification is sent.
When user is assigned to incident, email notification is sent.
When status of an incident is changed, email notification is sent.
When incident is updated, email notification is sent.
When comments are added to an incident, email notification is sent.
The following tokens are supported in EDI profile for CRM incidents:
</email1> = incident owner email address
</email2> = incident assignee email address
</email3> = incident contact email address
</description> = incident description
</docnumber> = incident number
</doctype> = "INCDT"
</docid> = incident primary key id
</docbody> = builds text of fields, notes and history of incident record
</comments> = incident comments
The incident color configuration option supports simple color names (e.g., red, blue, green, etc.), as well as the full range of hexadecimal codes (e.g., #FFA0A0, #FF50A8, etc.). Specify how you want incidents on the Incident workbench to appear according to their various statuses:
Specify the color for incidents whose status is New. The default color is set to white. Setting no value in this field will cause new incident rows to be rendered all black.
Specify the color for incidents whose status is Feedback. The default color is set to white. Setting no value in this field will cause new incident rows to be rendered all black.
Specify the color for incidents whose status is Confirmed. The default color is set to white. Setting no value in this field will cause new incident rows to be rendered all black.
Specify the color for incidents whose status is Assigned. The default color is set to white. Setting no value in this field will cause new incident rows to be rendered all black.
Specify the color for incidents whose status is Resolved. The default color is set to white. Setting no value in this field will cause new incident rows to be rendered all black.
Specify the color for incidents whose status is Closed. The default color is set to white. Setting no value in this field will cause new incident rows to be rendered all black.
Select if you want a default country (e.g., United States) to be used whenever new addresses are created. While a default address will be set, the choice can be overridden manually when creating or editing addresses. If not selected, users will need to manually select a country when entering addresses.
This section sets the defaults for contact email address requirements.
Select to specify that all email addresses must be unique per contact and the same email address cannot be used for a different contact.
Select this option to enforce email address validation. Users will be required to enter correctly formatted address information.
Select from the available options to determine how the validation will be carried out.
Choose from the selection of characters used as requirements in validating email addresses.
| |  | |
| 11.1. Configure |  | 11.2. Master Information |