
|
xTuple ERP Reference Guide |
|
|
xTuple ERP Reference Guide |
| 1.5. Payables Workbench | ||
|---|---|---|
 | 1. Accounts Payable |  |
The Payables workbench groups together in one location a range of current payables information, giving you the option to sort this information by individual vendor—or by all vendors or smaller subsets of vendors. To access the Payables workbench, go to . The following screen will appear:
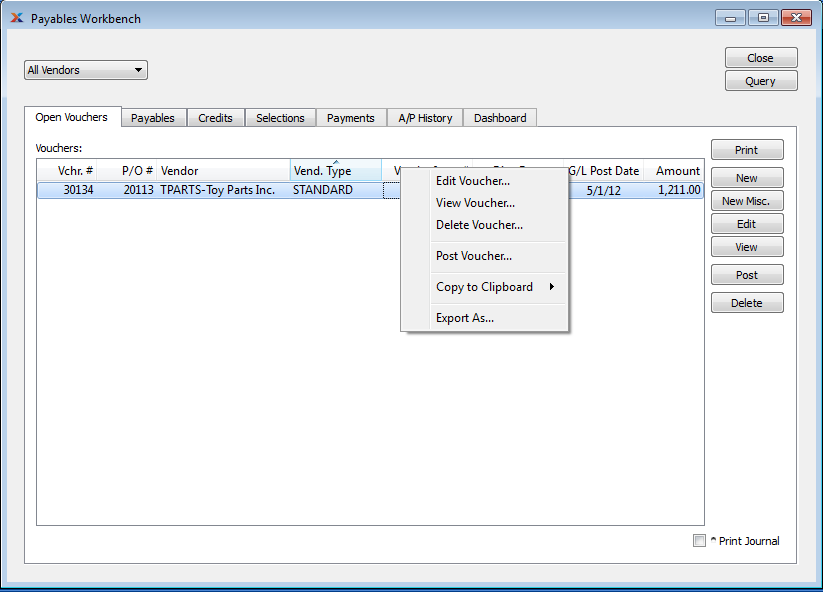
The tab displays information on all unposted vouchers, including voucher number, purchase order number, vendor number/vendor name, vendor invoice number, and distribution date. Users with the appropriate privilege will also see the G/L Distribution Date column.
Actual costs for purchased items will be automatically updated when vouchers are posted if there are differences between current actual costs and the vouchered costs for the items in question. Please keep in mind that actual costs only will be updated at posting. For new costs to be recognized as standard costs, actual costs must be posted to standard.
The following buttons are unique to this screen:
Opens screen for creating a new miscellaneous voucher.
If you have a purchase order voucher that was corrupted by, for example, a sudden power outage, you can clear the record by running the Post Vouchers screen. In most cases, this action will remove the corrupted record and allow you to voucher the purchase order with a fresh voucher.
Highlight one—or multiple—vouchers, then select this button to post the selected voucher(s). By default, vouchers post to the General Ledger (G/L) on their distribution date. However, users with the appropriate privilege may change the G/L distribution date to an alternate date during the voucher posting process. If used, vouchers will post on the alternate date. The ability privileged users have to change the distribution date applies to the posting of both individual and also batches of vouchers from this screen.
Select if you want to print a copy of the payables journal after the selected vouchers are posted.
You may select multiple vouchers for posting by highlighting them using your mouse—or a combination of your mouse and either the or key.
To view the list of open payables, select the tab. The following screen will appear:

When viewing the list of open payables, you are presented with the following options:
Specify date parameters to query open payables.
Display lists open payables. If a document is past due or on hold, the line for that document will display in red type. Open items may be placed on hold—or reopened— using the right-click menu on this screen. When on hold, open items may not be selected for payment.
You can void posted vouchers on the open payables screen—as long as they are unapplied. To un-apply documents, use the option on the Payables Application screen.
The following buttons are unique to this screen:
Highlight an open payable and then click this button to manually review and approve the item for payment. This option brings you to the individual Approve Payment screen, where you will find the full range of payment options.
Highlight an open payable and then click this button to automatically approve the open item for payment. Any available terms discount will also be applied automatically.
Highlight an open payable and then select this button to clear the approved payment. This option effectively reverses the action of the option.
Select this button to approve for payment all open payables whose payment date is due or past due and whose currency is the same as the bank account's currency.
Select this option to automatically approve all open payables which are eligible for a terms discount and whose currency is the same as the bank account's currency. The terms discount will be applied automatically to all approved open items.
Select this button to clear all approved payments due. This option effectively reverses the action of the option.
When selected, the application will start with the oldest open and unapplied credit memo (based on its due date) and apply it to the oldest open items (i.e., vouchers and debit memos) until the credit is fully applied—or until there are no more open items for the credit to be applied against. This process continues applying all available credit memos based on their due date.
To view credits associated with the vendor(s), select the tab. The following screen will appear:
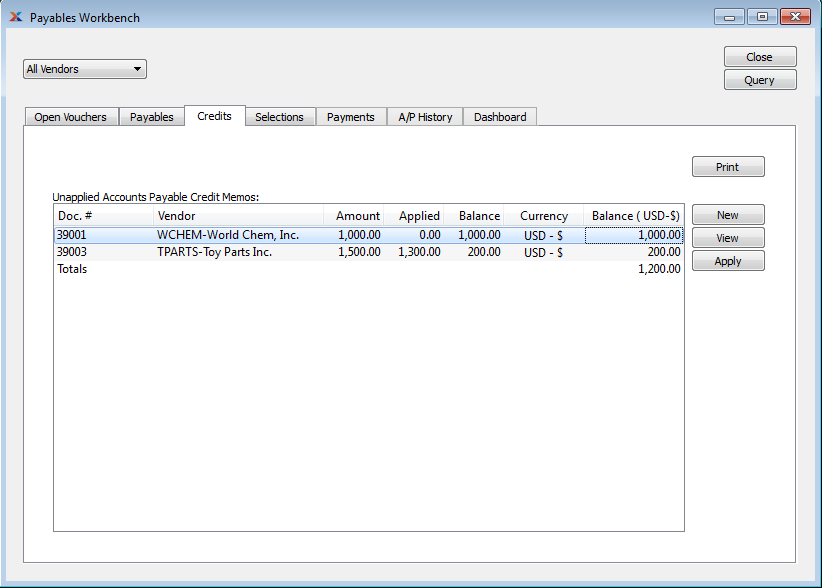
When displaying credits associated with the vendor(s), you are presented with the following options:
Displays the list of unapplied credit memos associated with the specified vendor.
The following buttons are unique to this screen:
Highlight an unapplied credit memo and then select this button to apply an amount.
To view the list of selected payments for the specified vendor(s), select the tab. The following screen will appear:
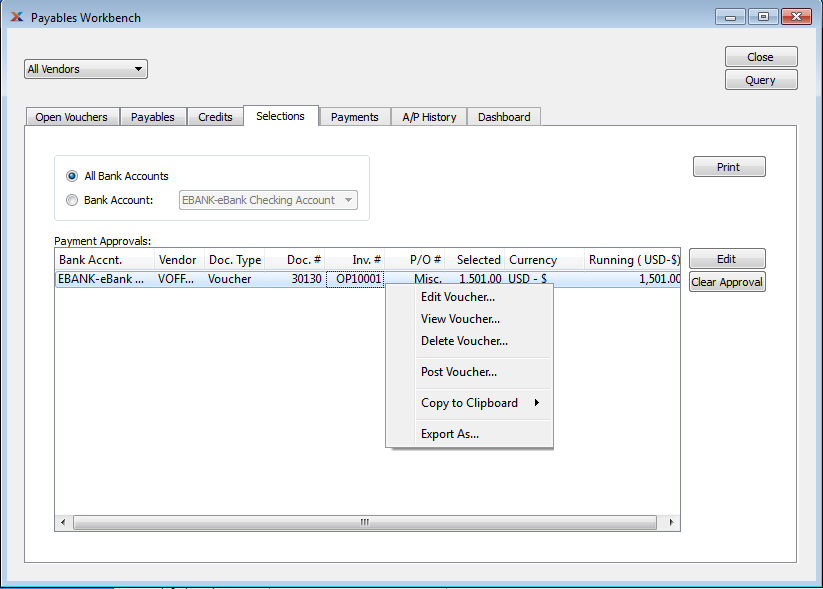
The Payment Approvals screen displays information on all existing selected payments, including bank account to be paid from, vendor name, document type, document number, invoice number, purchase order number, amount selected for payment, currency, and running total.
If you need to void a posted voucher, you can do this from the right-click menu. Voiding a voucher reverses all ledger transactions created by the original voucher. Only open vouchers may be voided. Vouchers with apply-to records cannot be voided. You will be given the option to specify a void date when voiding a voucher. Apply-to records will also be reversed on the void date you specify.
The following buttons are unique to this screen:
Highlight an approved payment and then select this button to clear the approval. Because an item that has been cleared is no longer approved for payment, this option removes the item from the master list of approved payments.
To view the payment run, select the tab. The following screen will appear:

When displaying the payment run, you are presented with the following options:
Specify the bank account whose payment run you want to view.
Display lists details for payments included in the payment run. This display is a nested list, with a plus (+) sign located to the far left of the display next to each payment. By clicking your mouse on a plus sign, you reveal lower levels of information related to the payment.
The following buttons are unique to this screen:
Select to prepare a payment run. For more information on preparing payment runs, see Section 1.4.3, “ Prepare Payment Run”.
Select from one of the following options. If a selected payment has already been written and/or paid, you will have the ability to mark the payment as such on the Print Payment screen. The options presented here will be limited if the specified bank account does not require payments to be printed. Also, if the bank account is configured to use electronic funds transfer (EFT), you will be presented with the option to create an EFT file on the Print Payment screen.
Highlight a payment in the list of payments and then select this button to print the payment. Only bank accounts which require printing will have payments to print.
If payments being printed contain reference lines which spill over and exceed one standard page, then consider using the report definition CheckMultiPage.xml. This payment form is designed to support multiple pages for one payment number.
Select to print the payment run, using the specified bank account. For more information on printing payment runs, see the Section 1.6.3, “ Print Payment Run” section.
Prints a copy of the pending payment run for review.
Select from the following context-sensitive posting options:
Highlight a payment in the list of payments and then select this button to post the payment. If the specified bank account requires printing, the payment must be printed before it can be posted. If printing is not required, the payment may be posted immediately. See the Printed column in the display to determine a payment's printed status.
Select to post all payments available for posting.
Select to create a new miscellaneous payment. Once saved, the payment will appear in the payment run.
Highlight a payment in the list of payments and then select this button to void the payment. Voided payments may not be printed or posted. When a payment is voided, the payable amount will be reopened on the Select Payments screen. In other words, if a payment for $100.00 is voided, that amount will once again be made available for payment on the Select Payments screen. The reopened amount will again be associated with the referring payable document (i.e., voucher or debit memo).
Highlight a miscellaneous payment and then select this button to edit the payment. Only unprinted miscellaneous payments may be edited.
Only unprinted miscellaneous payments may be edited. Regular payments may not be edited.
Highlight a voided payment in the list of payments and then select this button to delete the payment. Only voided payments may be deleted.
Highlight a voided payment in the list of payments and then select this button to replace the payment. Payments must be voided before they can be replaced. When a voided payment is replaced, the payable amount displayed on the Select Payments screen will be removed. In other words, if a voided payment for $500.00 is replaced, that amount will no longer be available for payment on the Select Payments screen.
Select this button to replace all payments shown in the list of payments. Payments must be voided before they can be replaced.
To view accounts payable (A/P) history by vendor, select the tab. The following screen will appear:

You must select a single vendor to view A/P history on this screen. Viewing A/P history by all vendors is not supported.
When viewing A/P history by vendor, you are presented with the following options:
Vendor activity entered on and after this date will be displayed.
Vendor activity entered on and before this date will be displayed.
To search for an invoice in the Vendor History display, begin typing an invoice number into this field. As you type, the list will automatically scroll toward the invoice number you are typing. You can also search for invoices manually by scrolling through the list.
To view the dashboard associated with your payables, select the tab. The following screen will appear:
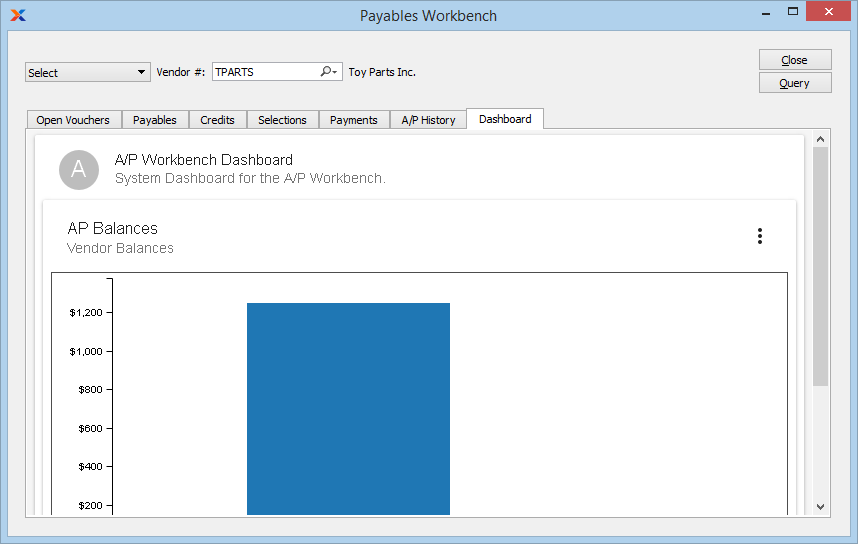
The payables dashboard includes the following pre-loaded dashboard panes, which you can either remove or supplement with additional panes at any time:
Displays the vendor's payable balance.
Dashboard panes are used to contain charts, which are populated using datasources. To create a new dashboard pane, select the button located toward the bottom of the Dashboard window. The following screen will appear:
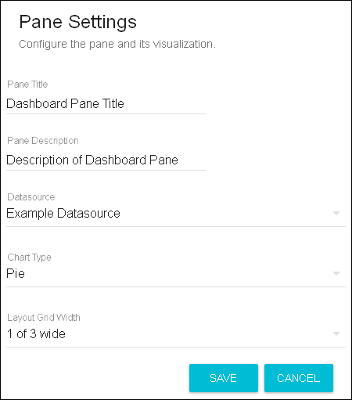
When creating a new dashboard pane, you are presented with the following options:
Enter a title to identify the pane.
Enter a brief description to describe the pane.
Specify which datasource you want to use as the source for the dashboard pane's chart. The dashboards package includes several stock datasources. You may also create custom datasources on your own. For more information, please see the xTuple Dashboards Product Guide.
Specify which chart type you want the dashboard pane to display. The chart type options will be limited to the types specified on the selected datasource definition.
Specify how many panes you want displayed in a row on the Dashboard screen, from as few as one to as many as three across. The layout grid width options will be limited to the layout options specified on the selected datasource definition.
| |  | |
| 1.4.8. Post Payments |  | 1.6. Forms |