
|
xTuple ERP Reference Guide |
|
|
xTuple ERP Reference Guide |
| 1.1. Log In Options | ||
|---|---|---|
 | 1. Getting Started |  |
To log in to xTuple ERP on either Windows or Macintosh, simply locate the xTuple application or application shortcut and double-click on it. Linux users should run the appropriate xTuple ERP .sh file to launch the application. This will bring you to the log in screen shown below:
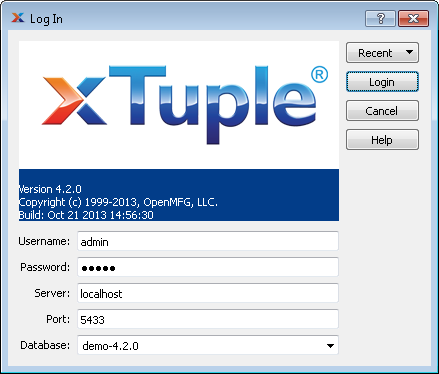
When you are logging in, the following screen will appear. Of course, this examples shows the log in for the Windows client. However, the screen is essentially the same regardless of the operating system used:
You should always be sure to use a version of xTuple ERP which matches the version of your xTuple database. Using mis-matched versions can lead to errors and loss of data integrity. The system will issue a warning message whenever you attempt to log in to a database whose version does not match the client version.
When logging into xTuple ERP, you are presented with the following options:
Enter your assigned username. Usernames are established by your system administrator. The username is case-sensitive.
Enter your assigned password. Passwords are established by your system administrator. The password you type into this field will not display on your screen, but will be represented by asterisks (*) for security purposes.
Enter the address of the server where your xTuple database is running. The address will consist of either a TCP/IP address or a network alias name. If the network address for the xTuple server changes, you may need to change the address in this field.
Displays the default port. The default port for the xTuple database is 5432.
Displays the name of the database you will be connecting to.
Using the drop-down feature, you can easily select a database from recently entered databases.
xTuple will automatically connect with SSL and enhanced authentication where required by the server.
To the far right of the screen, the following buttons are available:
Click to see a list of connections you have recently made. To reconnect to one of those databases, simply select the connection from the list—then log in using the appropriate username/password combination. This feature bypasses the need to enter connection options manually, as long as those options have been entered recently. To clear the list of recent connection, choose the Clear Menu option.
Click to log in to the application.
Closes the screen, returning you to your computer desktop.
Connect to online help.
| |  | |
| 1. Getting Started |  | 1.2. xTuple Desktop |