
|
xTuple ERP Reference Guide |
|
|
xTuple ERP Reference Guide |
| 2.2. Keyboard Shortcuts | ||
|---|---|---|
 | 2. Application Fundamentals |  |
Many people prefer to use keyboard shortcuts—instead of a mouse—when navigating within a software application. xTuple ERP features a number of keyboard shortcuts designed just for this purpose.
For example, keyboard shortcuts are universally available throughout the application for each of the following actions:
buttons
buttons
buttons
buttons
buttons
buttons
Next tab (e.g., Function + )
Previous tab (e.g., Function + )
Menu (e.g., + )
Double click (e.g., Highlight + )
The key sequence for each of these shortcuts conforms to your operating system's standard behavior. However, if you are unclear about what the key sequence should be, simply hover your mouse over the button or field in question to reveal a tool tip with that information.
Other keyboard shortcuts are available at several points throughout the application. In fields where you see the magnifying glass (e.g., contact lookup), you can click on the magnifying glass to see the full menu of shortcuts available for that field.

When using fields where there is a drop-down list (also known as a combo box), you will find an option called Edit List at the bottom of the list. The Edit List option enables you go straight to the master list for the given context, where you can add new terms or edit existing ones on the fly. The following screenshot shows an instance where this feature appears on the quantity on hand (QOH) report:
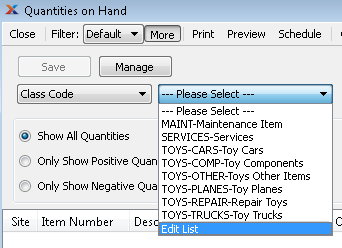
In this case, if we select the Edit List option we will be brought to the Class Codes master list. Now we can add or edit class codes, before returning to the report where the class codes are used.
| |  | |
| 2.1.2. Search Filters |  | 2.2.1. TAB Key |